Using the Algorithmia API, you can create, publish, update, and inspect individual algorithms. Among other things, this allows you to train and deploy your models on Algorithmia completely within your preferred development environment—without ever interacting with Algorithmia’s web-based UI.
Enabling Algorithm Management
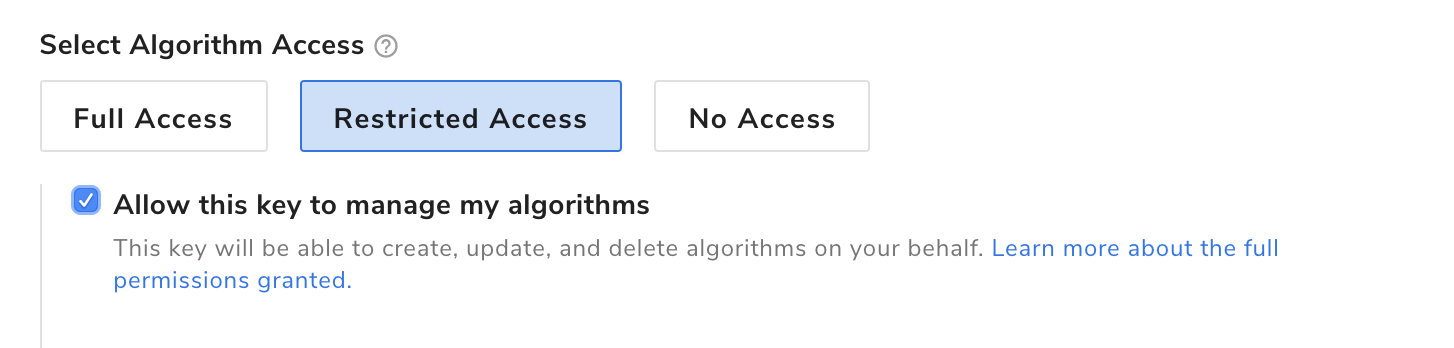
Algorithm management can be enabled when an API key is created, or by editing the configuration of an existing key. To create or edit an API key, navigate to your user homepage within the Algorithmia browser UI and click the “API Keys” tab. A new API key can be created through the “Create New” button. To edit an existing key, click the three vertical dots to the right of the key and select “Edit key”. In the modal, ensure that the key has an “Algorithm Access” value of either:
- Full Access - if you’d like to allow the key to call all public and private algorithms you have access to, in addition to managing algorithms you own

- Restricted Access - if you’d like to fine-tune which algorithms can be called (just be sure to select the “Allow this key to manage my algorithms” checkbox)
To see a full list of specific endpoints that a key with this permission can call, see the Python API for Algorithm Management. For languages other than Python, an OpenAPI Specification is available via the unofficial openapi docs or a raw openapi spec (under /algorithms).
Forward: Python Notebook or CI/CD (via Jenkins or GitHub Actions) for Publishing Algorithms
The step-by-step guide below will familiarize you with the Python and OpenAPI spec for creating algorithms. However, a complete end-to-end Jupyter Notebook (and Google Colab Notebook) is also available. To see a working end-to-end example of training a Model, then immediately deploying it as an algorithm within the same Notebook, see the GitHub repo with working Model Deployment Notebooks.
In addition, if you are using Jenkins or GitHub Actions for your CI/CD you should review our CI/CD Examples for Deploying Algorithms.
If you are using another CI/CD tool, or simply wish to deploy from a simple pure-Python script, the Python scripts used in the GitHub Actions workflow can be used in any Python-capable environment; they are not specific to GitHub Actions. Read through the documentation to understand their use, then copy and modify the model_*.py files from that repo and modify them to point to your own algorithm.
Step-by-step: Creating and Publishing an Algorithm via the API, using the Official Python Client (recommended)
Specifying an On-Premises or Private Cloud Endpoint
This feature is available to Algorithmia Enterprise users only.
If you are running Algorithmia Enterprise, remember to specify your API endpoint when creating the Python Client:
client = Algorithmia.client("API_KEY", "https://mylocalendpoint")1. Create your algorithm
First, set up an Algorithmia client using an API Key from your account, which must have the “Allow this key to manage my algorithms” setting enabled.
Then, create your algorithm by creating a client.algo("username/algoname") with the name you wish it to have: "username" here might be your own username, or the name of an Organization to which you belong, and "algoname" can be any algorithm name which doesn’t already exist in that userspace.
Next, call the .create() method of that new algorithm. The fields roughly correspond to those you’d see in the Add Algorithm user interface, and are fully described in the API Docs:
import Algorithmia
client = Algorithmia.client("API_KEY")
algo = client.algo("YOUR_USERNAME/Hello")
algo.create(
    details = {
        "label": "Hello World",
    },
    settings = {
        "language": "python3-1",
        "source_visibility": "closed",
        "license": "apl",
        "network_access": "full",
        "pipeline_enabled": True,
        "environment": "cpu"
    }
)
2. Edit and build your algorithm
Now that your algorithm exists, you can edit the source code via the Web IDE, or locally by cloning it via Git (git clone https://git.algorithmia.com/git/USERNAME/ALGORITHMNAME.git) or the CLI (algo clone USERNAME/ALGORITHMNAME).
Before attempting to publish, you must either click “Build” in the Web IDE, or git push your code (which implicitly triggers a build).
3. Publish your algorithm
Now you can publish your algorithm via a call to algo.publish.
While an empty dict {} will work as the version_info parameter, you may also include any of the fields included in the API Spec:
algo.publish(
    version_info = {
        "sample_input": "world"
    }
)
4. Get info about your algorithm
Your algorithm is now published and runnable. If you wish, you make also take advantage of several other management functions:
- Update an existing algorithm
- Force a recompile of your algorithm
- Get info, such as last published version number
- List all versions of your algorithm & corresponding info
ALTERNATIVE: Creating and Publishing an Algorithm Via the API, Using the OpenAPI Specification and Python Requests
Specifying an On-Premises or Private Cloud Endpoint
This feature is available to Algorithmia Enterprise users only.
If you are running Algorithmia Enterprise, you must specify a different API endpoint when using these APIs. Simply replace “https://api.algorithmia.com” with the base URL of your own installation.
1. Create your algorithm
First, create your algorithm by POSTing to https://api.algorithmia.com/v1/algorithms/USERNAME, where USERNAME is your user account and sim****** is an API Key from that account with the “Allow this key to manage my algorithms” setting enabled.
Note that the definition of the new Algorithm is in the payload of the request, and the fields roughly correspond to those you’d see in the Add Algorithm user interface:
import requests
url = "https://api.algorithmia.com/v1/algorithms/USERNAME"
headers = {
  "Authorization": "sim********",
  "Content-Type": "application/json"
}
payload = {
    "details": {
        "label": "<string>", #user-readable name of the algorithm
        "summary": "<string>", #markdown describing the Algorithm, for the "docs" tab
        "tagline": "<string>" #one-liner summarizing the Algorithm's purpose
    },
    "name": "<string>", #the short algorithm name (no spaces or special characters)
    "settings": {
        "license": "<string>", #apl, apache2, gpl3, mit
        "network_access": "<string>", #isolated, full
        "pipeline_enabled": <boolean>, #can this algo call other algos?
        "source_visibility": "<string>", #open, closed
        "language": "<string>", #java, javascript, python2-langpack, python3-1, r, ruby, rust, scala
        "environment": "<string>", #cpu, gpu
        "royalty_microcredits": <integer> #0 for none
    },
    "version_info": {
        "sample_input": "<string>" #example input visible to end-user
    }
}
response = requests.request("POST", url, headers=headers, json=payload)
print(response.text)
2. Edit and build your algorithm
Now that your Algorithm exists, you can edit the source code the Web IDE, or locally by cloning it via Git (git clone https://git.algorithmia.com/git/USERNAME/ALGORITHMNAME.git) or the CLI (algo clone USERNAME/ALGORITHMNAME).
Before attempting to publish, you must either click “Build” in the Web IDE, or git push your code (which implicitly triggers a build).
3. Publish your algorithm
Now you can publish your algorithm via a POST to https://api.algorithmia.com/v1/algorithms/USERNAME/ALGORITHMNAME/versions.
While an empty payload dict {} will work, you may consider including the payload fields shown below:
import requests
url = 'https://api.algorithmia.com/v1/algorithms/USERNAME/ALGORITHMNAME/versions'
headers = {
  'Authorization': 'sim********',
  'Content-Type': 'application/json'
}
payload = {
    "settings": {
        "algorithm_callability": "<string>" #public, private
    },
    "version_info": {
        "type": "<string>", #default, major, minor, revision
        "semantic_version": "<string>", #if blank, a minor version increment will be used
        "git_hash": "<string>", #if blank, the latest git hash will be used
        "release_notes": "<string>",
        "sample_input": "<string>",
        "sample_output": "<string>"
    }
}
response = requests.request('POST', url, headers = headers, json = payload)
print(response.text)
You can also include any "details" or "settings" fields as shown in the “Create your algorithm” step.