 iOS
iOSIn this post, we’ll walk through a very simple iOS app that uses the Algorithmia API in Swift.
The full sample code can be found in the GitHub repo: FORK
You can either clone the repo directly and follow along with the README instructions to see the fully complete app, or you can follow the tutorial below to build your first iOS app with Algorithmia!
Getting Started
First, download and install Xcode.
If you didn’t do so on first run, switch Xcode to developer mode: sudo xcode-select -switch /Applications/Xcode.app/Contents/Developer
Download the sample project and use Xcode to open the directory “algorithmia-swift” (not the file “AlgorithmiaSwift.xcodeproj”).
Now you’re almost ready to run the project… there are just a few options to configure first.
Settings, Permissions, & API Key
Add your developer profile
Make sure you have added a developer profile under Xcode > Preferences > Accounts > Add Apple ID.
Set your API key
On your Algorithmia credentials page, create a new Key. Set its Algorithm Access to 'algo://deeplearning/DeepFilter' and set the Data access to read and write. Save this API key.
Now we need to add this API key to your Environment. From the menu, pick Product > Scheme > Edit Scheme. In the popup, select “Run”, then “Arguments”. Add an entry under “Environment Variables” with the name “ALGORITHMIA_API_KEY”, and paste your API Key in as its value.

Create a Data Collection to store your images during processing
Since this demo app will be processing images, we’ll need to create a temporary directory at Algorithmia to hold them.
Head to your Data Portal and click “Browse Files” under “My Hosted Data”. Then click “Add Collection”, and type the name “test”. Note that this corresponds to the folders used by sourcePath and resultPath in “AlgorithmiaSwiftDemo/AlgorithmiaSwiftDemo/ViewController.swift”.
Run the app
Before changing any code, build and run the app to test out the default functionality. In XCode, make sure “Algorithmia project” is selected. Then, pick a destination to test on under the Product > Destination menu: this can be either a real attached iPhone, or the built-in iPhone simulator. Now click Product > Run to start the project on your selected device.
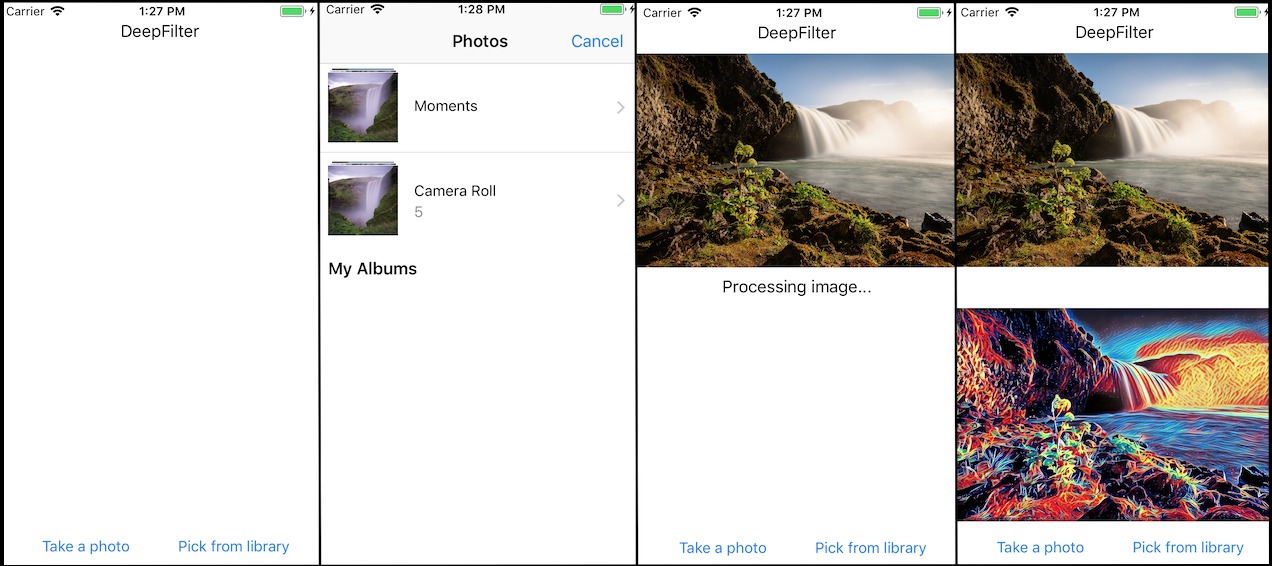
If all is working properly, you’ll see a mostly-blank screen with options to take a photo or pick one from your phone’s library. Once you’ve selected a photo, it will upload it to the sourcePath specified earlier, run Algorithmia’s DeepFilter algorithm on the image, and render the result on the screen (as well as storing it your Hosted Data under resultPath):
Revising the Code
Now that we know our base app works, let’s peek into the code to find out what’s happening, and make a few changes.
Open up “AlgorithmiaSwiftDemo/ViewController.swift” and take note of the line which creates the Algorithmia client instance, using the environment key ALGORITHMIA_API_KEY which we specified earlier:
let client = Algorithmia.client(simpleKey: ProcessInfo.processInfo.environment["ALGORITHMIA_API_KEY"] ?? "%DEFAULT_API_KEY%")Now scroll down a bit and take a look at the three functions we use to createupload, process, and download the image:
    func uploadImage() {
        // Upload file using Data API
        let file = client.file(sourcePath)
        file.put(data: UIImageJPEGRepresentation(image!, 0.7)!) { _, error in
            if let error = error {
                print(error)
                self.display(error: error)
                return
            }
            self.processImage(file: file)
        }
    }

    func processImage(file:AlgoDataFile) {
        let param:[String:Any] = [
            "images": [
                file.toDataURI()
            ],
            "savePaths": [
                resultPath
            ],
            "filterName": "space_pizza"
        ]

        // Process with DeepFilter algorithm
        self.client.algo(algoUri: "algo://deeplearning/DeepFilter/1.0.0").pipe(json: param, completion: { (response, error) in
            if let error = error {
                print(error)
                self.display(error: error)
                return
            }
            self.downloadOutput(file: self.client.file(self.resultPath))
        })
    }

    func downloadOutput(file:AlgoDataFile) {
        // Download output file
        file.getData { (data, error) in
            if let error = error {
                print(error)
                self.display(error: error)
                return
            }
            DispatchQueue.main.async {
                self.resultImageView.image = UIImage(data: data!)
                self.statusLabel.text = " "
            }
        }

    }
First, uploadImage() uses Algorithmia’s Data API to upload the local image file into the Hosted Data URI specified by sourcePath.
Next, processImage() creates a data structure (param) which corresponds to the input specification for the DeepFilter algorithm, then uses the Algorithmia client to execute that algorithm remotely.
Once this API call returns, it calls downloadOutput() to retrieve the resultant image via the Data API, and displays it to the user.
Let’s make a few changes, to get a feel for how we can use different APIs inside our app. The simplest change we can make is to alter which filter we’ll be using: inside processImage(), change "filterName": "space_pizza" to "filterName": "colorful_blocks". Now re-run the app and filter another photo… you should get a very different-looking result.
Next, peek at Algorithmia’s Saliency Detection (SalNet) algorithm. Just like DeepFilter, it takes in an image URI, and returns an image URI. However, it performs a different function: instead of applying an artistic filter, SalNet generates a heatmap of the most important (salient) parts of your image.
SalNet doesn’t require a filter to be specified, takes only a single input (not an array), and has slightly different parameter names – so we need to adjust param to match its expectations. Inside processImage, remove the line "filterName": "colorful_blocks" and the preceding comma. Then, change "images": [file.toDataURI()] to "image": file.toDataURI(), and "savePaths": [resultPath] to "location": resultPath.
Lastly, replace "algo://deeplearning/DeepFilter" with "algo://deeplearning/SalNet":
    func processImage(file:AlgoDataFile) {
        let param:[String:Any] = [
            "image": file.toDataURI(),
            "location": resultPath
        ]

        // Process with SalNet algorithm
        self.client.algo(algoUri: "algo://deeplearning/SalNet/0.2.2").pipe(json: param, completion: { (response, error) in
            if let error = error {
                print(error)
                self.display(error: error)
                return
            }
            self.downloadOutput(file: self.client.file(self.resultPath))
        })
    }
Try re-running the app. You should get back an image which highlights the most salient features of the original.
Next Steps
Integrating Algorithmia into iOS is an easy and convenient way add immense power to your mobile app, so now that you’ve got the basic API integration down, you can follow this pattern to start hacking away at your own apps!
Browse through Algorithmia’s microservice catalog to see what other algorithms interest you. Not all are image-related; for example, you could send text to SentimentAnalysis in order to determine if a user’s messages convey anger or happiness, or pull down a lict of recent tweets relating to a specific keyword. With over 4000 cloud-scaled microservices at your fingertips, the possibilities are endless.