Amazon SQS
This feature is only available in Algorithmia Enterprise installations.
This guide will walk you through setting up Algorithmia Event Flows using an Amazon Simple Queue Service (SQS) message broker. Once configured, you can create event-driven workflows in which your algorithms subscribe to an SQS queue and are automatically invoked with the contents of messages published to the queue.
Event Flow configuration overview
The process of configuring Event Flows with an SQS message broker involves multiple steps, some of which are to be completed on the AWS side and some of which are to be completed on the Algorithmia side. At a high level, the configuration steps are:
- Gather required information from Algorithmia.
- On AWS, create a stack of resources (including an SQS queue) using a CloudFormation template or manually as the situation dictates.
- On Algorithmia create an algorithm and connect it to the SQS queue to subscribe to messages published there.
- Test the connection by sending messages to the SQS queue to be consumed by the subscriber algorithm.
How messages are read from SQS
To begin, let’s first expore the following diagram, which displays the interaction between SQS and Algorithmia. When a message is published to SQS, it’s sent to Algorithmia as an API call, and if Algorithmia’s API server returns 200 OK, the message is queued for processing. If the API server returns 429 Too Many Requests, the message is requeued in SQS with a 5-minute delay.

To influence how much work Algorithmia will accept, you can tune either the maximum number of workers or the user session limit.
On the SQS side, the option for Maximum Receives determines how many times a message will loop through the system before being delivered to the dead letter queue (DLQ). Since each loop is 5 minutes, messages will queue on the SQS side for (5 minutes) * (Maximum Receives). The Maximum Receives value defaults to 10, but this can be increased up to 1000 to queue messages for more loops. See this Amazon SQS – New Dead Letter Queue blog post for additional details.
1. Gathering required information from Algorithmia
Contact support@algorithmia.com to obtain the account number of the AWS account running your Algorithmia cluster. This number references below as AlgorithmiaAccountNumber.
2. Configuring resources on AWS
NOTE: The steps in this section are to be completed within the AWS Management Console.
Required permissions
The CloudFormation template that we’ll walk through below describes the creation of CloudFormation, IAM, and SQS resources. In order to use the template you’ll need to be a user (or assume a role) with the following AWS permissions:
- CloudFormation: CreateStack and DescribeStacks (on all resources)
- IAM: CreateRole, GetRole, and PutRolePolicy (on all resources)
- SQS: CreateQueue, GetQueueAttributes, and SetQueueAttributes (on all resources)
Scenarios
The following are the two possible scenarios that describe the relationship between the AWS account that creates the SQS queue and the AWS account running the Algorithmia cluster from which the queue is accessed:
- The SQS queue is created within the account that’s running the Algorithmia cluster.
- The SQS queue is created within a different account than the one running the Algorithmia cluster.
The configuration steps are essentially the same for these two scenarios, but before diving into CloudFormation, it’s helpful to consider these scenarios separately to understand where the differences are so that you configure the permissions correctly.
Scenario #1: Queue created in the same AWS account
If you create SQS resources within the account running your Algorithmia instance, it’s assumed by default that the instance profile running Algorithmia is trusted because it’s in the same account. If you’re using the CloudFormation template, you don’t need to concern yourself with configuring the trust relationship. After the CloudFormation step, you’ll attach a policy to the instance profile to allow it to assume the appropriate role to take actions on the target SQS queue.
Scenario #2: Queue created in a different AWS account
If you create an SQS queue in a different account than the one running the Algorithmia instance, establishing the trust relationship is essential because it tells AWS that the account associated with the instance profile is allowed to take actions on the target queue. There’s otherwise no implicit relationship between the two accounts. Again, if you’re using the CloudFormation template, you don’t need to concern yourself with configuring the trust relationship. Similar to Scenario #1, you’ll attach a policy to the instance profile to allow it to assume the appropriate role to take actions on the target queue, in this case a queue from a different account.
Understanding the CloudFormation template
In this section we’ll walk through the key components of the CloudFormation template file that we’ll be using with AWS CloudFormation to create the stack of resources that support Algorithmia Event Flows.
To begin, save the following YAML template as a local file client-aws-cloudformation-template.yaml.
AWSTemplateFormatVersion: 2010-09-09
Resources:
  algoqueuedlq:
    Type: 'AWS::SQS::Queue'
    Properties:
      QueueName: !Ref QueueDLQName
      MessageRetentionPeriod: '1209600'
  algoqueue:
    Type: 'AWS::SQS::Queue'
    Properties:
      MessageRetentionPeriod: '1209600'
      QueueName: !Ref QueueName
      RedrivePolicy:
        maxReceiveCount: 10
        deadLetterTargetArn: !GetAtt
          - algoqueuedlq
          - Arn
    DependsOn:
      - algoqueuedlq
  algoqueuepolicy:
    Type: 'AWS::IAM::Policy'
    Properties:
      PolicyName: eventlistenerpolicy
      PolicyDocument:
        Version: 2012-10-17
        Statement:
          - Sid: VisualEditor0
            Effect: Allow
            Action:
              - 'sqs:ChangeMessageVisibility'
              - 'sqs:DeleteMessage'
              - 'sqs:GetQueueAttributes'
              - 'sqs:ReceiveMessage'
            Resource:
              - !GetAtt
                - algoqueue
                - Arn
      Roles:
        - !Ref algoqueuerole
  algoqueuerole:
    Type: 'AWS::IAM::Role'
    Properties:
      AssumeRolePolicyDocument:
        Version: 2012-10-17
        Statement:
          - Effect: Allow
            Principal:
              AWS: !Sub
                - 'arn:aws:iam::${AlgorithmiaAccountNumber}:root'
                - AlgorithmiaAccountNumber: !Ref AlgorithmiaAccountNumber
            Action: 'sts:AssumeRole'
            Condition: {}
Parameters:
  AlgorithmiaAccountNumber:
    Description: Algorithmia's AWS account number
    Type: Number
  QueueName:
    Description: The name of the algorithm payload queue
    Type: String
    AllowedPattern: '[a-zA-Z][a-zA-Z0-9-]*'
    ConstraintDescription: must start with a letter and contain only alphanumeric characters or hyphens
  QueueDLQName:
    Description: The name of the queue which stores payloads which could not run by Event Listener
    Type: String
    AllowedPattern: '[a-zA-Z][a-zA-Z0-9-]*'
    ConstraintDescription: must start with a letter and contain only alphanumeric characters or hyphens
Outputs:
  QueueURL:
    Description: URL of SQS Queue used to create Event Flow in Algorithmia Platform
    Value: !Ref algoqueue
  QueueConsumerARN:
    Description: ARN of role used to create Event Flow in Algorithmia Platform
    Value: !GetAtt
      - algoqueuerole
      - Arn
Template components
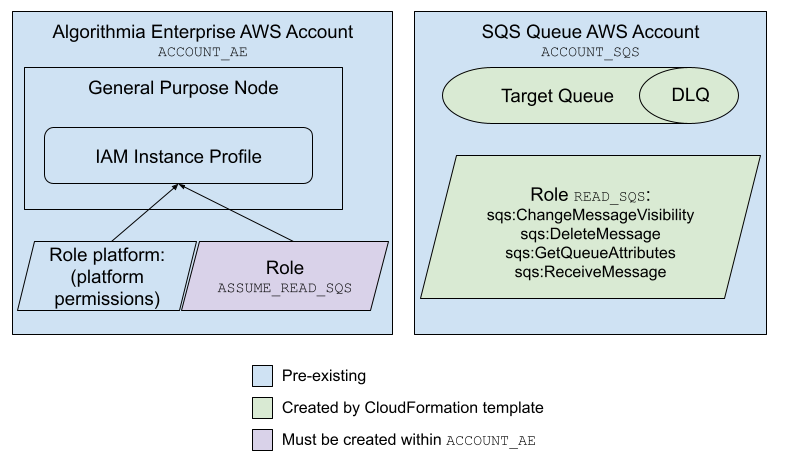
To understand the resource stack, let’s begin by considering an instance of Algorithmia Enterprise running in some AWS account called ACCOUNT_AE. All nodes in this Algorithmia instance run with the same IAM instance profile, which has a set of IAM policies attached to it.
Let’s also suppose that you’re in Scenario #2, creating an SQS queue in some other AWS account called ACCOUNT_SQS. This account needs an IAM role and policy created to allow for reading, acknowledging, and deleting messages from the target SQS queue. Let’s call this role READ_SQS; it must be created within ACCOUNT_SQS, specifying the appropriate permissions on the SQS queue.
The following diagram is a visual representation of this configuration, and we’ll continue to explore it below.
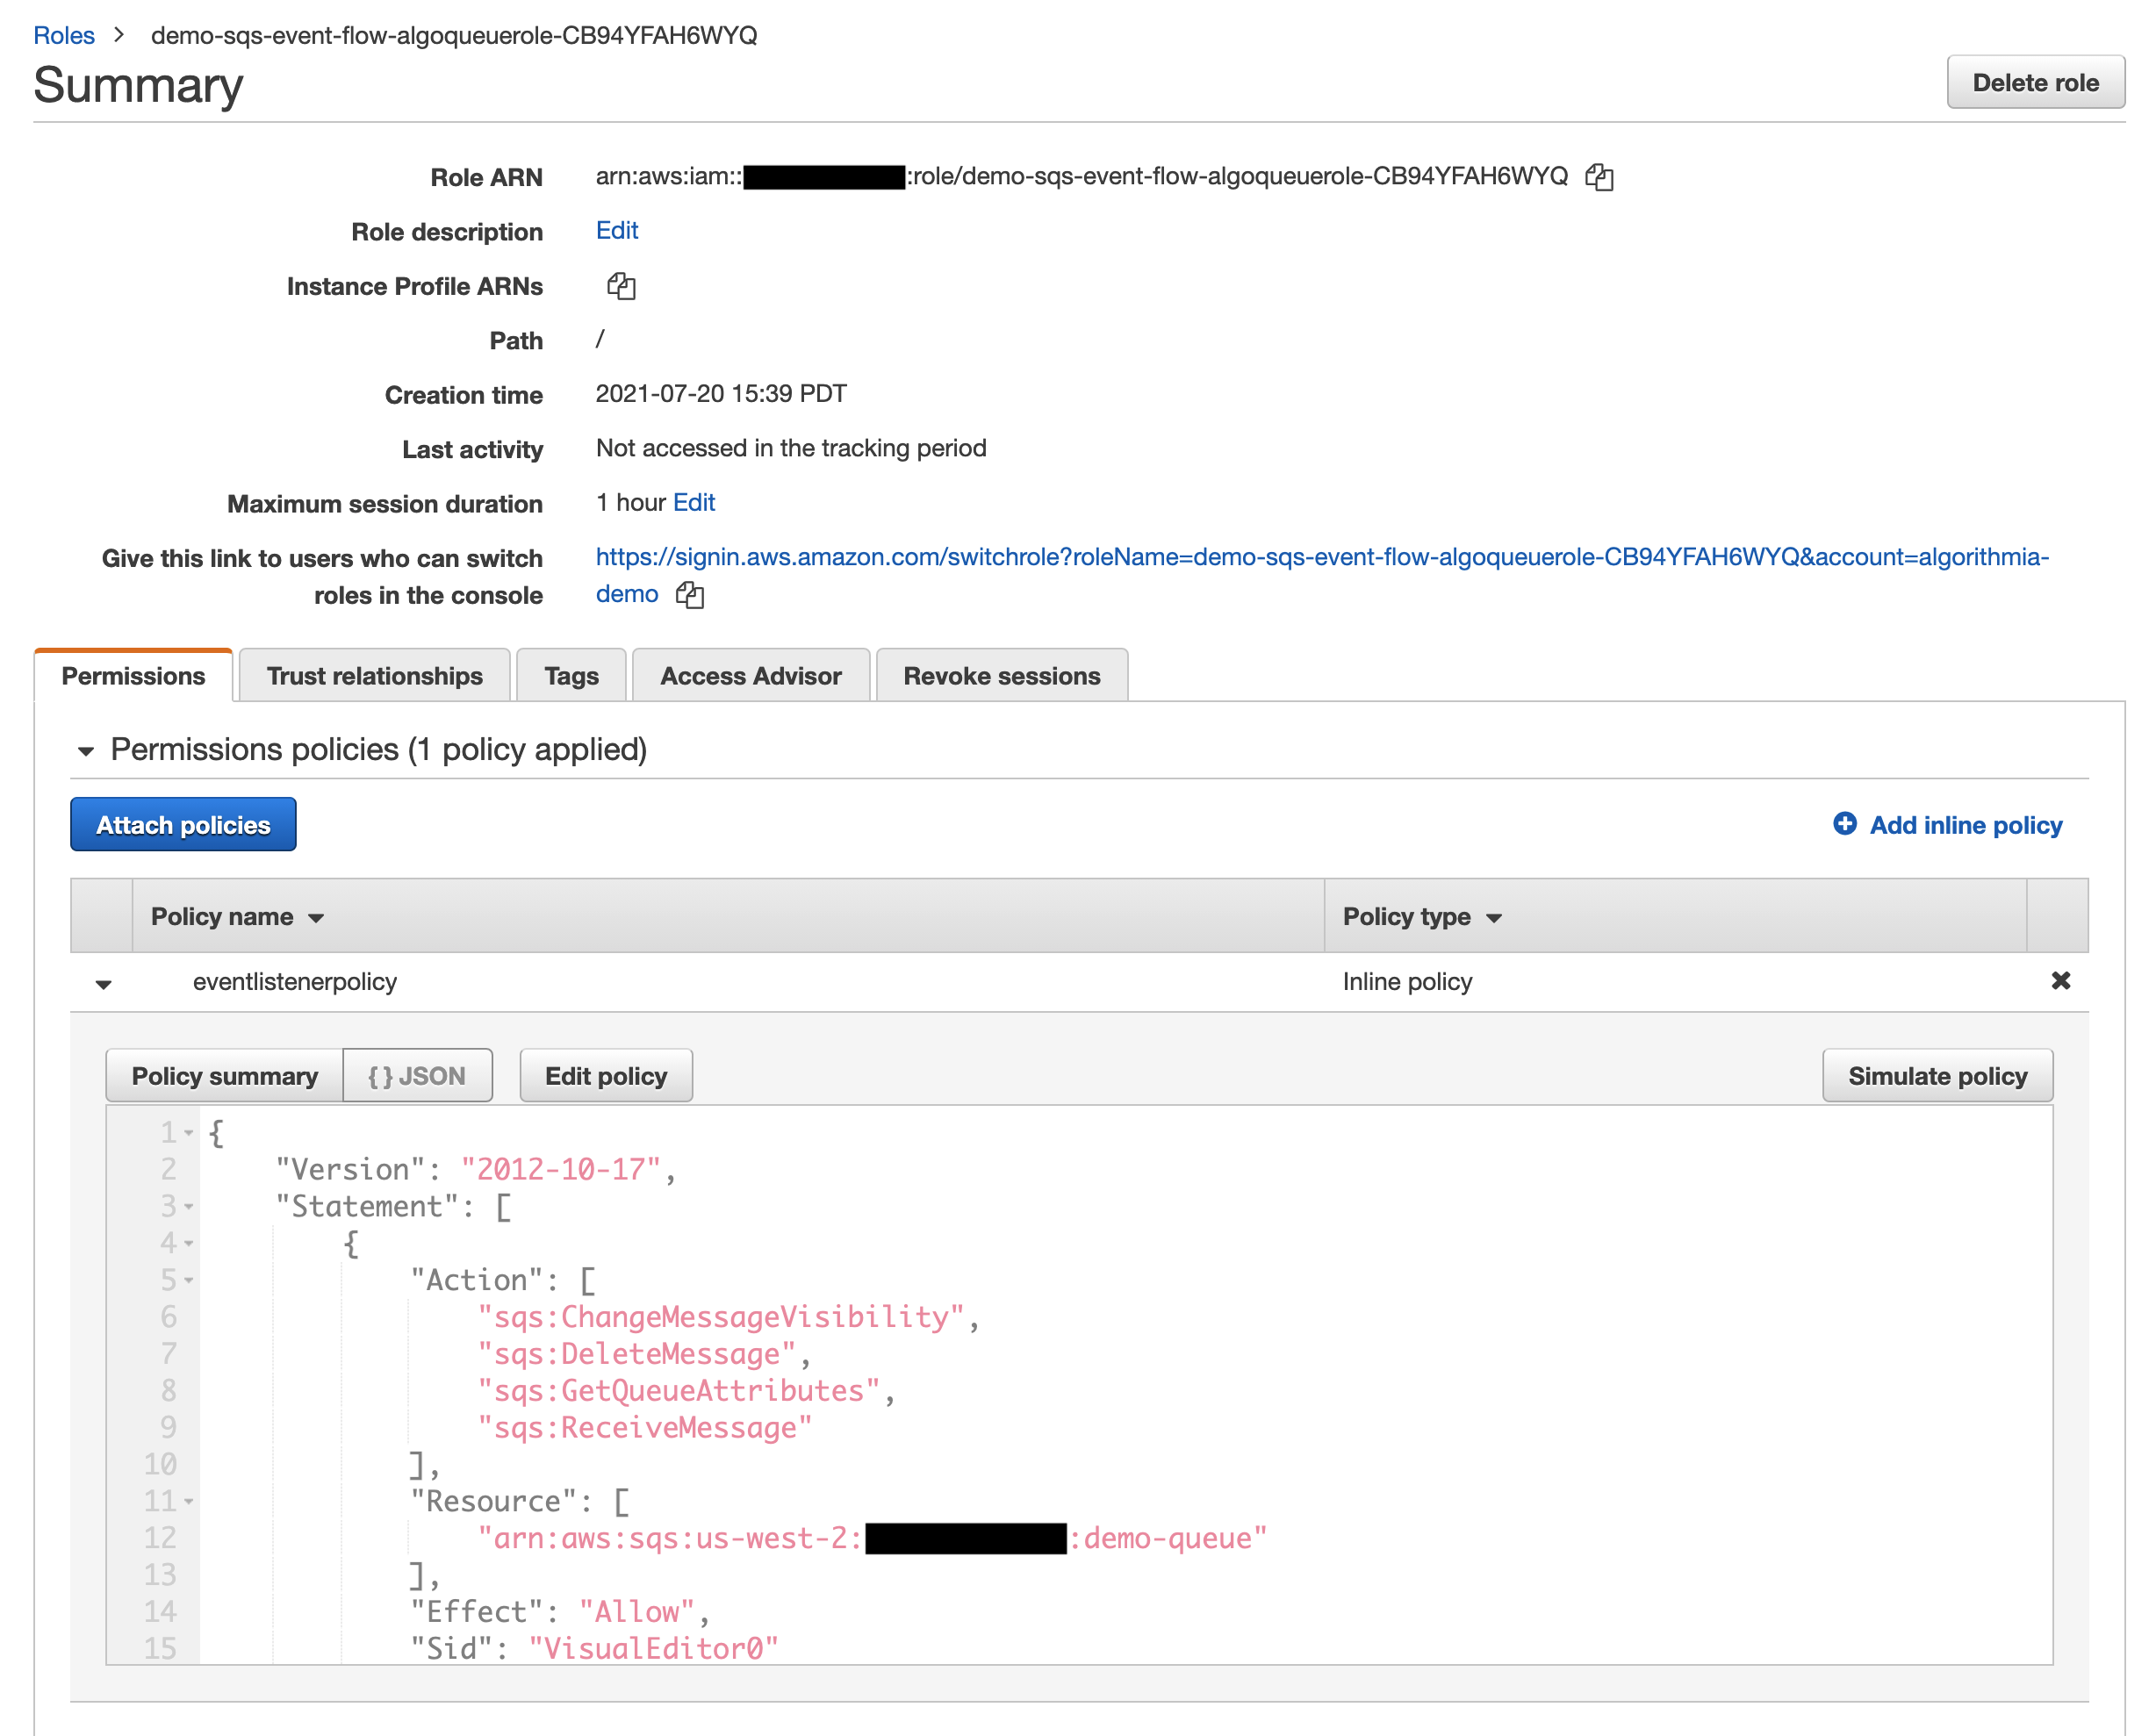
Here’s what the READ_SQS permission policy looks like in JSON. (NOTE: This policy is created by CloudFormation.)
{
    "Version": "2012-10-17",
    "Statement": [
        {
            "Action": [
                "sqs:ChangeMessageVisibility",
                "sqs:DeleteMessage",
                "sqs:GetQueueAttributes",
                "sqs:ReceiveMessage",
            ],
            "Resource": "arn:aws:us-west-2:ACCOUNT_SQS:QueueName",
            "Effect": "Allow",
            "Sid": "VisualEditor0"
        }
    ]
}
Note that further down in this guide, the READ_SQS role ARN will be used both for the AssumeRole policy that you’ll attach to ACCOUNT_AE and in Algorithmia’s browser UI when you connect the SQS message broker.
In order to consume messages from the queue created in ACCOUNT_SQS, the ACCOUNT_AE Algorithmia instance profile must attach an IAM policy allowing it to assume the READ_SQS role from above. Let’s call this policy ASSUME_READ_SQS; it must be created within ACCOUNT_AE to allow the instance profile to assume this specific role from ACCOUNT_SQS.
Here’s what the ASSUME_READ_SQS permission policy looks like in JSON. (NOTE: You must attach this policy to the ACCOUNT_AE profile; we’ll walk through this below.)
{
    "Version": "2012-10-17",
    "Statement": [
        {
            "Action": "sts:AssumeRole",
            "Resource": "arn:aws:iam::ACCOUNT_SQS:role/READ_SQS",
            "Effect": "Allow",
            "Sid": "VisualEditor0"
        }
    ]
}
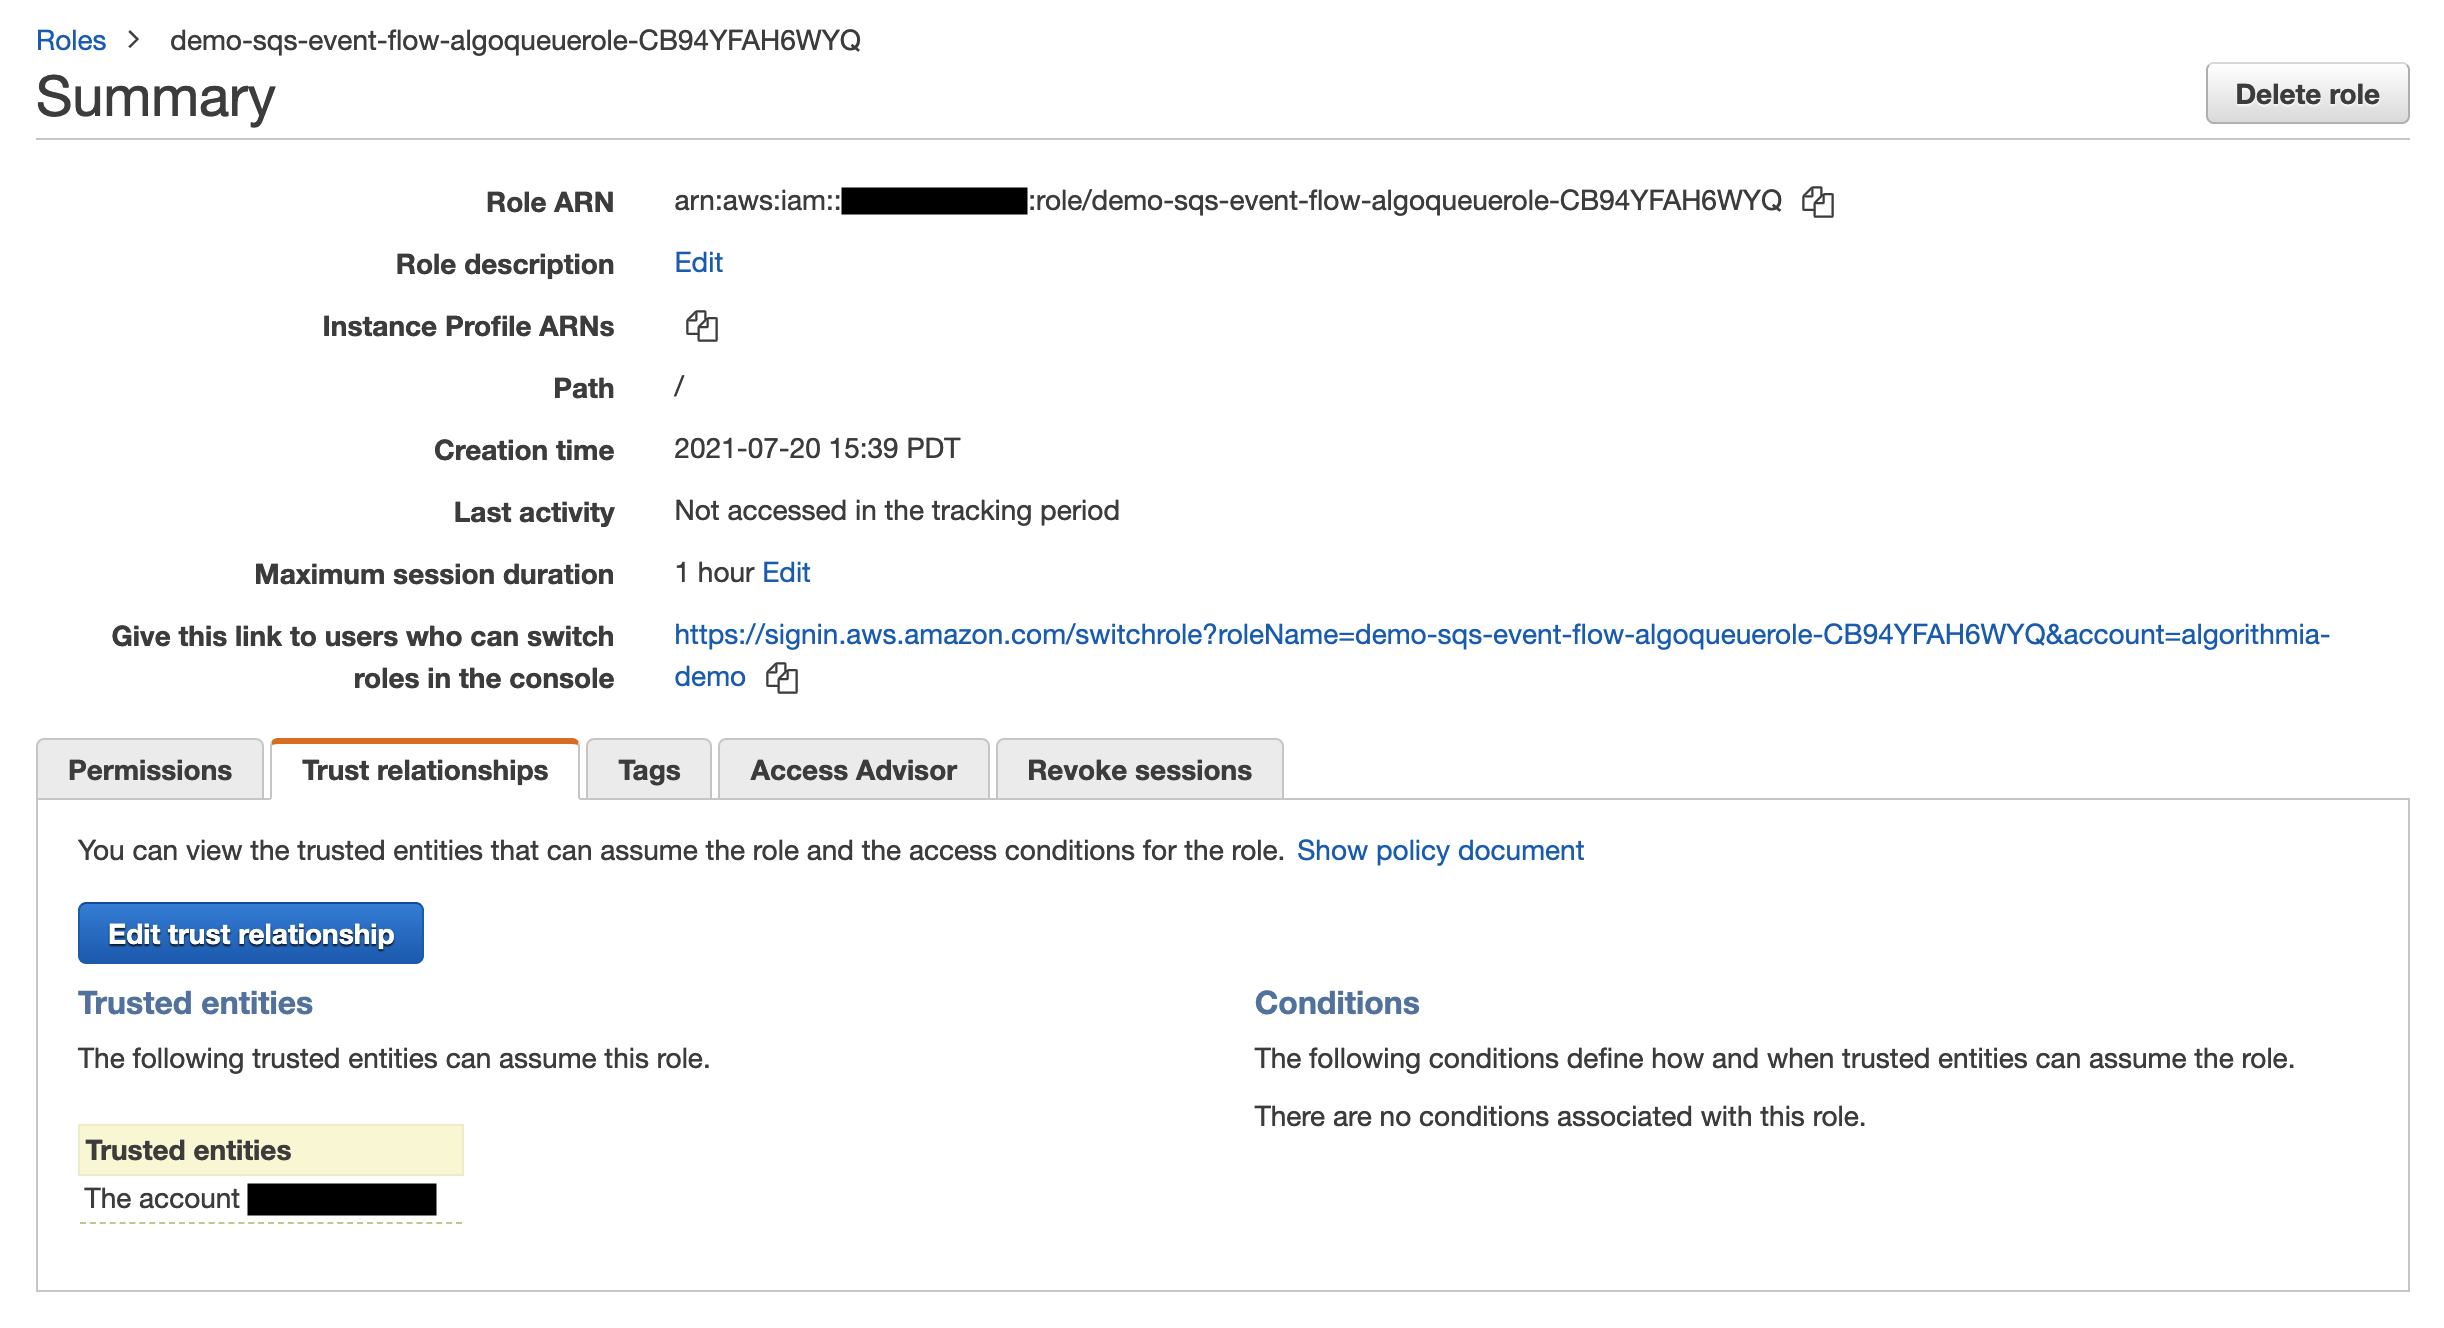
On the ACCOUNT_SQS side, the READ_SQS role must designate ACCOUNT_AE as a Trusted entity so that the READ_SQS role can be assumed by roles from ACCOUNT_AE. (NOTE: This trust relationship will be configured by CloudFormation.) Note that if you aren’t using CloudFormation, setting a trust relationship is only necessary in Scenario #2 where Account_AE is different from Account_SQS.
If necessary, the trust relationship can be edited under IAM → Roles → {READ_SQS} → Trust relationships. You can also access the role-configuration page for the READ_SQS role through CloudFormation → Stacks → {Stack name} → Resources (the role will by Type AWS::IAM::Role in the table under this tab).
Creating a stack with CloudFormation
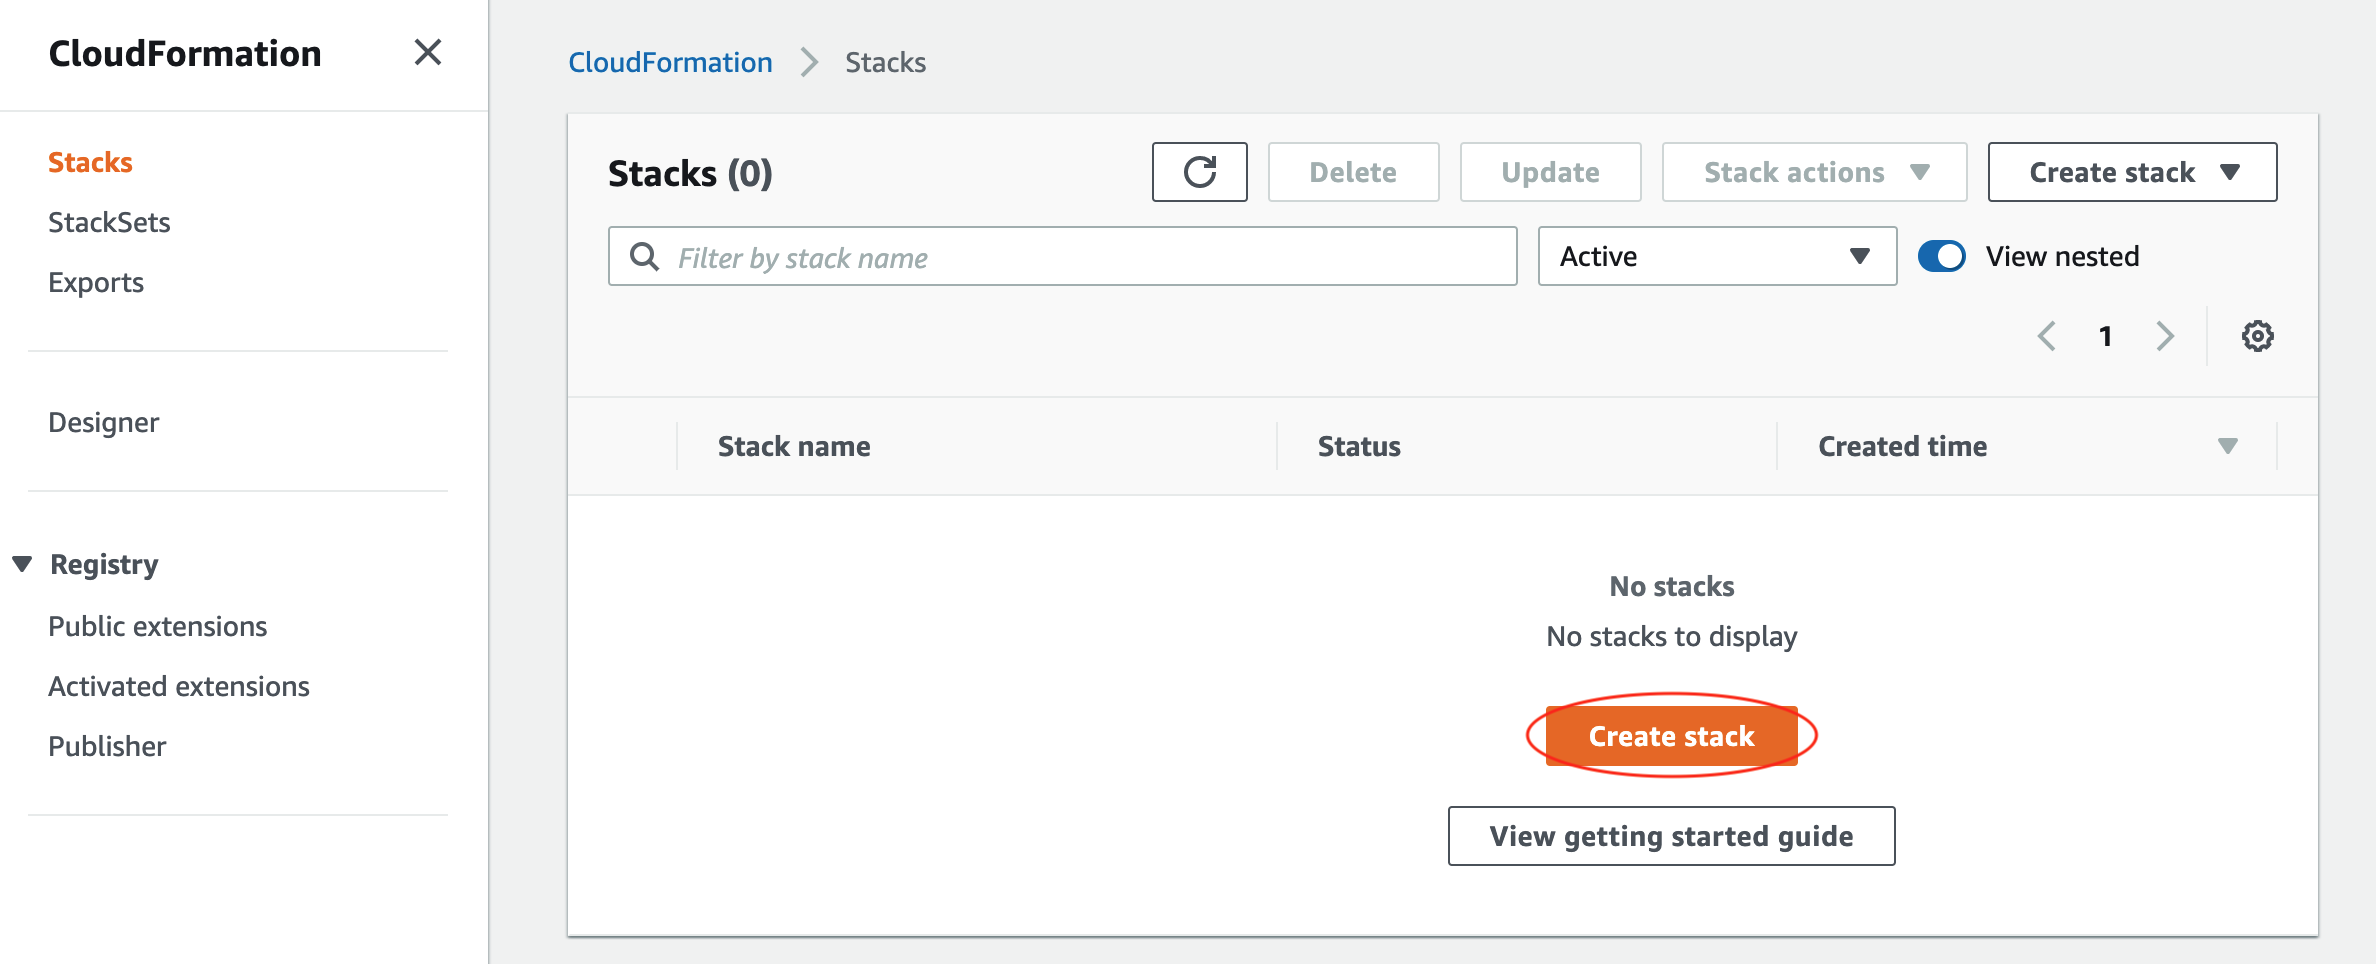
Open the CloudFormation page in the AWS console.
Click Stacks in the left-hand navigation menu, and then click Create stack. If you already have resources provisioned, you may need to specify whether to create the stack using those existing resources. In this guide we’ll create the stack with new resources, so in the dropdown select the With new resources (standard) option.
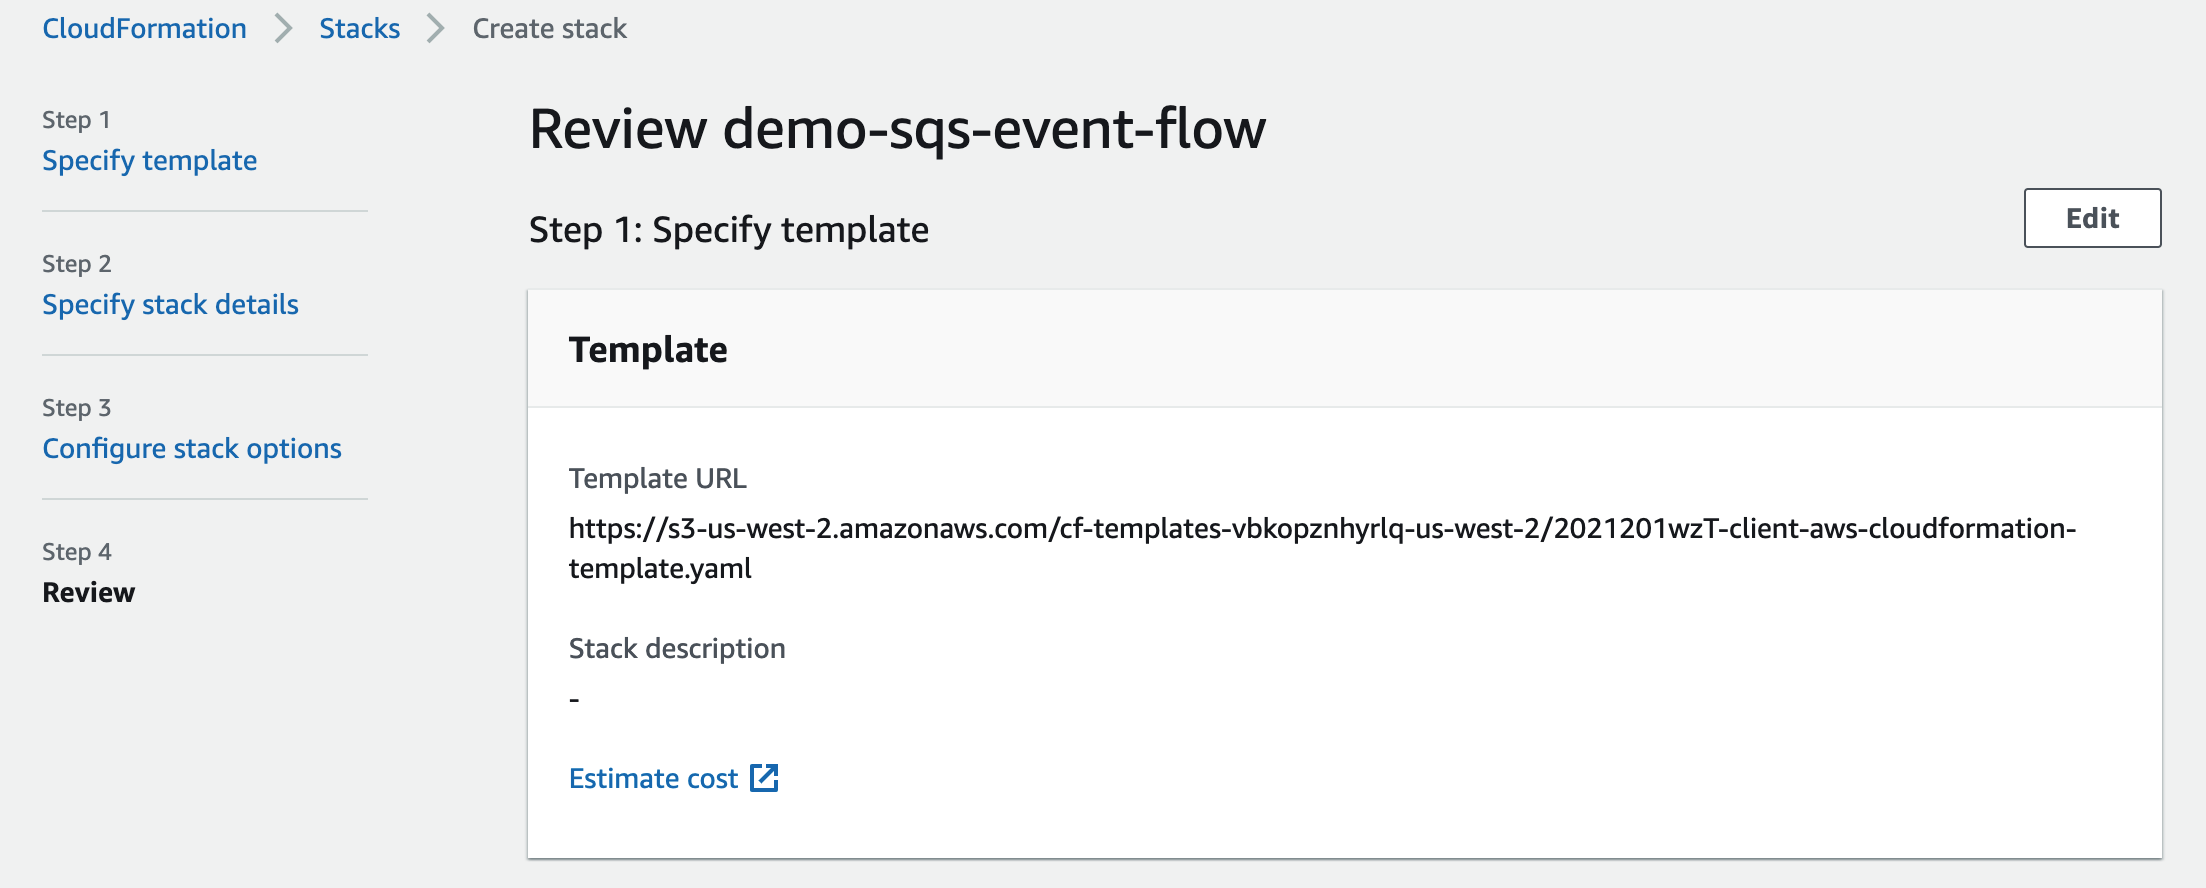
On the resulting page, in the Specify template section, leave the default Template is ready option selected in the first box and select Upload a template file in the second box. Click Choose file, navigate to the client-aws-cloudformation-template.yaml template file that you saved locally above, and select it for upload.
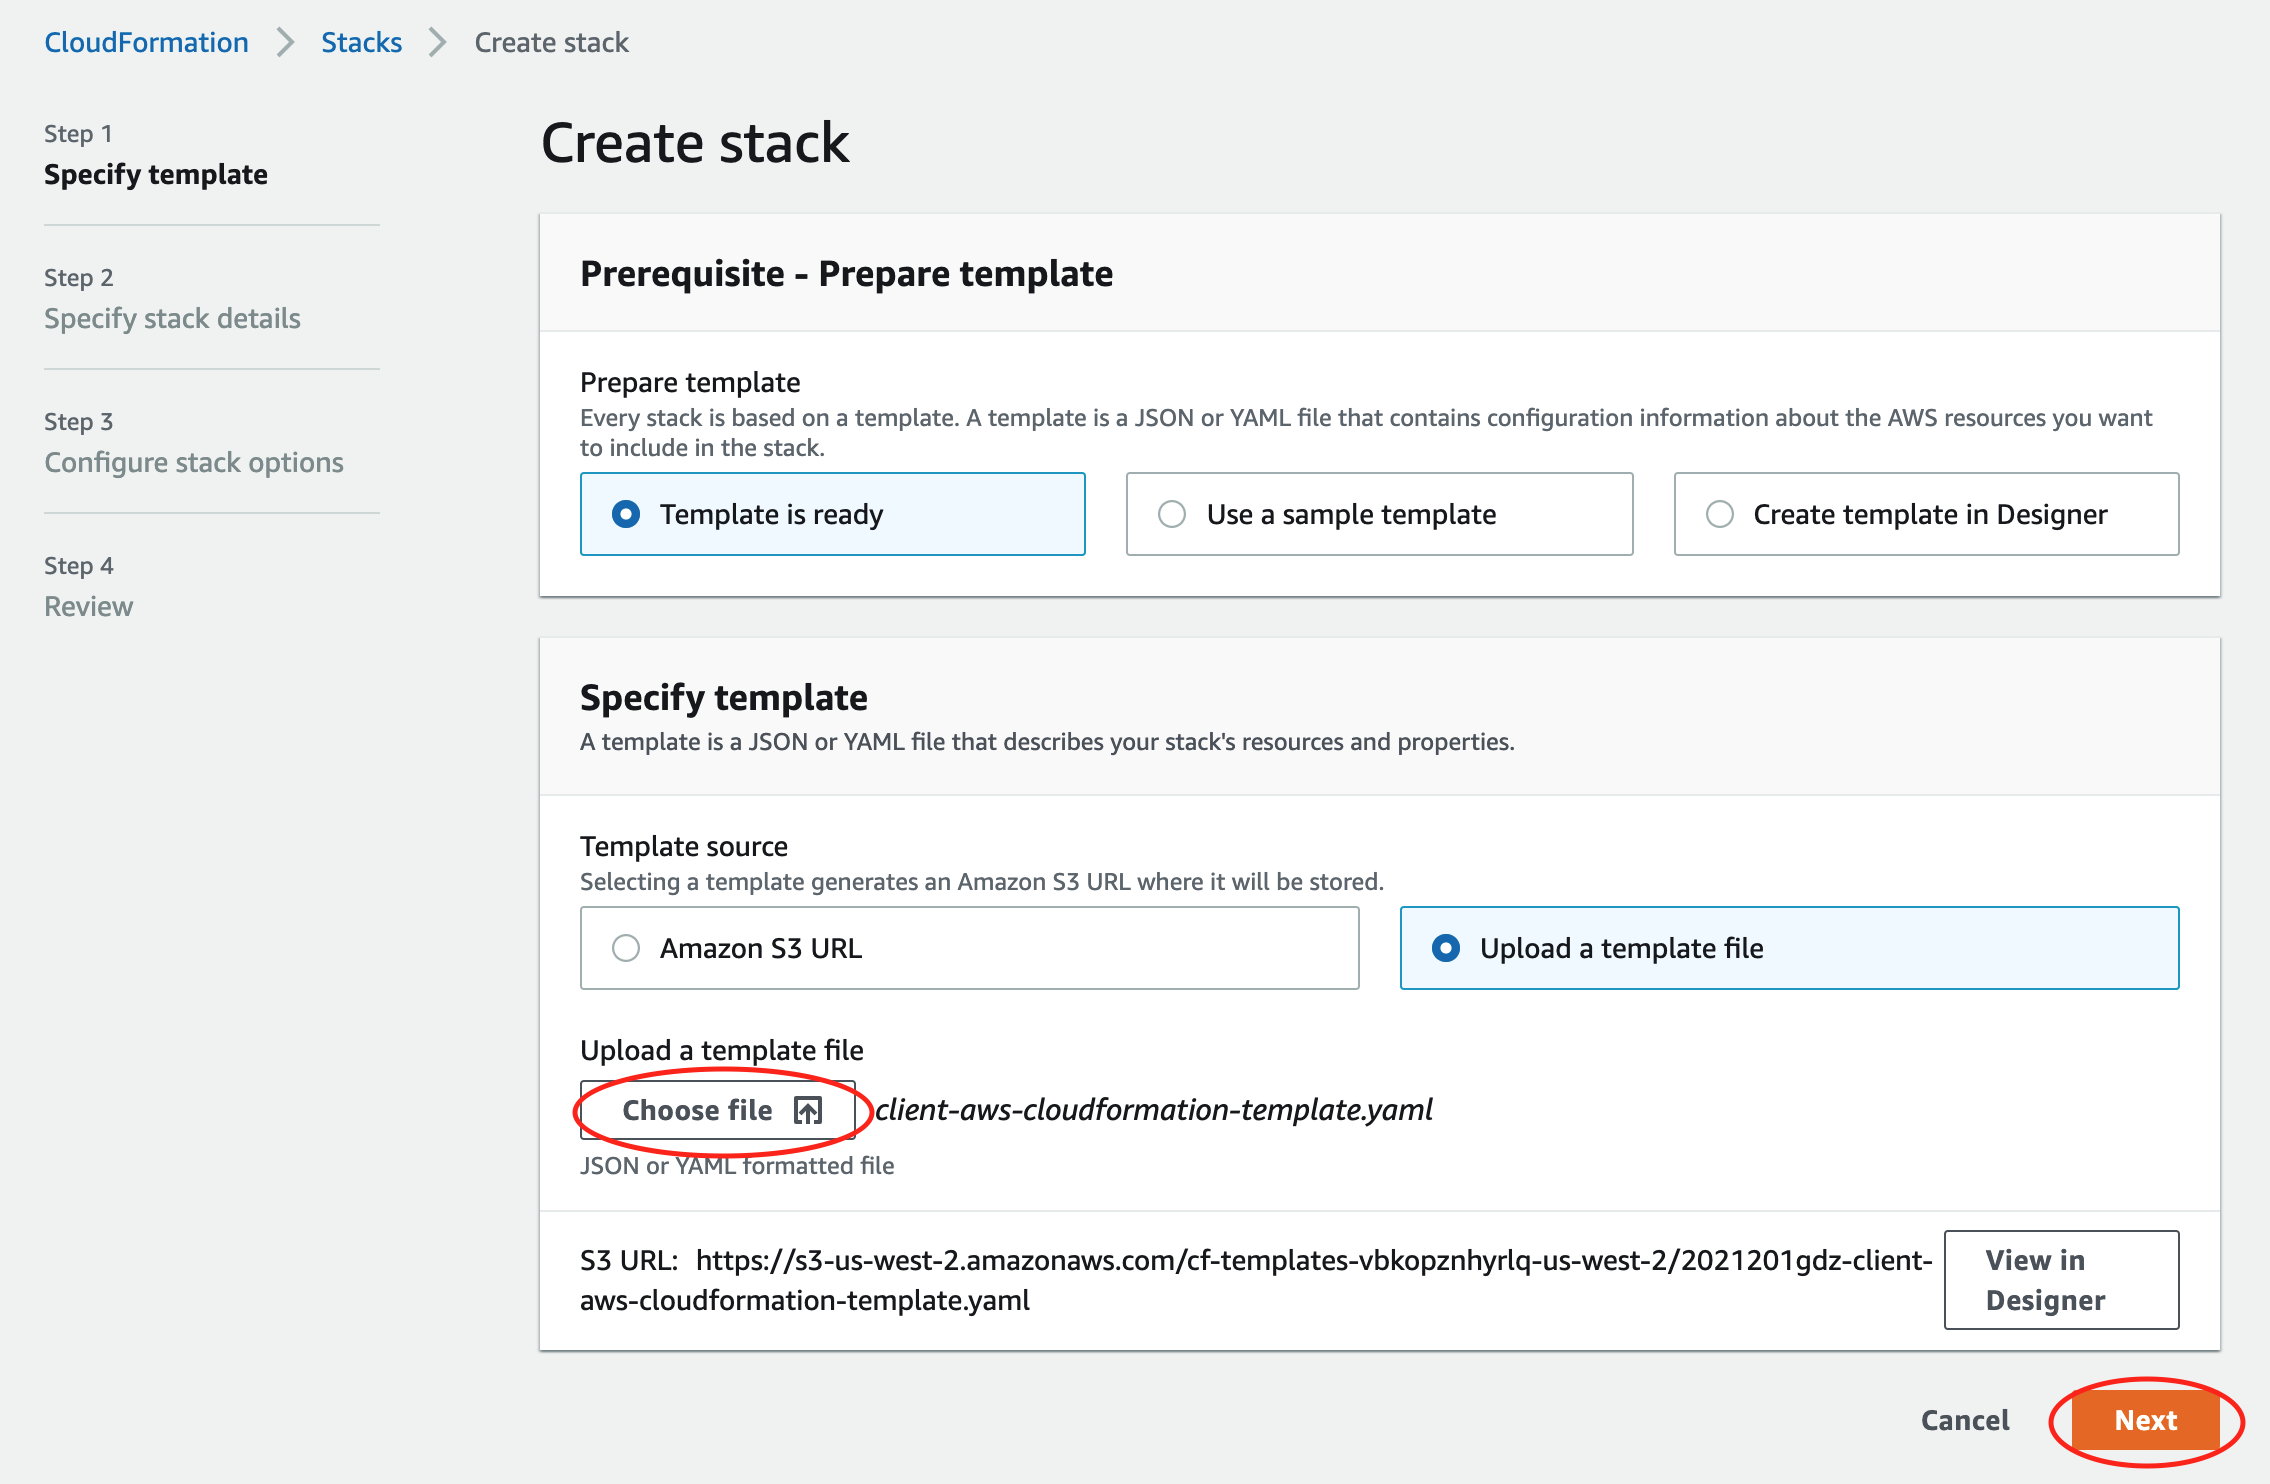
Click Next.
On the following page, enter a Stack name. This should be a unique name that identifies the bundle of Amazon resources used for this configuration.
Under AlgorithmiaAccountNumber, enter Algorithmia’s AWS account number, provided to you by Algorithmia.
The AlgorithmiaAccountNumber is the account number of the AWS account running the Algorithmia instance, regardless of where the SQS queue is created.
Under QueueDLQName, enter a unique name that identifies the Amazon SQS queue that’ll be a holding queue for payloads that weren’t accepted by the Algorithmia algorithm for any reason (invalid message format, Algorithmia platform downtime, etc.).
Under QueueName, enter a unique name that identifies the SQS queue that’ll be the source of payloads for the algorithm to run.
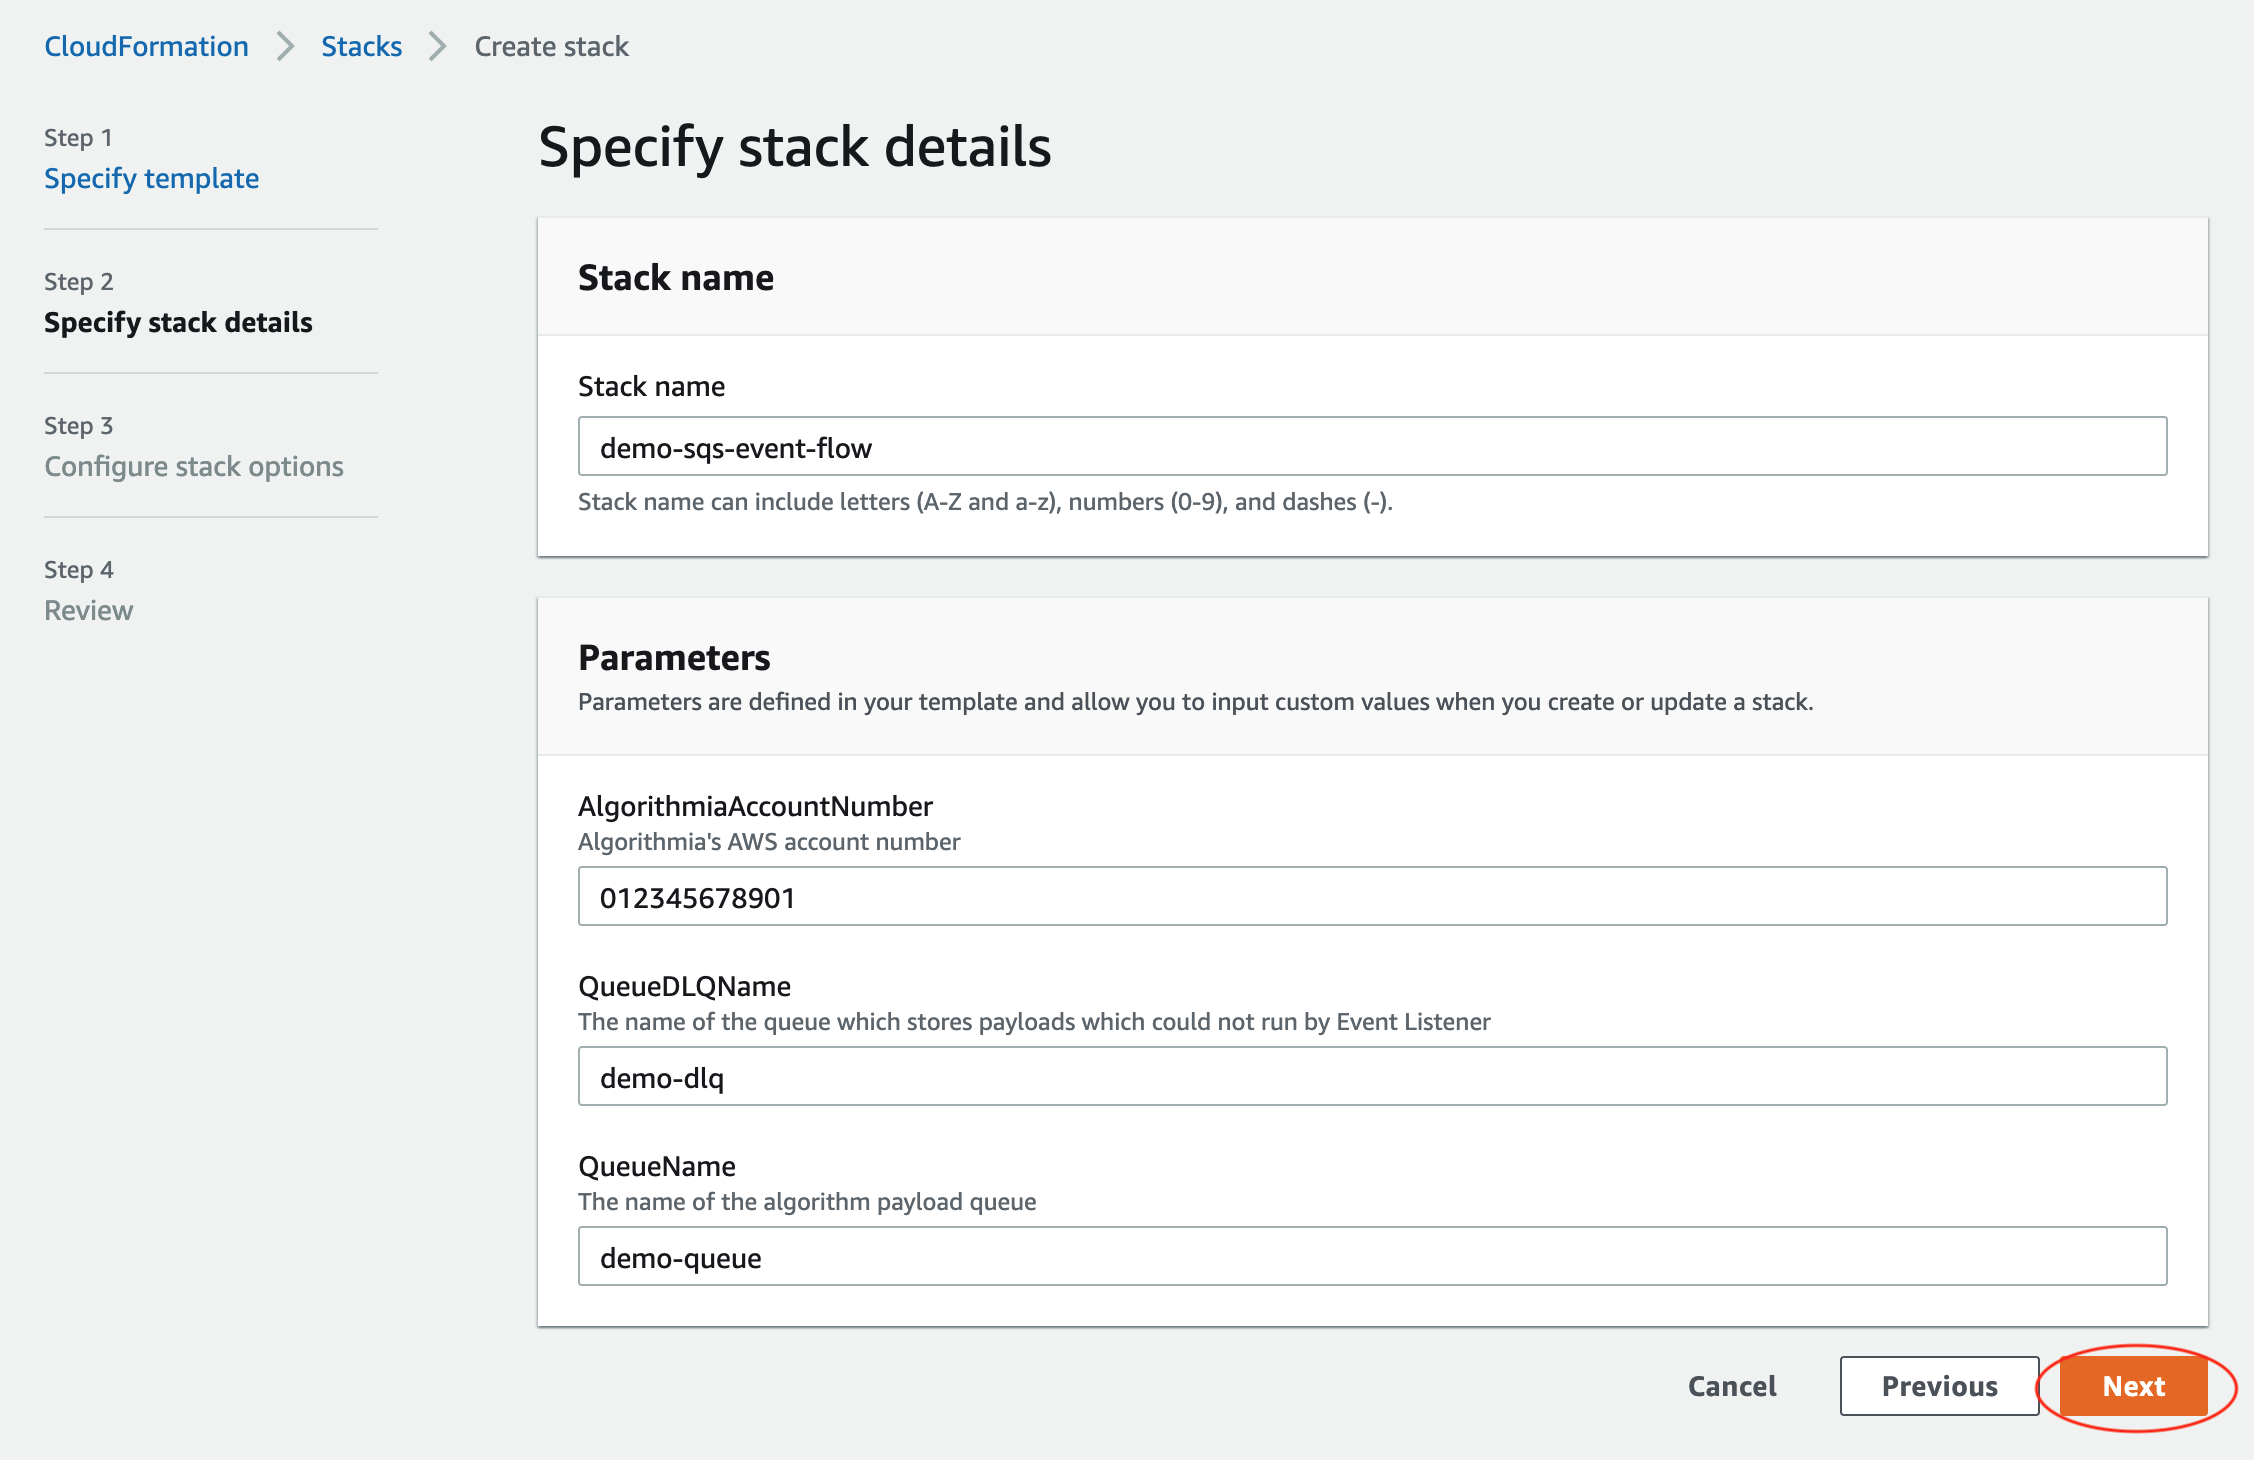
Click Next.
The next page allows you to Configure stack options. If you need to use a specific IAM role that has the permissions specified above, enter that role in the Permissions section. Otherwise, leave it blank.
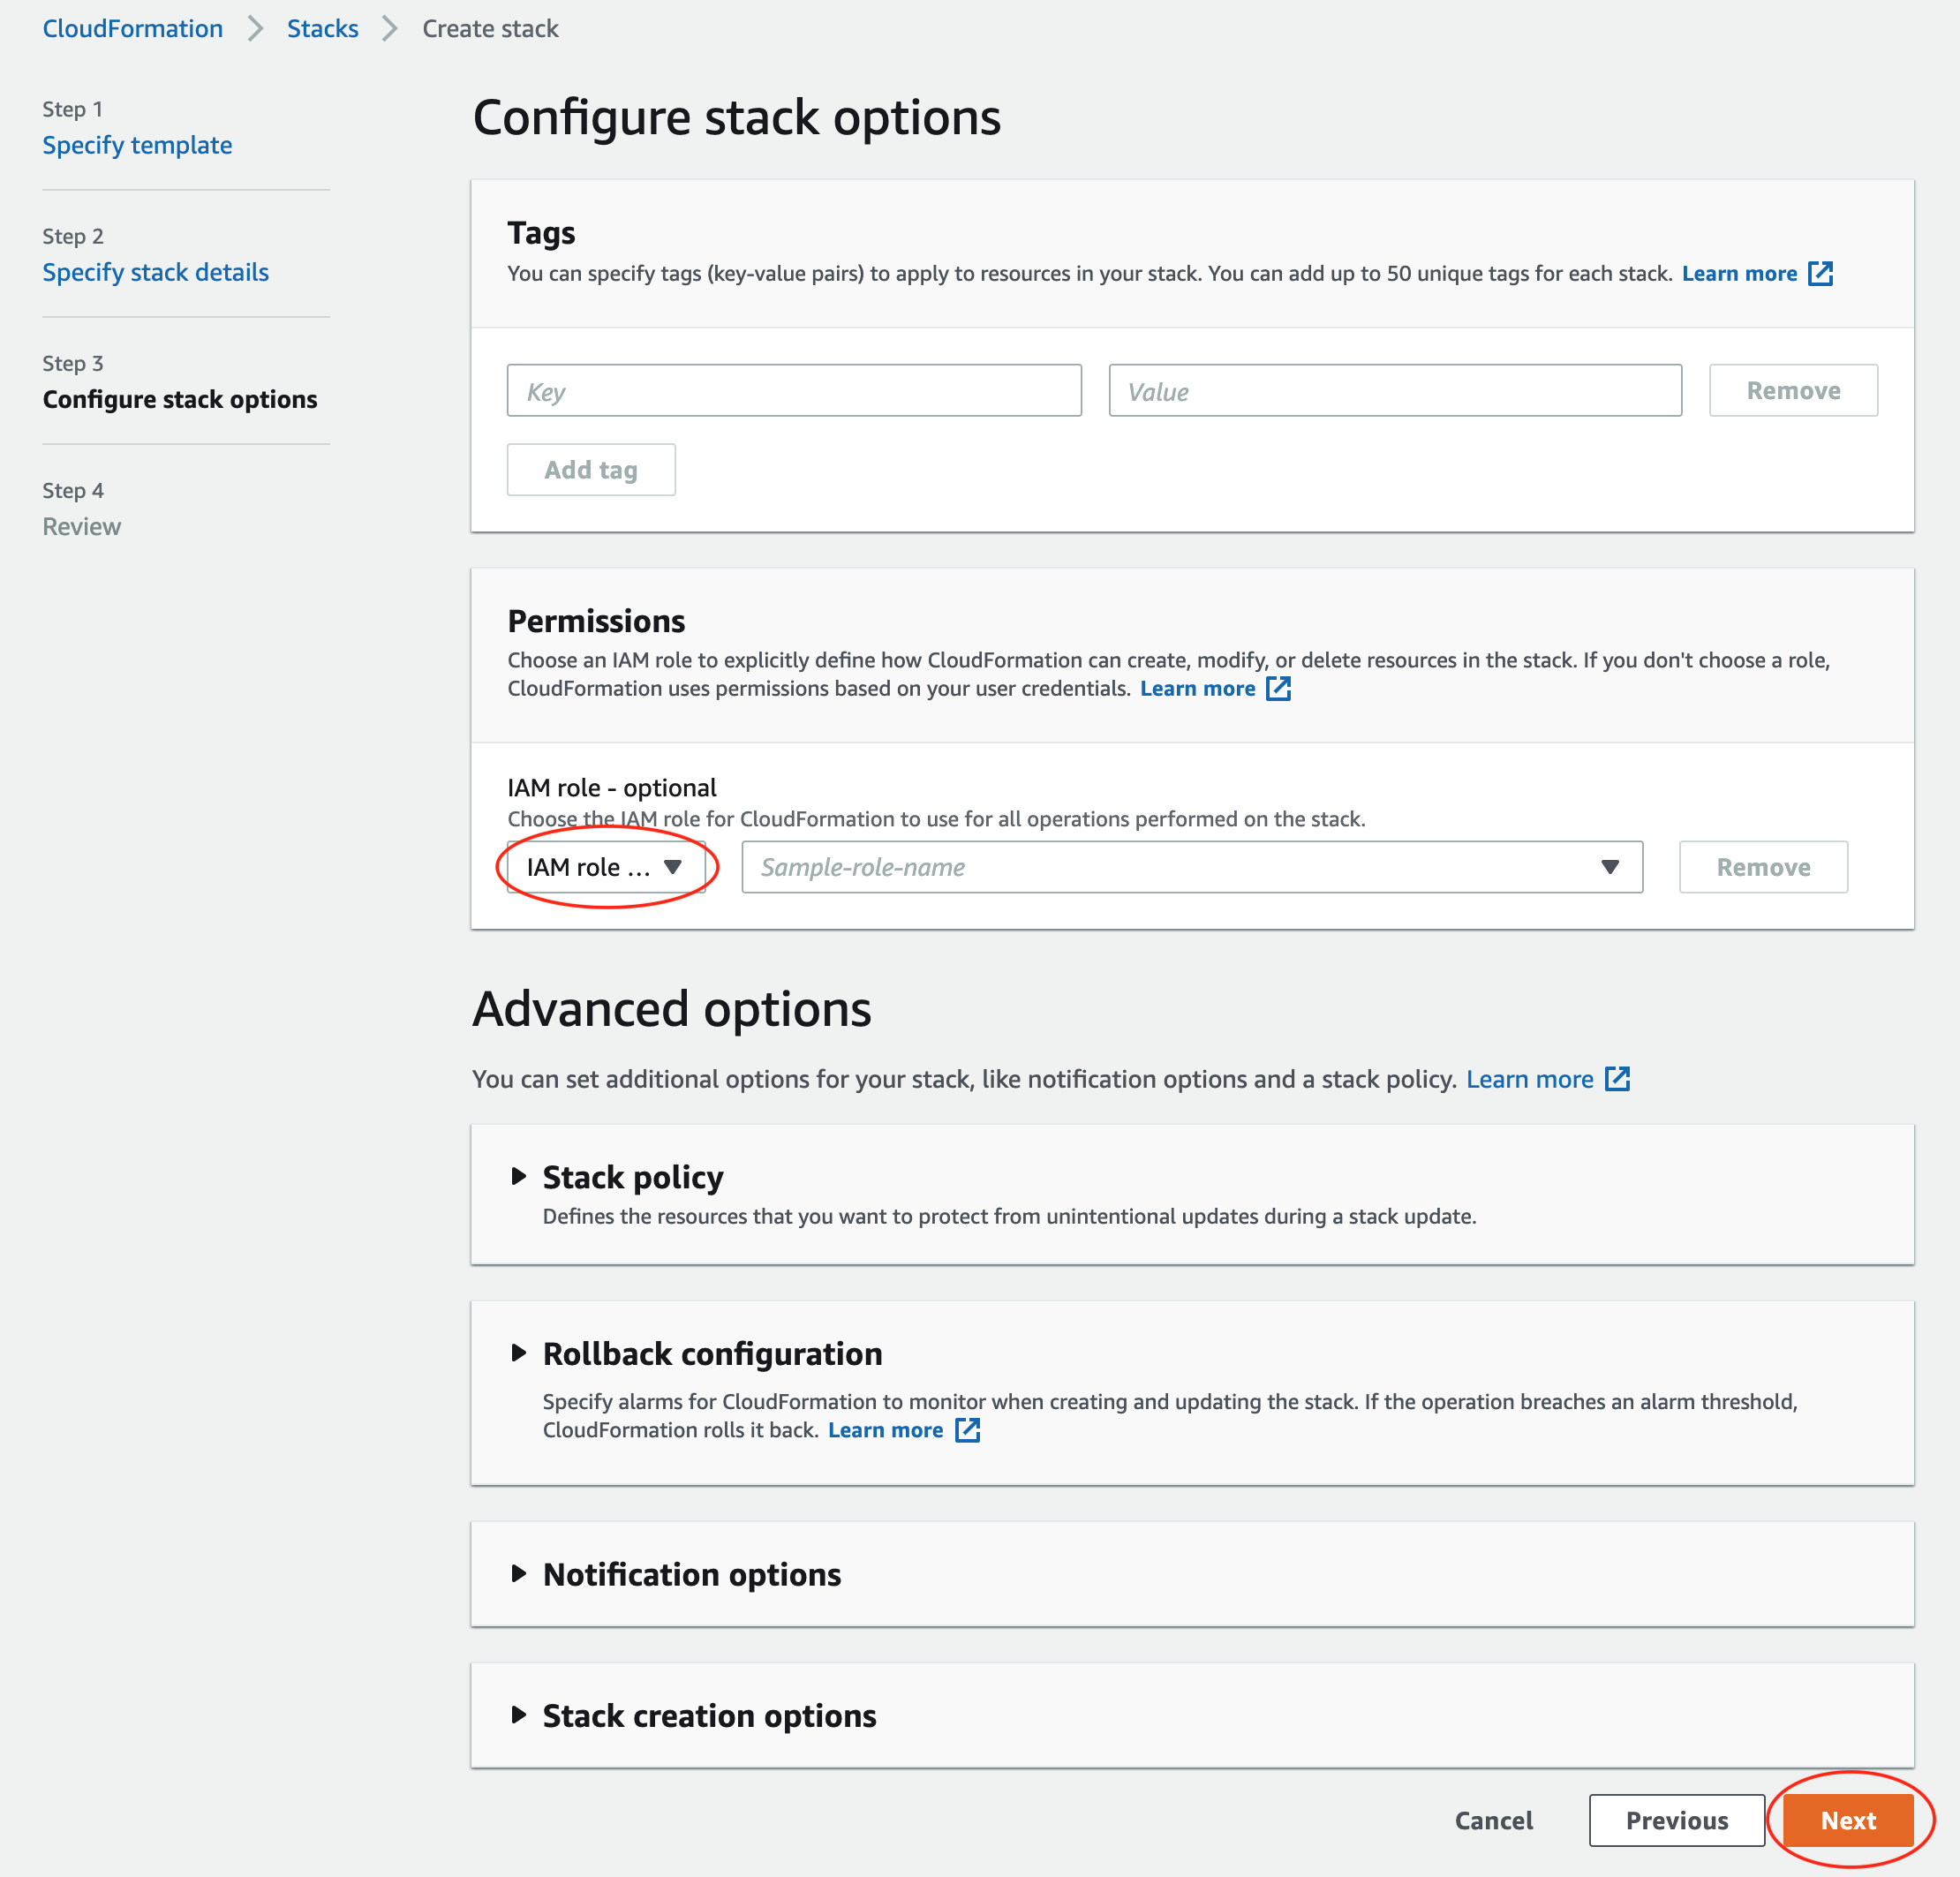
Click Next.
The next page allows you to review your options. Scroll to the bottom and click the checkbox next to I acknowledge that AWS CloudFormation might create IAM resources.
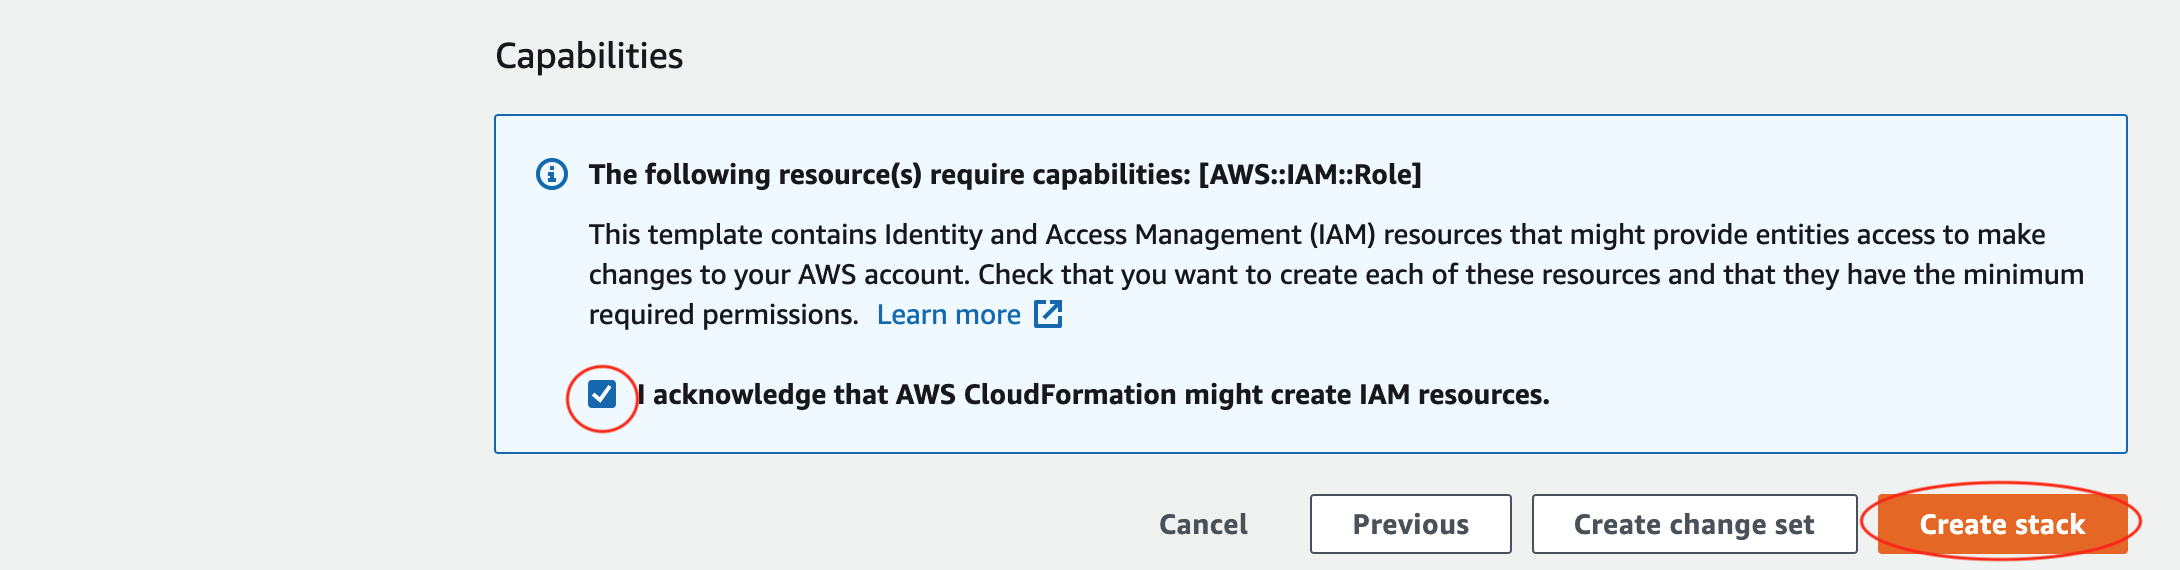
Finally, click Create stack.
The next page will indicate that the stack creation is in progress.

After about 60 seconds, click the gray refresh wheel ( ). It should show the Stack status as “CREATE_COMPLETE”. If not, wait another 60 seconds and click the wheel again.
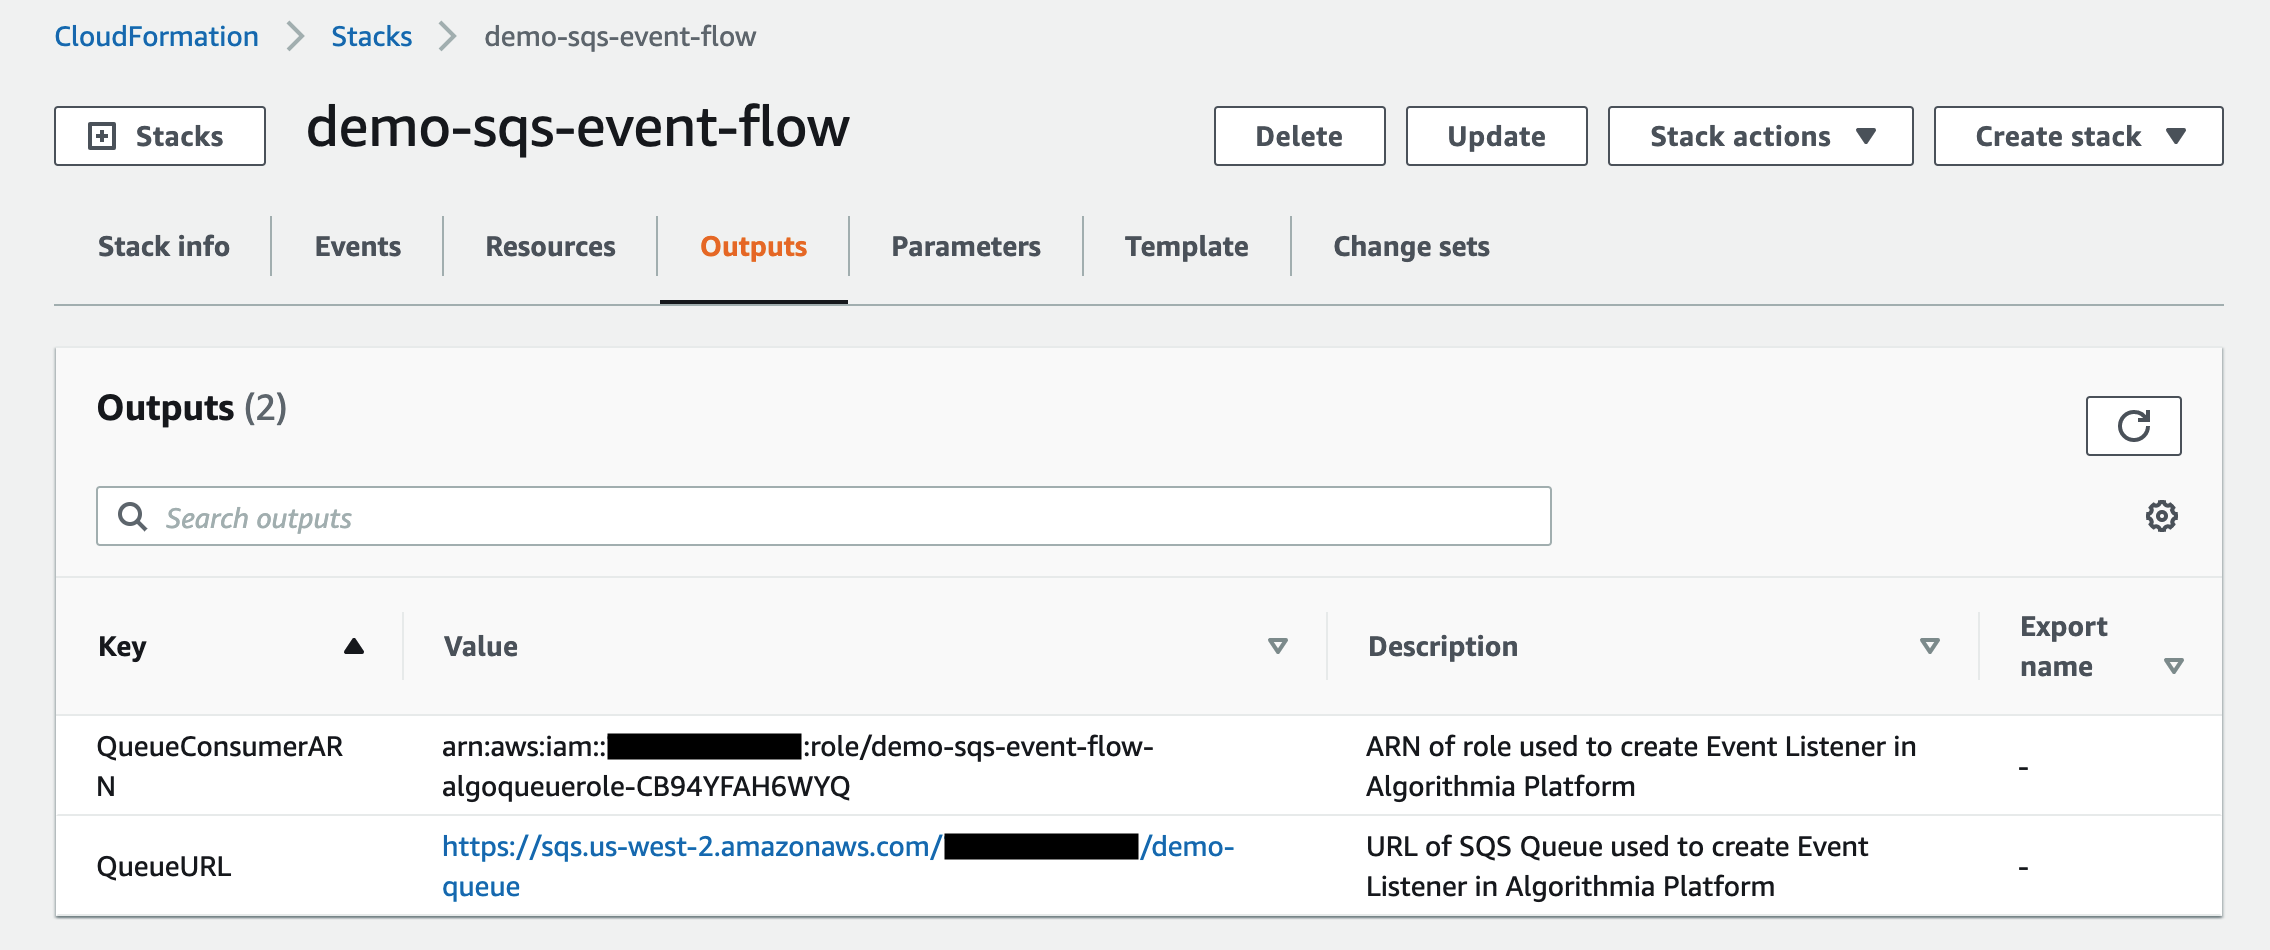
Click the Outputs tab. Copy the QueueConsumerARN and QueueURL; you’ll use them below both for the AssumeRole policy that you’ll attach to ACCOUNT_AE and in Algorithmia’s browser UI when you connect the SQS message broker.
Attaching an AssumeRole policy
As described above, once you’ve created the resource stack with CloudFormation, you’ll need to attach the following policy to the Algorithma instance profile account, replacing the Resource value with the role ARN for the READ_SQS role created. The following policy template is the same as that shown above.
{
    "Version": "2012-10-17",
    "Statement": [
        {
            "Action": "sts:AssumeRole",
            "Resource": "arn:aws:iam::ACCOUNT_SQS:role/READ_SQS",
            "Effect": "Allow",
            "Sid": "VisualEditor0"
        }
    ]
}
If you’re not familiar with working with IAM policies, see the AWS documentation for creating an IAM policy using the JSON editor and attaching an IAM policy to an identity to complete this step.
3. Creating an Event Flow in Algorithmia
NOTE: The steps in this section are to be completed on Algorithmia, from within the browser user interface (UI) or through the API. In this guide, we’ll demonstrate what the workflow looks like in the UI.
Note that you can set up any algorithm to subscribe to an SQS message broker so that the algorithm is executed when a message is published to that specific queue. On our platform we refer to this type of event-driven configuration as an Event Flow, and the following demonstrates one possible example of how to set one up.
Create an algorithm
Create a Python 3.x algorithm with a generic Python 3.7 algorithm environment and default settings. If you’re new to Algorithmia or need a quick refresher on how to create and modify algorithms, see our Getting Started Guide.
On the newly created algorithm’s profile, click the Source Code tab to access the algorithm’s source code in the Web IDE.
In the body of your algorithm, paste the code below, replacing COLLECTION_OWNER and COLLECTION_NAME with your Algorithmia account name and the name of a data collection (which you’ll create in the next section), respectively. In the screenshot below the sample code, these respective values are ezra and TestingSQSEventFlow.
import Algorithmia
from Algorithmia import ADK

def apply(input):
    Algorithmia.client().file("data://COLLECTION_OWNER/COLLECTION_NAME/" + input.get("filename")).put(input.get("data"))

algorithm = ADK(apply)
algorithm.init("Algorithmia")
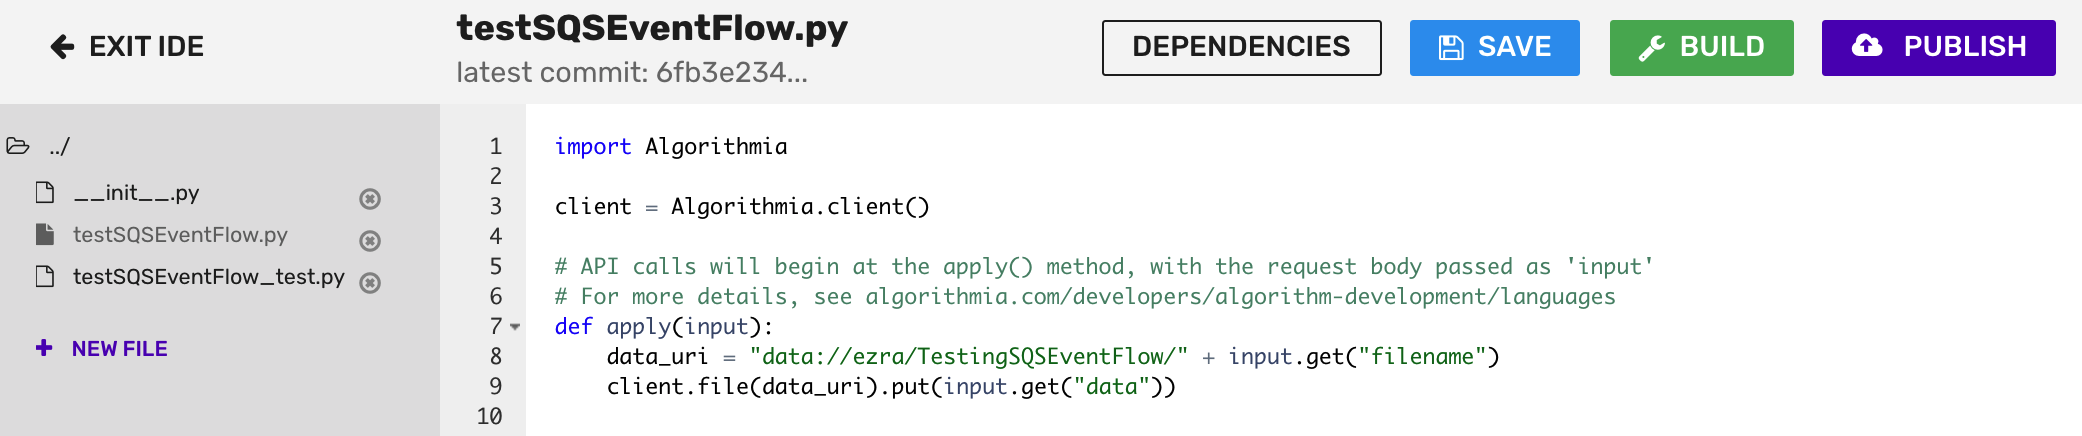
Click the Save and Build buttons and then click Publish when the build completes.
On the newly published algorithm’s profile, copy the algorithm endpoint, which will be in the form ALGO_OWNER/ALGO_NAME/ALGO_VERSION; in the screenshot below, this is ezra/testSQSEventFlow/0.2.0.

Create a hosted data collection
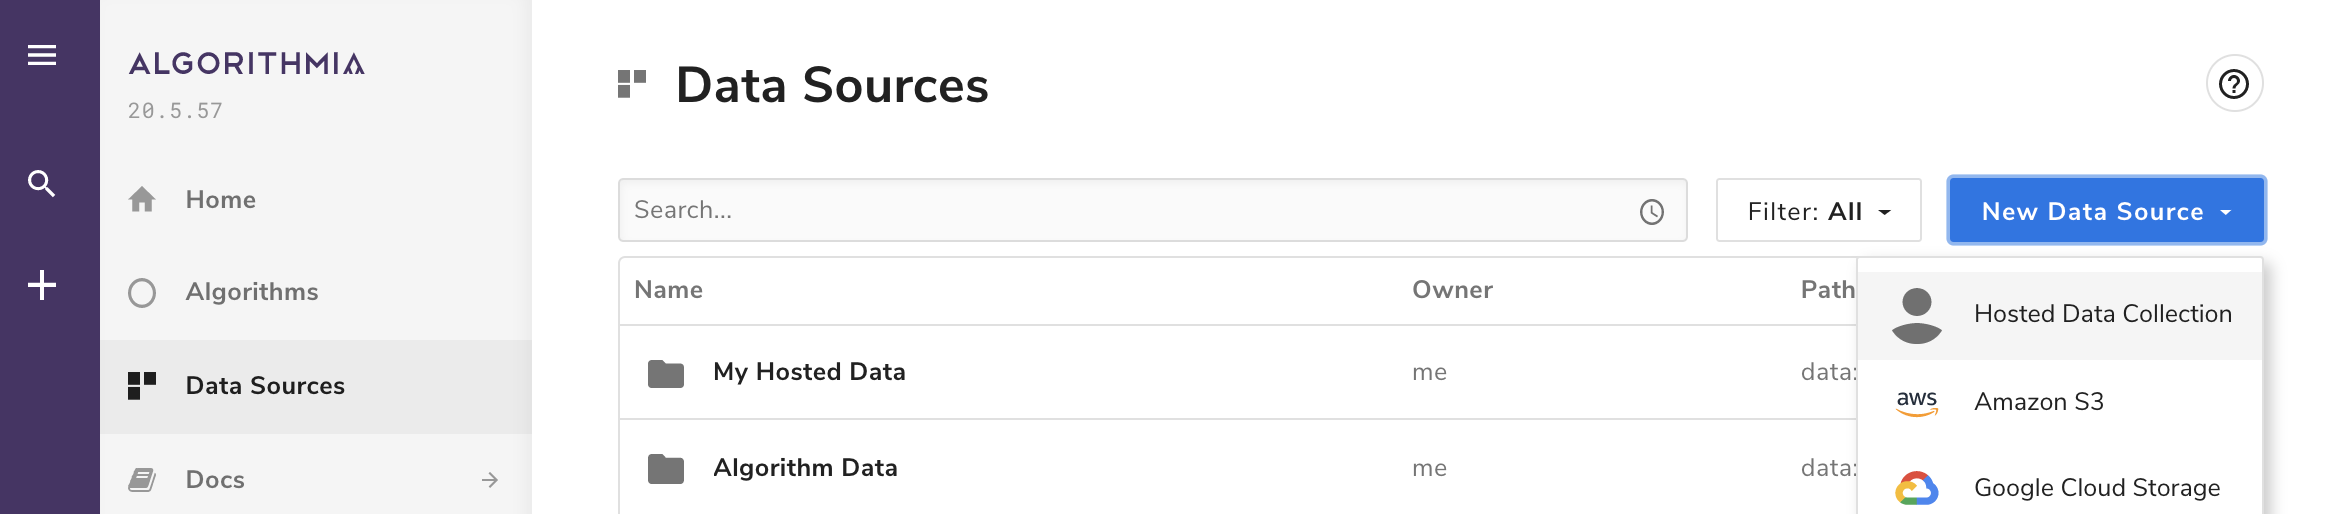
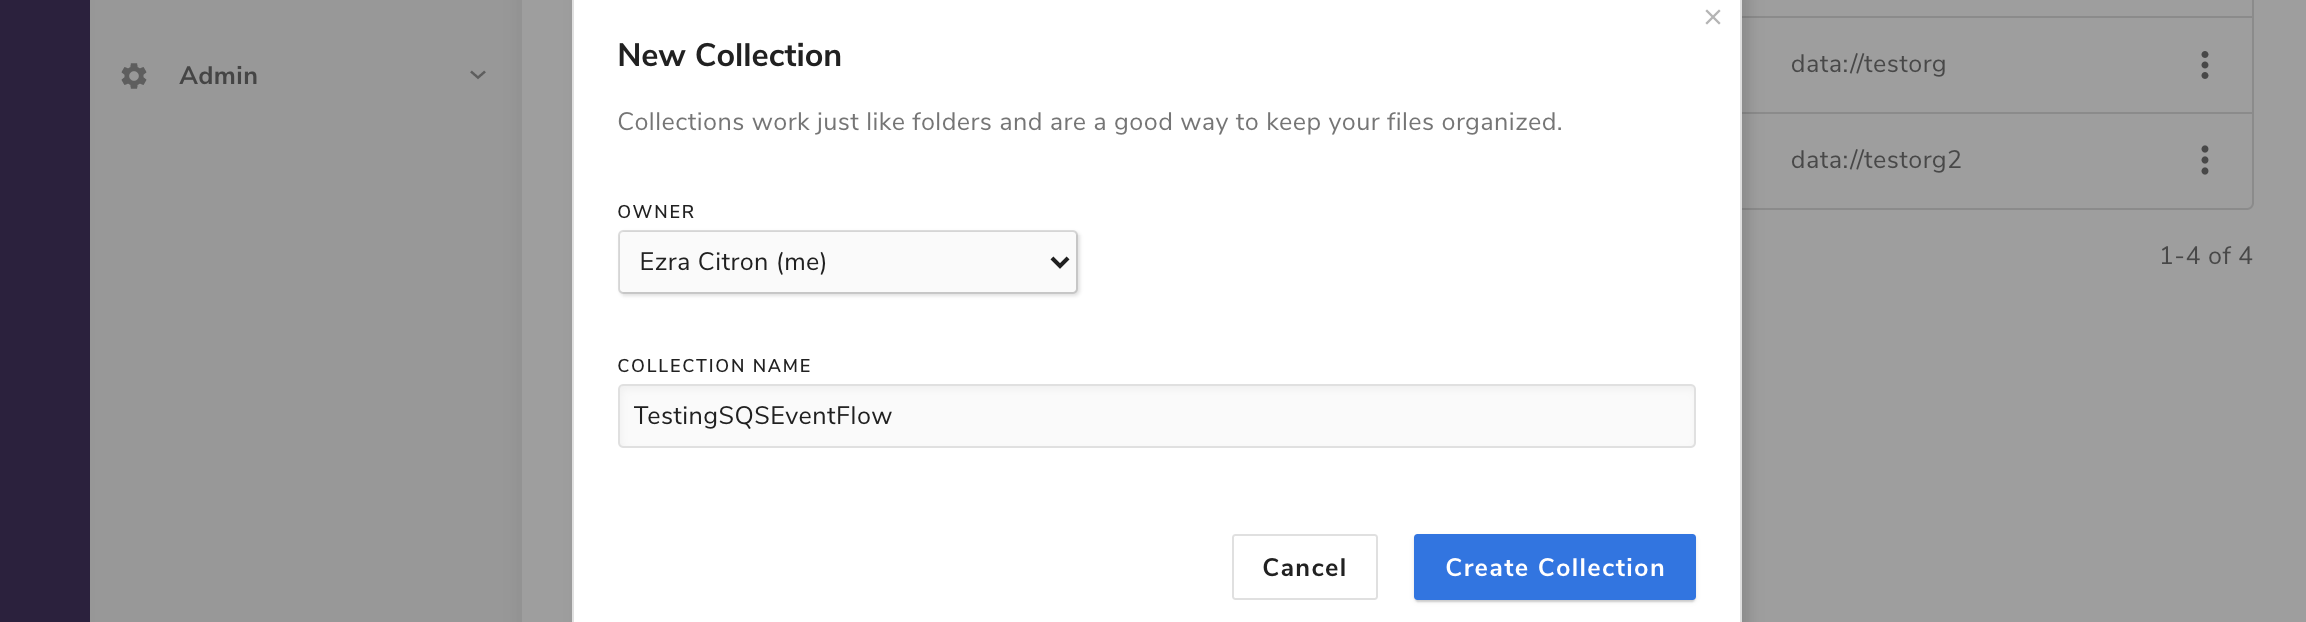
Now create a hosted data collection to which the algorithm above will write the records read from the SQS message broker. To begin, click the Data Sources menu item in the left-hand navigation bar. Click New Data Source and then Hosted Data Collection.
In the dialog box that appears, enter the COLLECTION_NAME value from above (in this case, TestingSQSEventFlow) and click Create Collection.
Connect to an SQS message broker
This section documents the workflow in Algorithmia versions >=20.5.53. See the section below for the previous event listeners-based workflow.
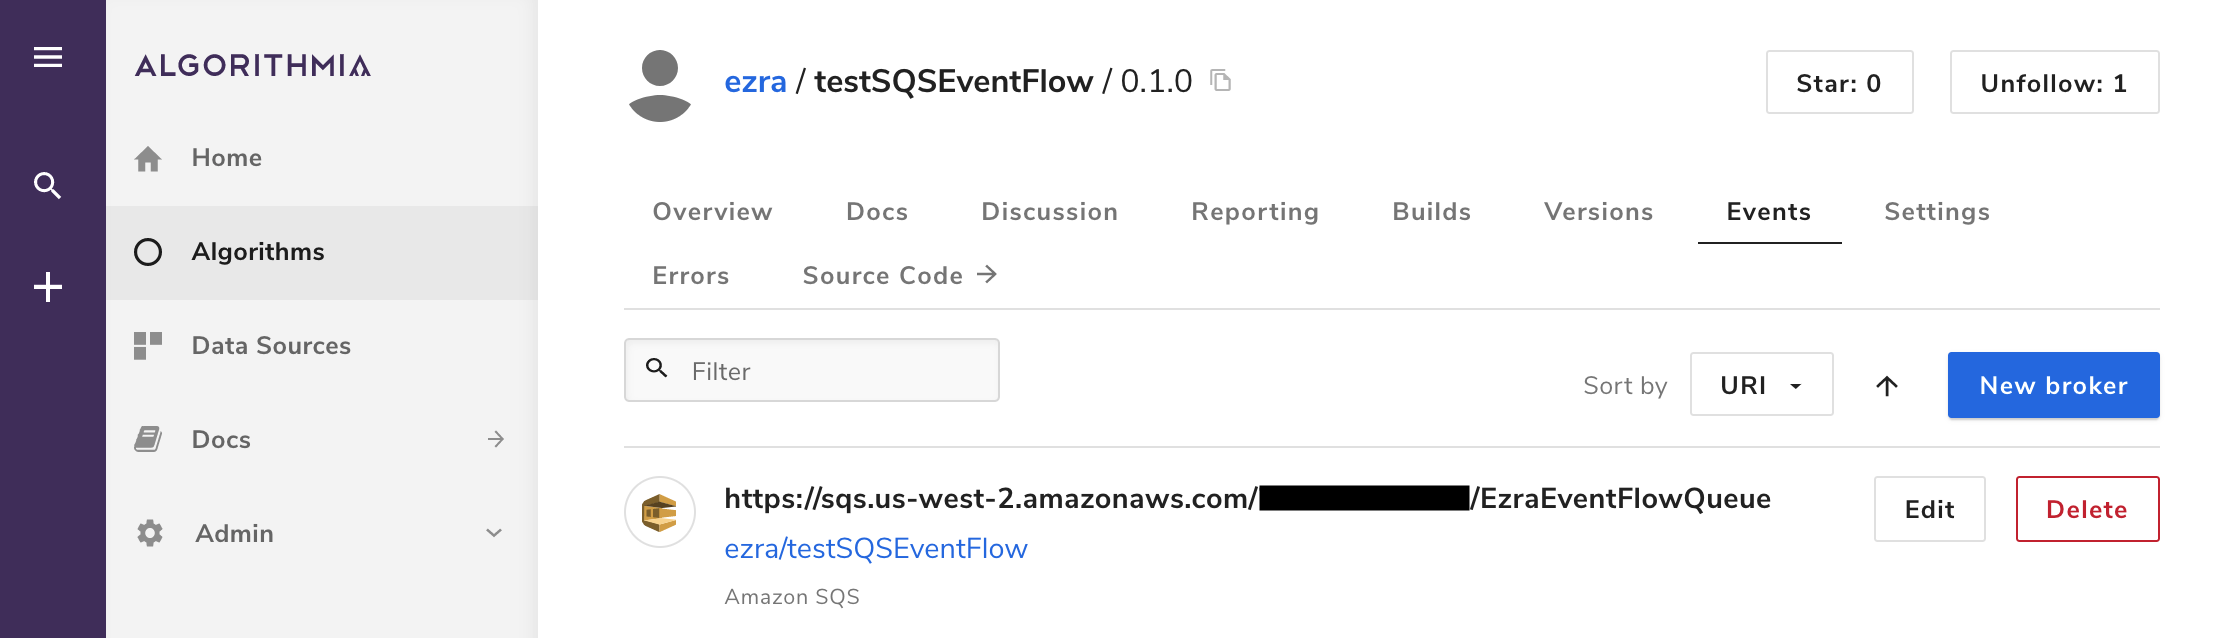
Navigate to your new algorithm’s profile and click the Events tab and then the Connect broker button.

In the modal, enter the QueueURL and QueueConsumerARN stack output values for the URI and ROLE ARN fields, respectively.
The Algorithm endpoint field is auto-populated, and the full algorithm path is shown below the text input field. The version number is optional if the algorithm is published publicly. If it’s only published privately, you’ll either need to specify a semantic version, a version hash, or the string latestPrivate.
Optionally, enter a value for Algorithm timeout in seconds.
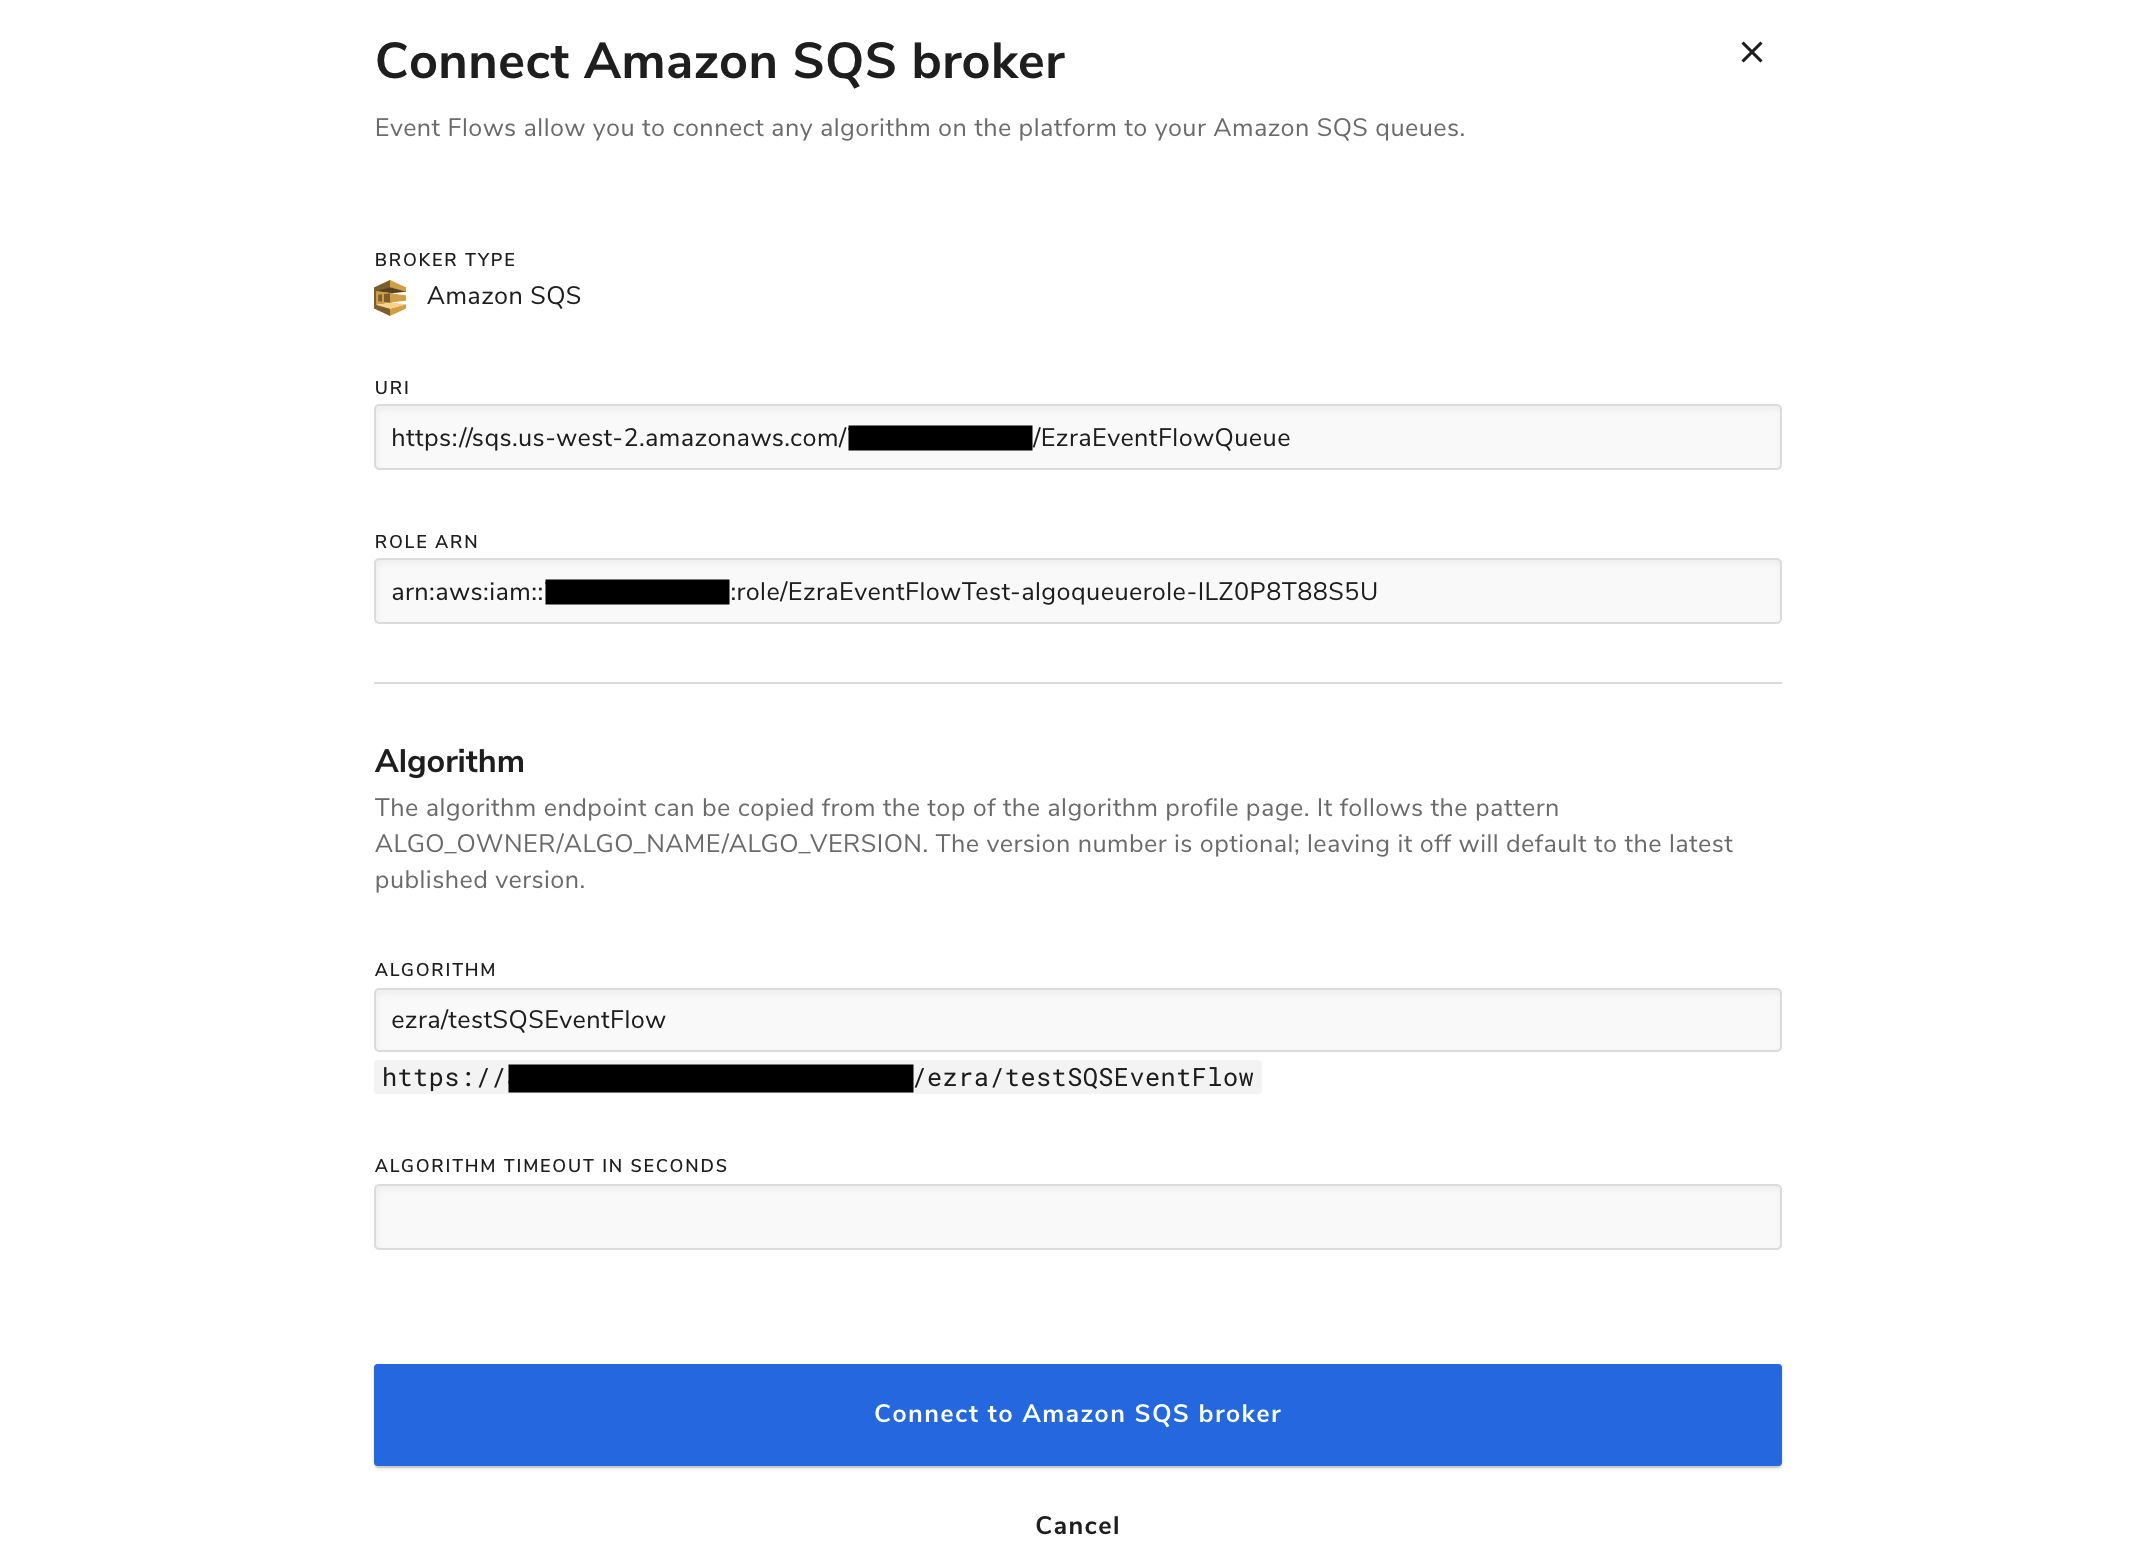
Click Connect to Amazon SQS broker. The Events tab on the algorithm profile will now list your newly created connection.
Click here to skip to the next step to learn how to send messages to the newly connected broker.
Create an Event Listener
This section documents the workflow in Algorithmia versions <20.5.53, where Event Flows were called event listeners. See the section above for the updated Event Flows workflow.
Navigate to the Home tab on the left-hand navigation menu. Click on the Create New button and select Event Listener. Select Amazon SQS from the dropdown.
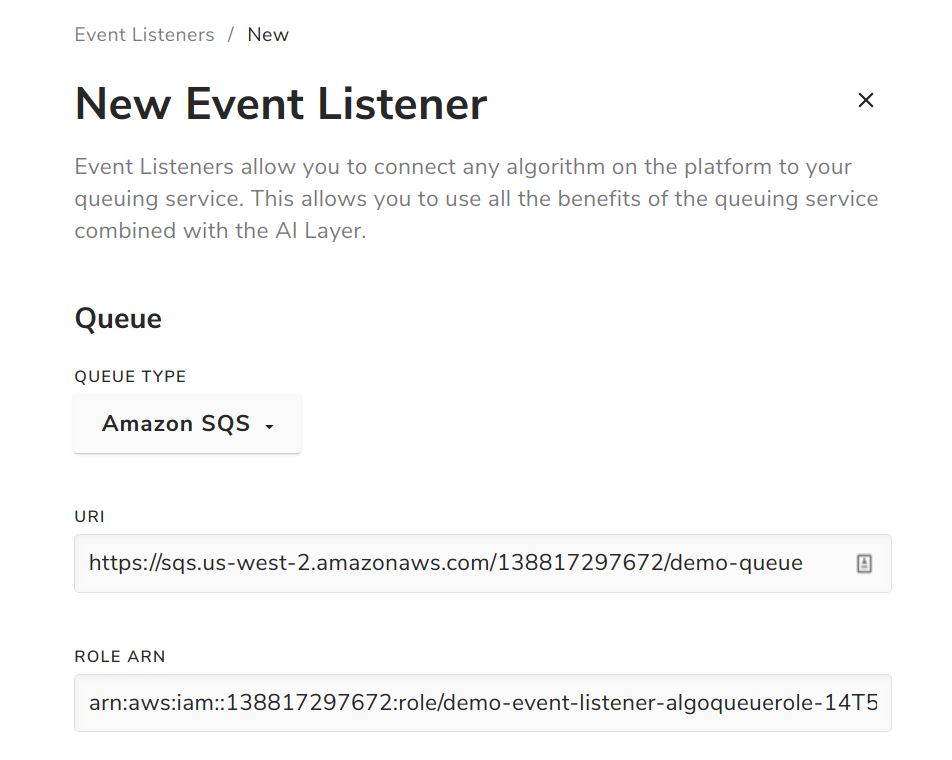
In the modal, enter the QueueURL and QueueConsumerARN stack output values for the URI and ROLE ARN fields, respectively.
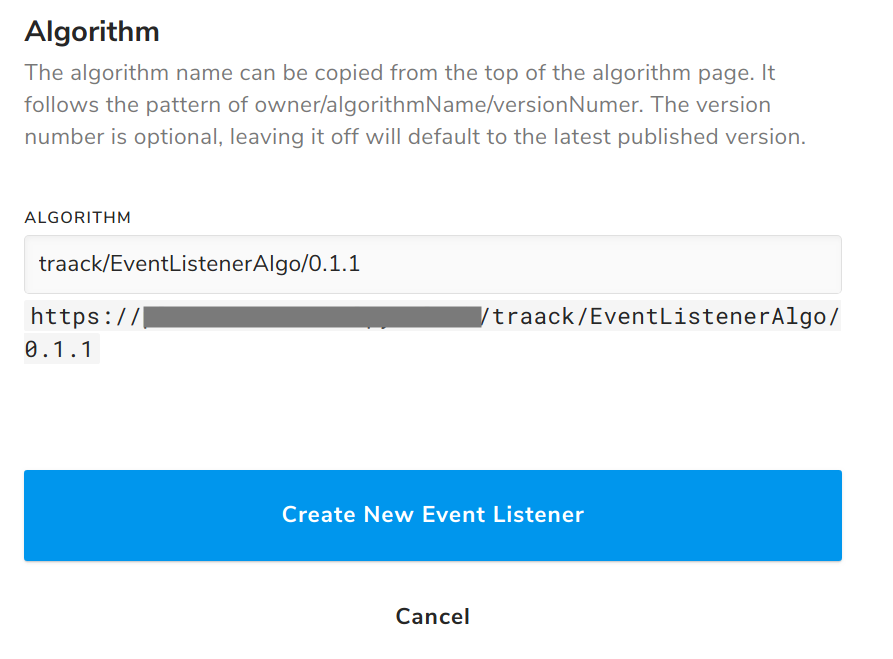
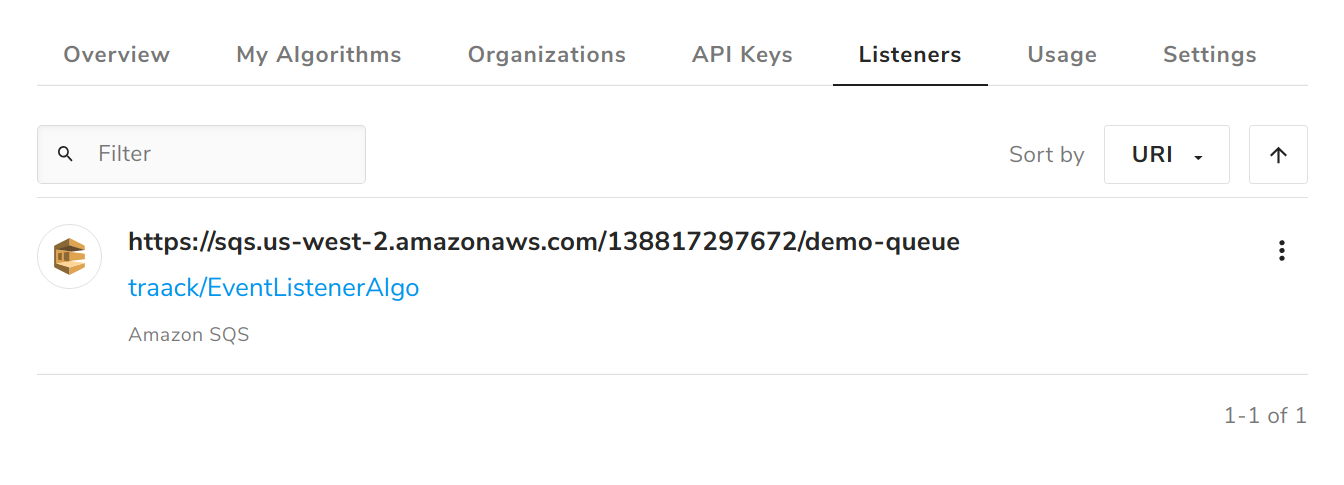
Enter the full path to the algorithm you created above and click Create New Event Listener. The Listeners tab on the algorithm profile will now list your newly created event listener.
4. Sending messages to the broker
Many methods exist for sending messages to Amazon SQS queues. For the purposes of this demonstration, here we show how to send messages in the AWS console.
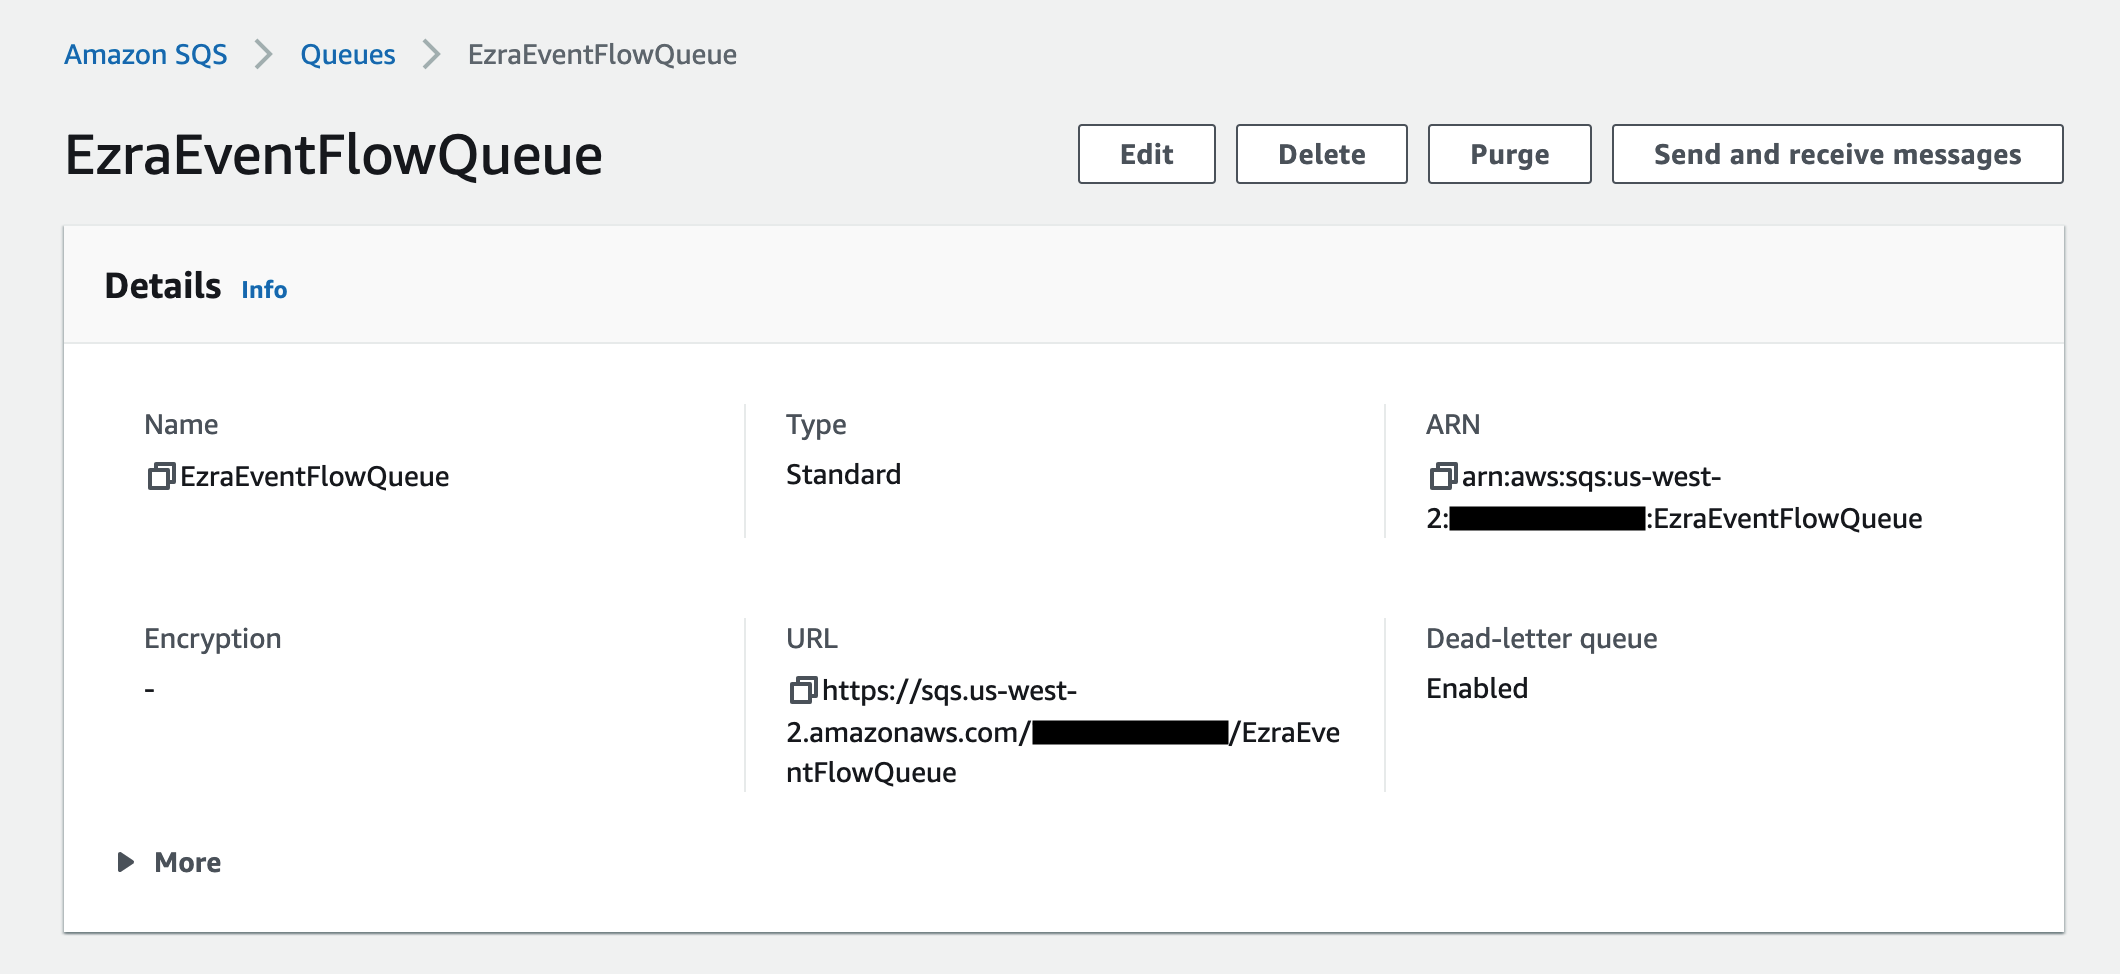
Open the SQS page in the AWS console. Click on the name of the target queue (QueueName from above) and click the Send and receive messages button.
In the Send and receive messages page, in the Message body field enter the message payload to send to the algorithm you created above. For the example code above, you can use the following format.
{
    "filename": "some-new-file.txt",
    "data": "file contents to store"
}
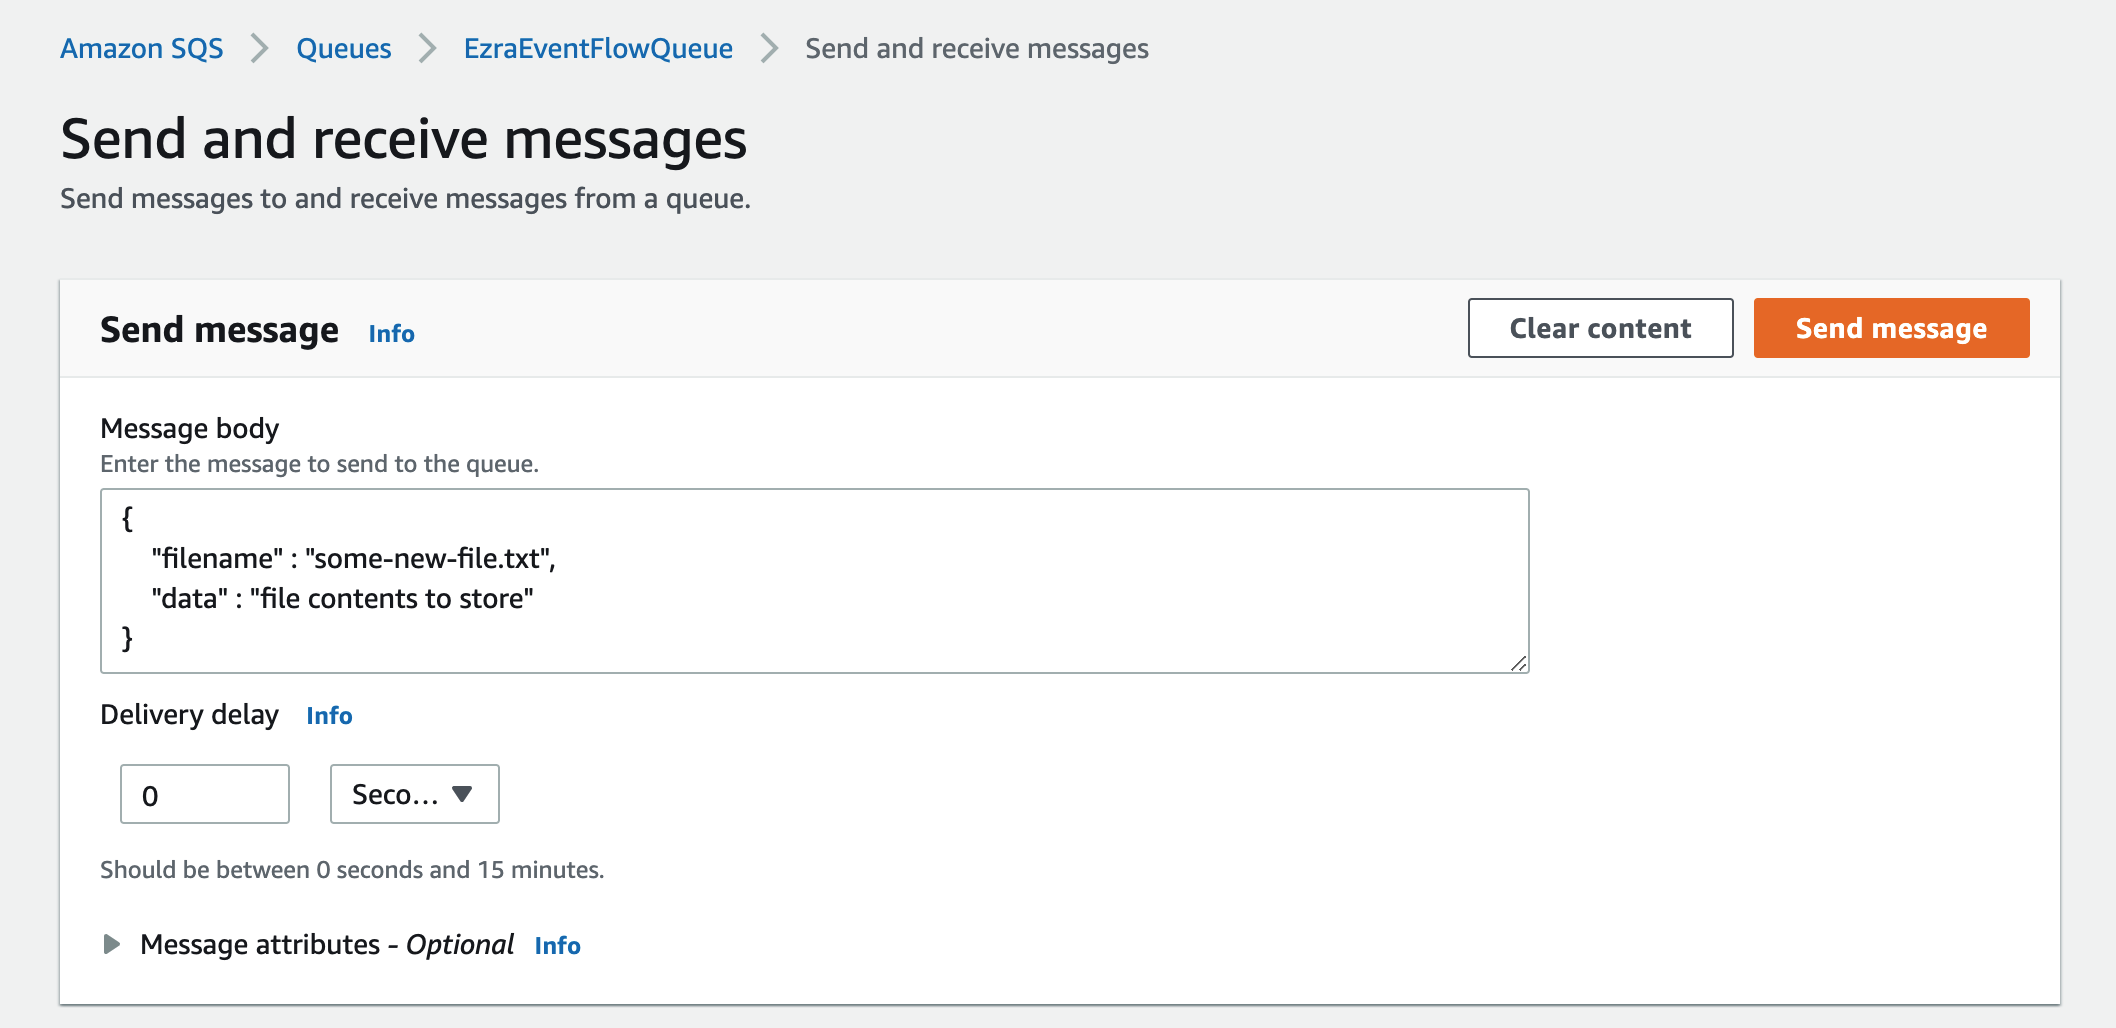
Click Send Message and the payload will be consumed by Algorithmia and sent to the configured algorithm as input for execution.
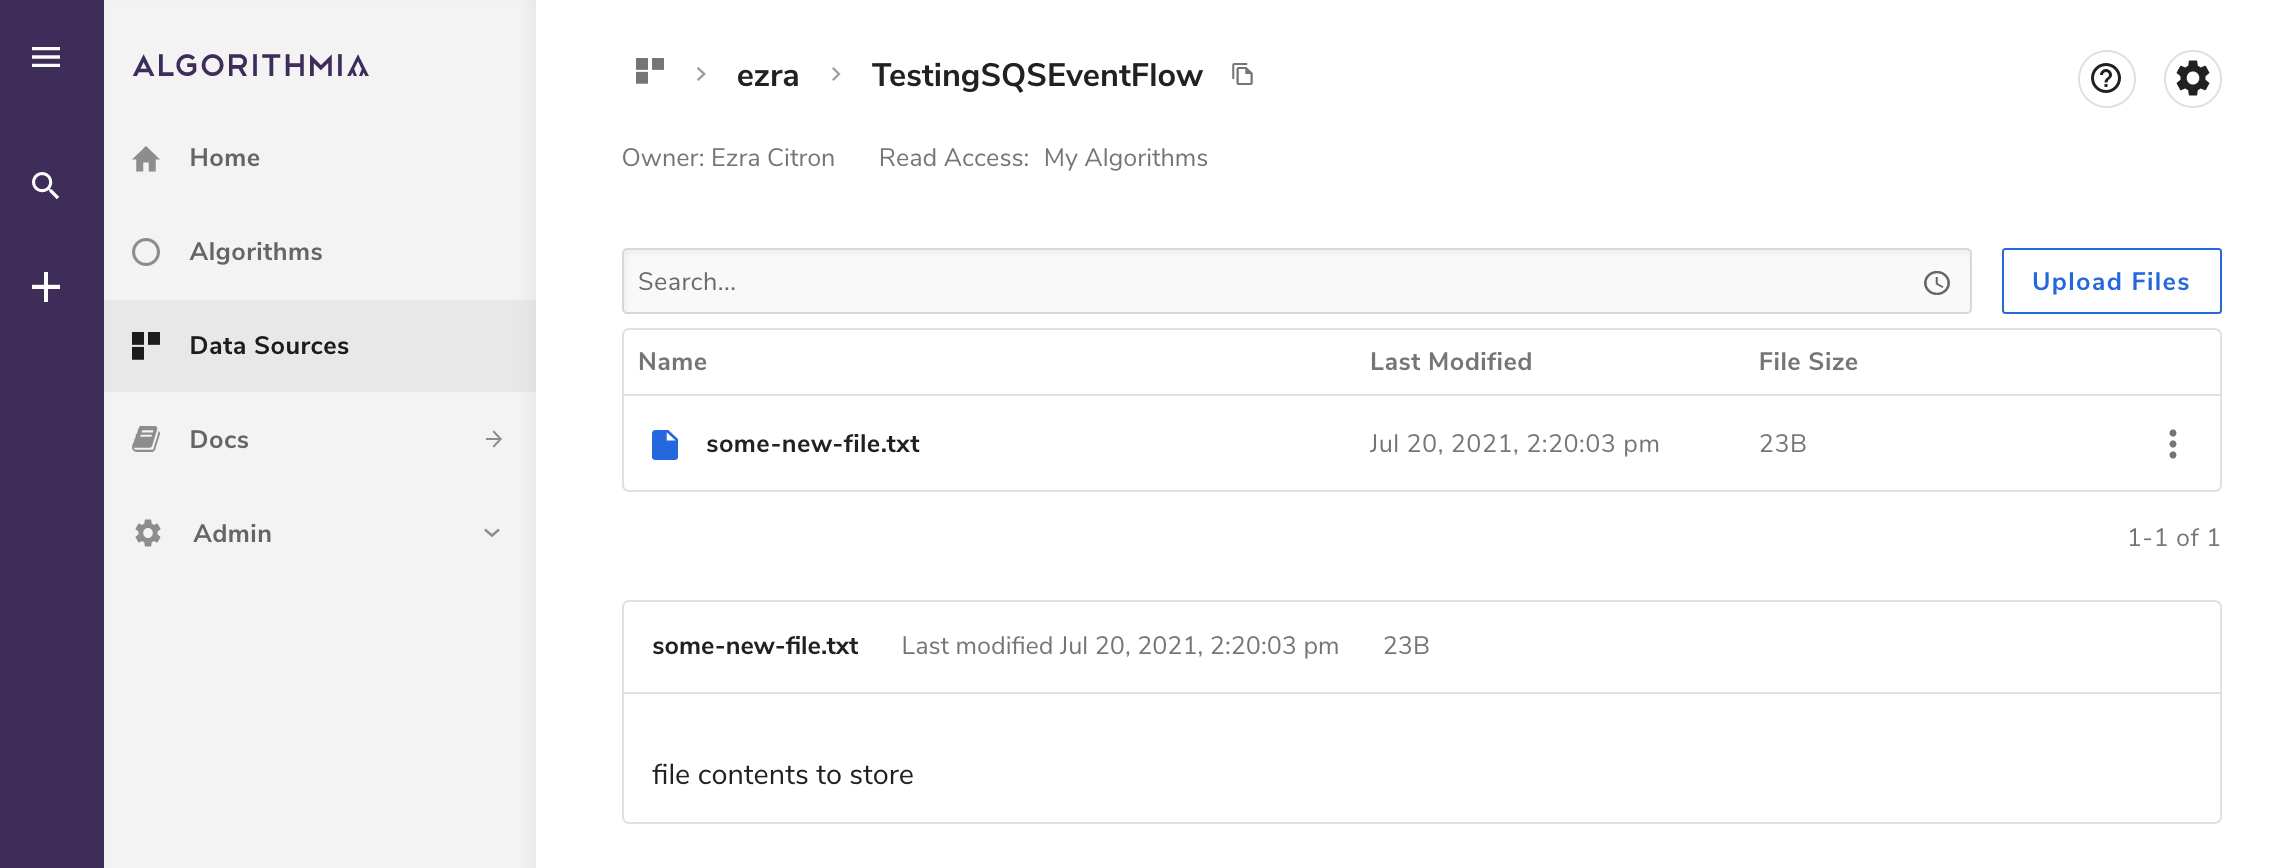
To verify, open the Data Sources menu item in the left sidebar and navigate to the COLLECTION_NAME data collection that you configured above as the destination for your algorithm to write data. Based on the payload shown above in the Message body section, the collection should contain the file some-new-file.txt, with contents equal to the string file contents to store.