This feature is only available in Algorithmia Enterprise installations.
This guide will walk you through setting up Algorithmia Event Flows using an Azure Service Bus (SB) message broker. Once configured, you can create event-driven workflows in which your algorithms subscribe to an SB queue and are automatically invoked with the contents of messages published to the queue.
Event Flow configuration overview
The process of configuring Event Flows with an SB message broker involves multiple steps, some of which are to be completed on the Azure side and some of which are to be completed on the Algorithmia side. At a high level, the configuration steps are:
- Gather required information from Algorithmia.
- On Azure, create a group of resources (including an SB queue) using an Azure Resource Manager (ARM) template or manually as the situation dictates.
- On Algorithmia, create an algorithm and connect it to the SB queue to subscribe to messages published there.
- Test the connection by sending messages to the SB queue to be consumed by the subscriber algorithm.
1. Gathering required information from Algorithmia
Contact support@algorithmia.com to obtain the email address of the Azure account running your Algorithmia cluster.
2. Configuring resources in the Azure portal
NOTE: The steps in this section are to be completed within the Azure Portal.
Configure permissions
NOTE: You only need to complete these permission configuration steps if you’re creating a queue in a different Azure account than the one running your Algorithmia instance.
Create a custom role in your account
To begin, save the following JSON custom role definition as a local file GuestRole.json. You’ll need to replace SUBSCRIPTION_ID with your Azure account’s unique Subscription ID value. This can be found under the Subscriptions service in the Azure portal, and it will be a UUID of the format 51a70446-0c61-4017-577a-9327a28bcb73.
{
  "Name": "QueueReceiver",
  "Id": "SUBSCRIPTION_ID",
  "IsCustom": true,
  "Description": "Can receive messages and get connection string",
  "Actions": [
    "Microsoft.ServiceBus/namespaces/queues/authorizationRules/listkeys/action",
    "Microsoft.ServiceBus/namespaces/queues/read",
    "Microsoft.ServiceBus/namespaces/read"
  ],
  "NotActions": [],
  "DataActions": [
    "Microsoft.ServiceBus/namespaces/messages/receive/action"
  ],
  "NotDataActions": [],
  "AssignableScopes": [
    "/subscriptions/SUBSCRIPTION_ID"
  ]
}
With this file in place, authenticate with the Azure CLI and then create a custom QueueReceiver role in your account with the command below.
$ az role definition create --role-definition GuestRole.json
For more information on how to work with the Azure CLI to complete this step, visit the Azure Docs. Note that this step can also be completed via PowerShell or REST API.
Invite the Algorithmia account as a guest account in your account’s Active Directory
Create a new guest user account with the Algorithmia account’s email address using the following steps:
- Sign in to the Azure portal as an Azure AD administrator.
- In the left-hand navigation menu, select Azure Active Directory (or search for the service in the search bar).
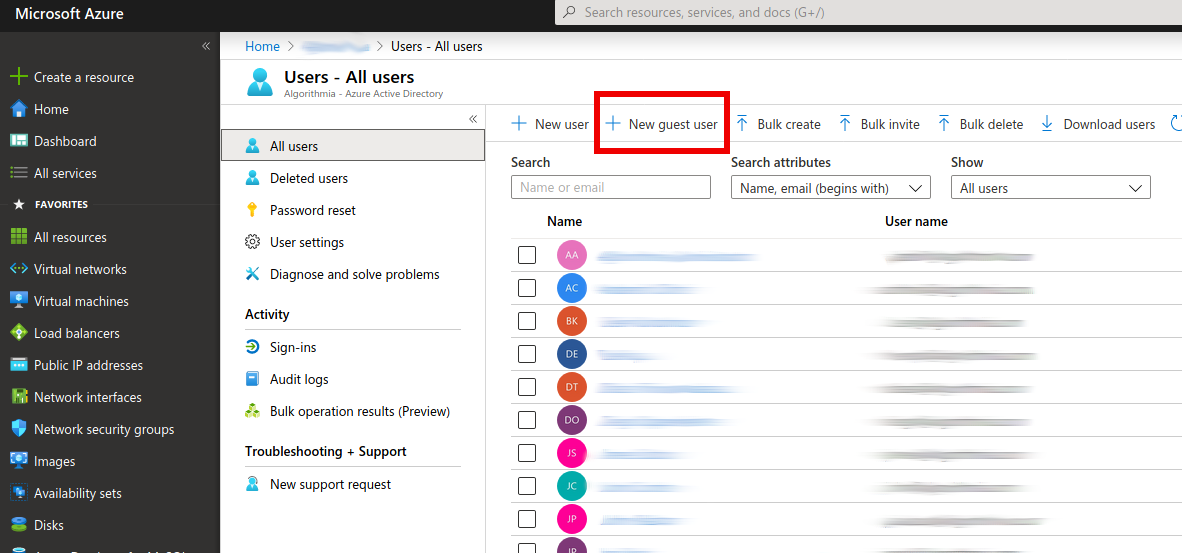
- In the left-hand navigation submenu under Manage, select Users.
- Select + New guest user from the options along the top.
- On the New user page, select Invite user and then add the guest user’s information as follows:
- Identity → Name: first and last name of the guest user
- Identity → Email address: email address obtained in step 1
- Groups and roles → Groups: add the guest user to one or more existing groups, or do it later
- Groups and roles → Roles: select the QueueReceiver role you created above

- Click Invite to automatically send the invitation to the guest user. A “Successfully invited user” notification will appear in the upper-right corner. The user account is now added to the directory as a guest account with the custom role.
Create a Service Bus namespace and queue using an ARM template
To begin using Azure SB, you must create a namespace with a name that’s globally unique across Azure, and a queue to serve as a message broker. We provide the ARM template below to create these resources. See What is Azure Resource Manager? and What are ARM templates? for general information about Azure resource management.
To use this ARM template, search for the Templates service in the portal and click + Create.
In the General page, provide a Name and Description for and click OK.
Now paste the JSON template below into the text field on the ARM template page and click OK and then Add.
{
  "$schema": "https://schema.management.azure.com/schemas/2015-01-01/deploymentTemplate.json#",
  "contentVersion": "1.0.0.0",
  "parameters": {
    "serviceBusNamespaceName": {
      "type": "string",
      "metadata": {
        "description": "Name of the Service Bus namespace"
      }
    },
    "serviceBusQueueName": {
      "type": "string",
      "metadata": {
        "description": "Name of the Queue"
      }
    },
    "location": {
      "type": "string",
      "defaultValue": "westus2",
      "metadata": {
        "description": "Location for all resources."
      }
    }
  },
  "variables": {
    "QueueAPName": "AccessPolicyQueue"
  },
  "resources": [
    {
      "apiVersion": "2017-04-01",
      "name": "[parameters('serviceBusNamespaceName')]",
      "type": "Microsoft.ServiceBus/namespaces",
      "location": "[parameters('location')]",
      "sku": {
        "name": "Standard"
      },
      "properties": {},
      "resources": [
        {
          "apiVersion": "2017-04-01",
          "name": "[parameters('serviceBusQueueName')]",
          "type": "Queues",
          "dependsOn": [
            "[concat('Microsoft.ServiceBus/namespaces/', parameters('serviceBusNamespaceName'))]"
          ],
          "properties": {
            "lockDuration": "PT5M",
            "maxSizeInMegabytes": "1024",
            "requiresDuplicateDetection": "false",
            "requiresSession": "false",
            "defaultMessageTimeToLive": "P10675199DT2H48M5.4775807S",
            "deadLetteringOnMessageExpiration": "false",
            "duplicateDetectionHistoryTimeWindow": "PT10M",
            "maxDeliveryCount": "10",
            "autoDeleteOnIdle": "P10675199DT2H48M5.4775807S",
            "enablePartitioning": "false",
            "enableExpress": "false"
          },
          "resources": [
            {
              "apiVersion": "2017-04-01",
              "name": "[variables('QueueAPName')]",
              "type": "authorizationRules",
              "dependsOn": [
                "[parameters('serviceBusQueueName')]"
              ],
              "properties": {
                "Rights": ["Listen","Send","Manage"]
              }
            }
          ]
        }
      ]
    }
  ],
  "outputs": {
    "QueueConnectionString": {
      "type": "string",
      "value": "[listkeys(variables('QueueAPName'), '2017-04-01').primaryConnectionString]"
    }
  }
}
The newly created template will now appear in the list on the Templates page. If it doesn’t appear immediately, try clicking the gray refresh wheel ( ). Once the template appears, click Deploy from the action menu at right.
In the Custom deployment page, select the name of the Resource group containing the target Algorithmia cluster’s resources.
Fill in the Service Bus Namespace Name field in adherence with the namespace naming rules; this namespace name must be unique across Azure.
Fill in the Service Bus Queue Name field; this will be the name you use to identify your queue from the Algorithmia side.
Fill in the Location field with an appropriate Azure region in which to create this deployment.
Review your selections and click Purchase to deploy the resources. You can view the deployment status in the notifications area (the bell icon) at the upper-right corner.
NOTE: If the deployment fails, it’s possible that there’s already an existing namespace in the same region with the same name that you chose. If the deployment error message indicates that this is the issue, you’ll need to try redeploying with a different name until the deployment is successful.
When the deployment is complete, click on the name of the resource group into which the namespace was deployed. You can filter by service bus namespace to see the newly created resource.

If you click into the namespace, you’ll see the queue listed at the bottom.

In the left-hand navigation submenu under Settings, click Shared access policies and click on the RootManageSharedAccessKey policy, which should have the Manage, Send, Listen claims associated with it. Copy the Primary Connection String from the fly-out menu at right. You’ll use this as the Connection String value when connecting to the queue from Algorithmia, and it will look something like:
Endpoint=sb://test-azure-sb-namespace.servicebus.windows.net/;SharedAccessKeyName=RootManageSharedAccessKey;SharedAccessKey=oq4/9pt9miVFgFWVaPO9ARYyKSro8qfVMzGFMvQzYX8=
Create resources manually
If you aren’t able to use the ARM template and need to create the SB resources manually, follow the steps in the Azure documentation to create a Service Bus namespace and queue.
3. Creating an Event Flow in Algorithmia
NOTE: The steps in this section are to be completed on Algorithmia, from within the browser user interface (UI) or through the API. In this guide, we’ll demonstrate what the workflow looks like in the UI.
Note that you can set up any algorithm to subscribe to an SB message broker so that the algorithm is executed when a message is published to that specific queue. On our platform we refer to this type of event-driven configuration as an Event Flow, and the following demonstrates one possible example of how to set one up.
Create an algorithm
Create a Python 3.x algorithm with a generic Python 3.7 algorithm environment and default settings. If you’re new to Algorithmia or need a quick refresher on how to create and modify algorithms, see our Getting Started Guide.
On the newly created algorithm’s profile, click the Source tab to access the source code in the Web IDE.
In the body of your algorithm, paste the source code below, replacing the COLLECTION_OWNER and COLLECTION_NAME with your Algorithmia account name and the name of a data collection (which you’ll create in a subsequent step), respectively. In the screenshot below the sample code, these values are Ezra and TestingSQSEventFlow, respectively.
import Algorithmia
from Algorithmia import ADK

def apply(input):
    Algorithmia.client().file("data://COLLECTION_OWNER/COLLECTION_NAME/" + input.get("filename")).put(input.get("data"))

algorithm = ADK(apply)
algorithm.init("Algorithmia")

Click the Save and Build buttons and then click Publish when the build completes.
On the newly published algorithm’s profile, copy the algorithm endpoint, which will be in the form ALGO_OWNER/ALGO_NAME/ALGO_VERSION; in the screenshot below, this is ezra/testAzureSB/0.1.0.

Create a hosted data collection
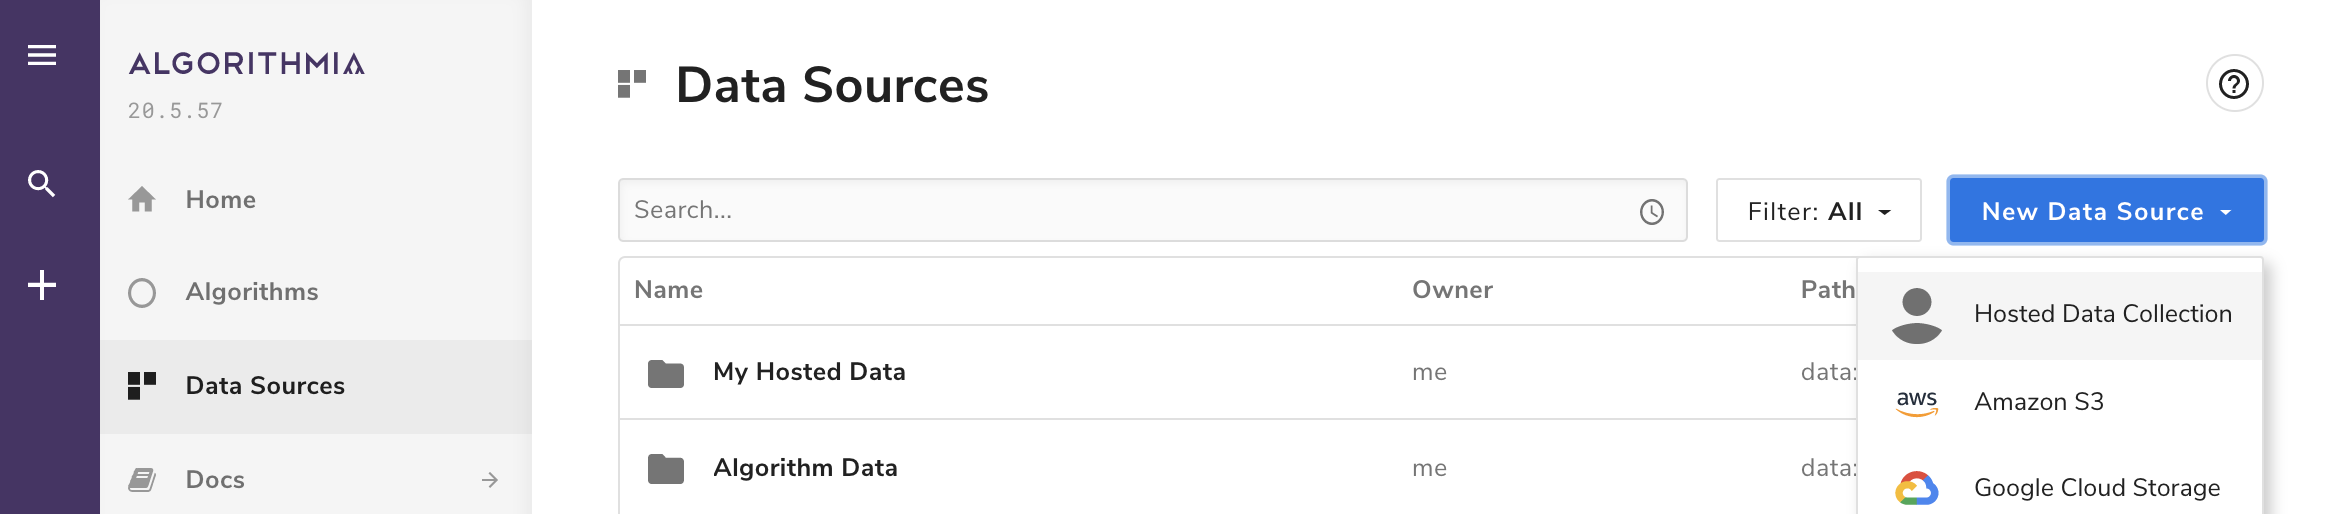
Now create a hosted data collection to which the algorithm above will write the records read from the message broker. To begin, click the Data Sources menu item in the left-hand navigation bar. Click New Data Source and then Hosted Data Collection.
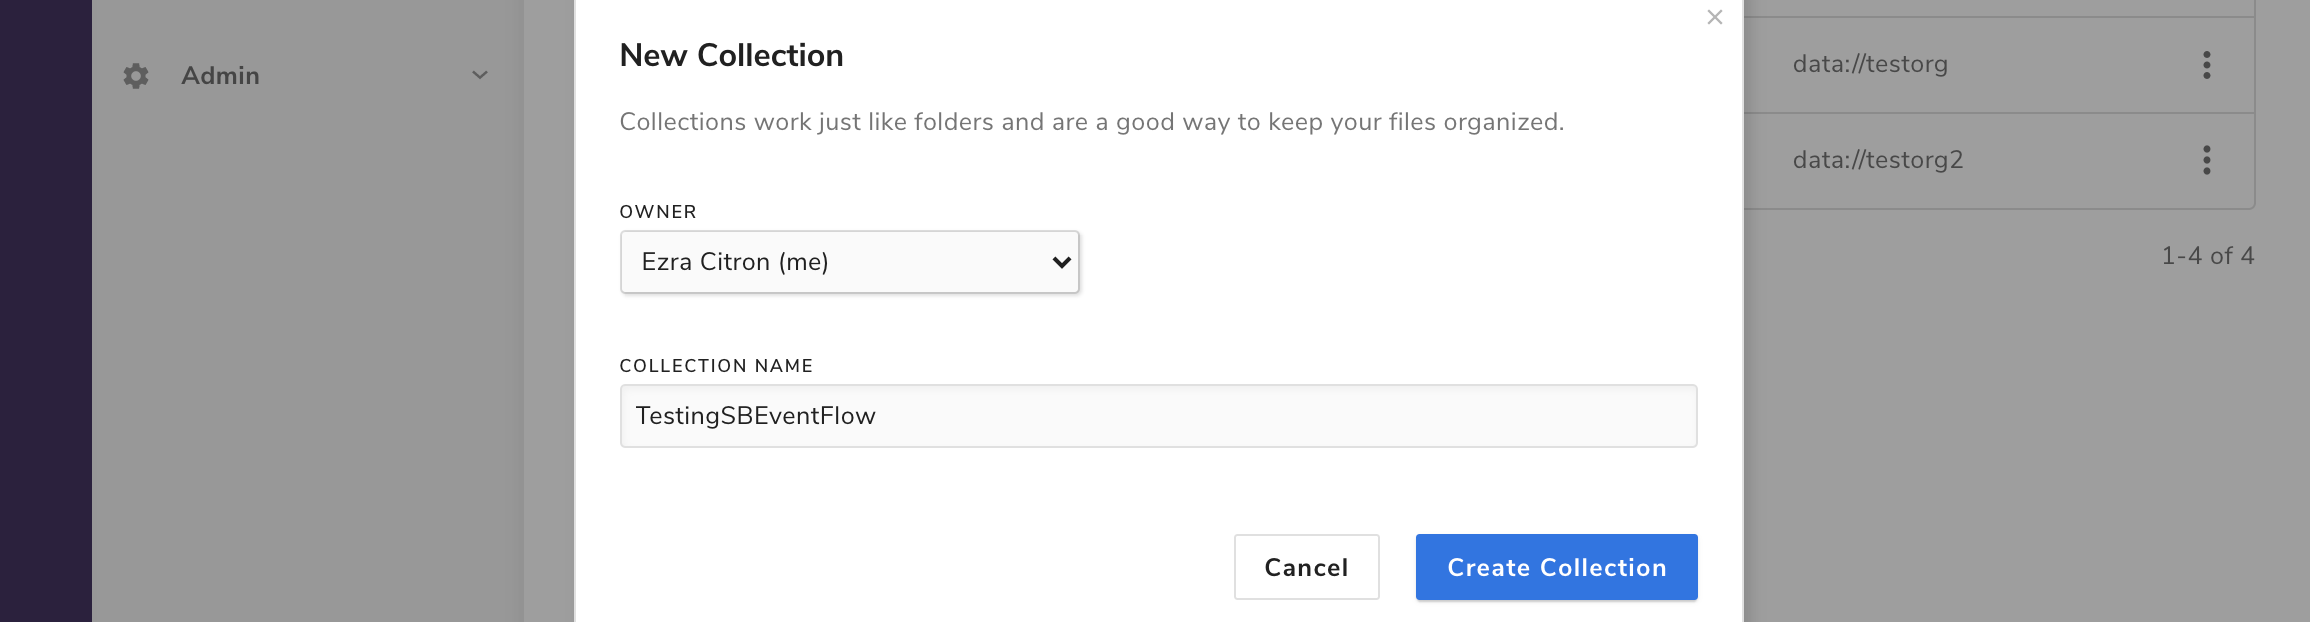
In the dialog box that appears, enter the COLLECTION_NAME value from above (in this case, TestingSBEventFlow) and click Create Collection.
Connect to an SB message broker
This section documents the workflow in Algorithmia versions >=20.5.53. See the section below for the previous event listeners-based workflow.
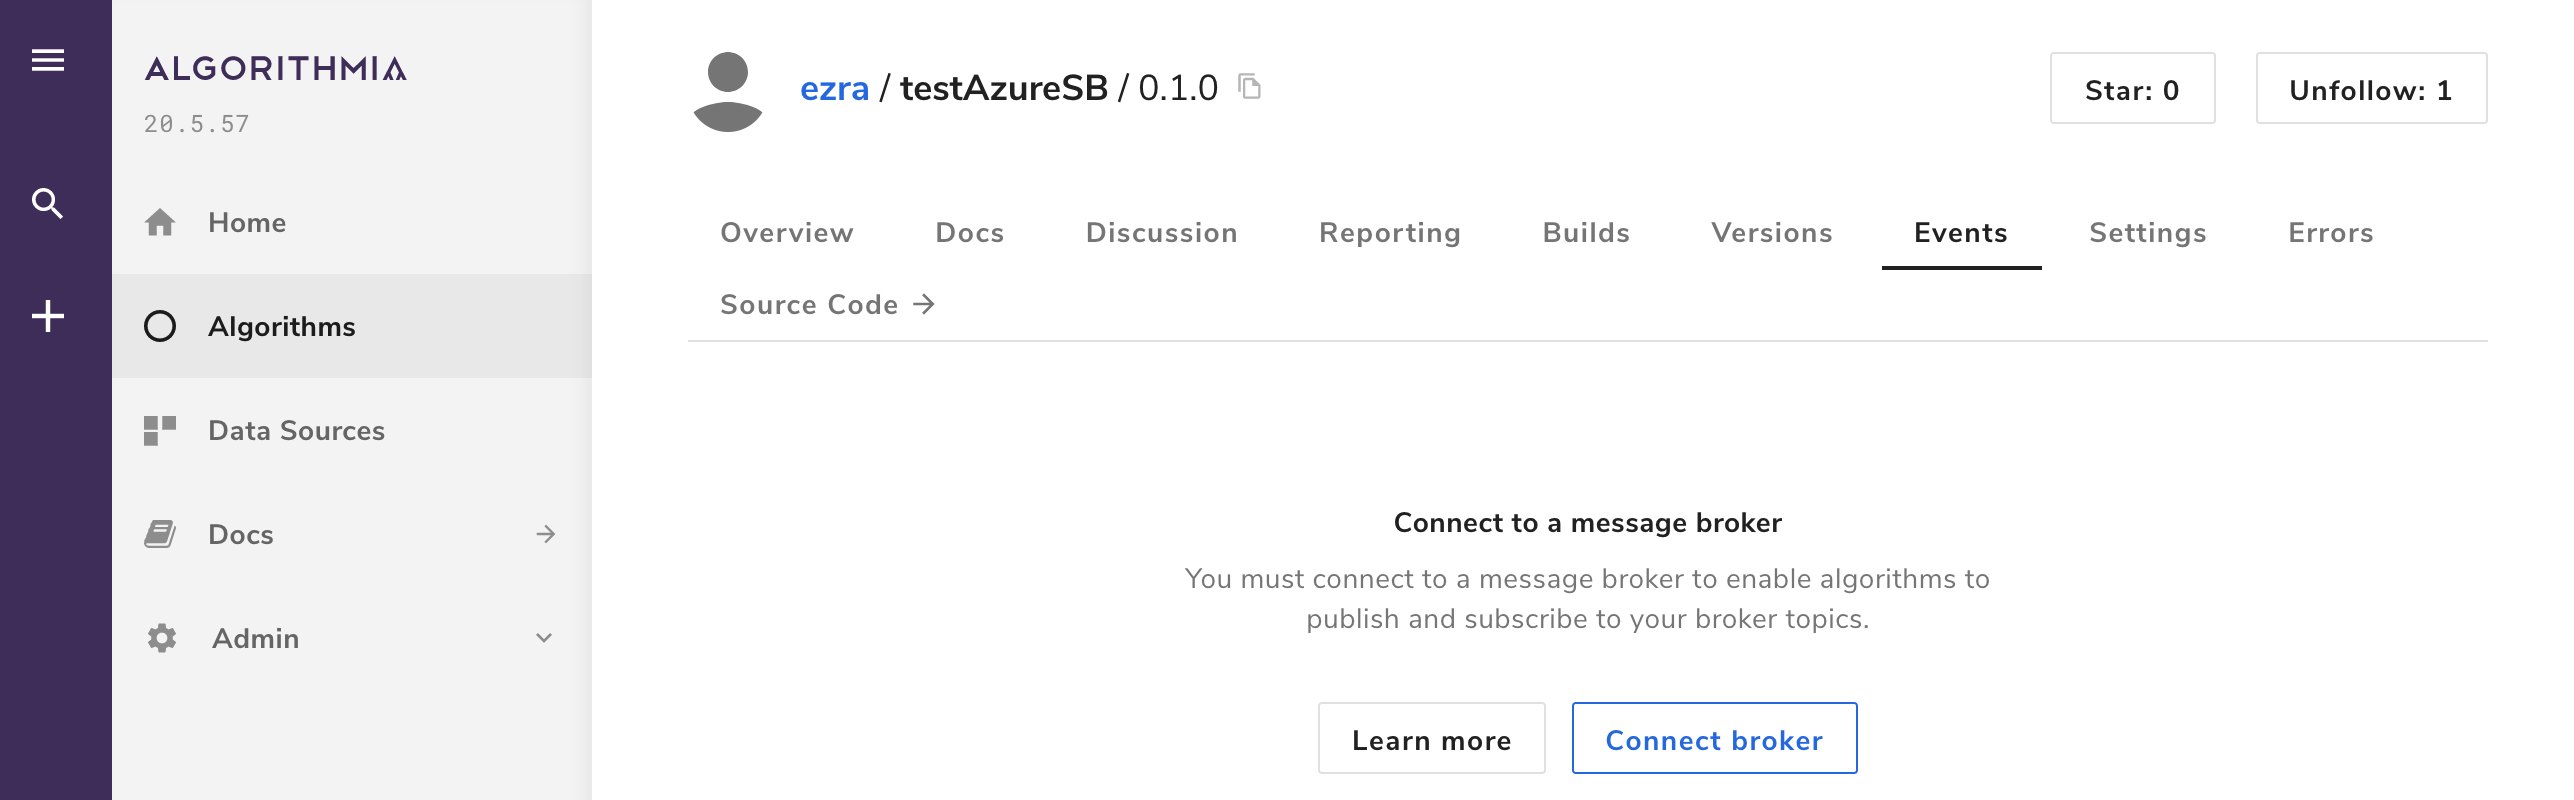
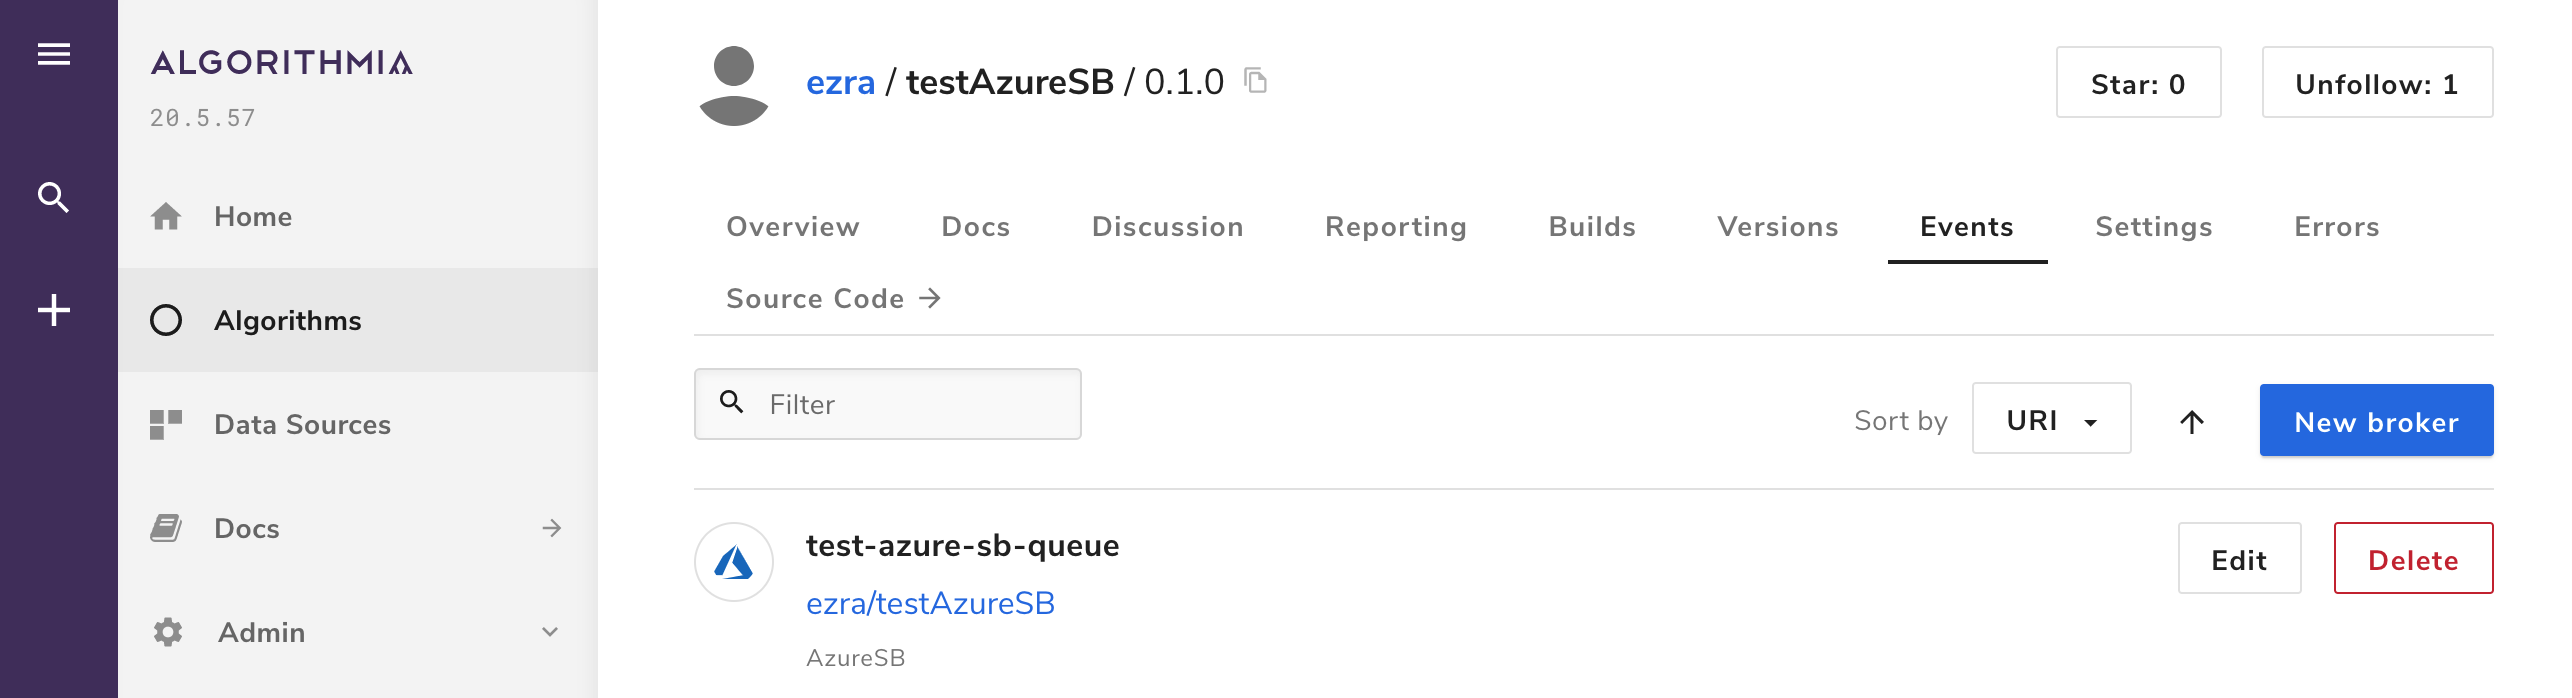
Navigate to your new algorithm’s profile and click the Events tab and then the Connect broker button.
In the modal, enter the Queue Name and Connection String values from above.
The Algorithm endpoint field is auto-populated, and the full algorithm path is shown below the text input field. The version number is optional.
Optionally, enter a value for Algorithm timeout in seconds.

Click Connect to Azure SB broker. The Events tab on the algorithm profile will now list your newly created connection.
Click here to skip to the next step to learn how to send messages to the newly connected broker.
Create an Event Listener
This section documents the workflow in Algorithmia versions <20.5.53, where Event Flows were called event listeners.
Navigate to the Home tab on the left-hand navigation menu. Click on the Create New button and select Event Listener. Select Azure SB from the dropdown.

In the modal, enter the Queue Name and Connection String.
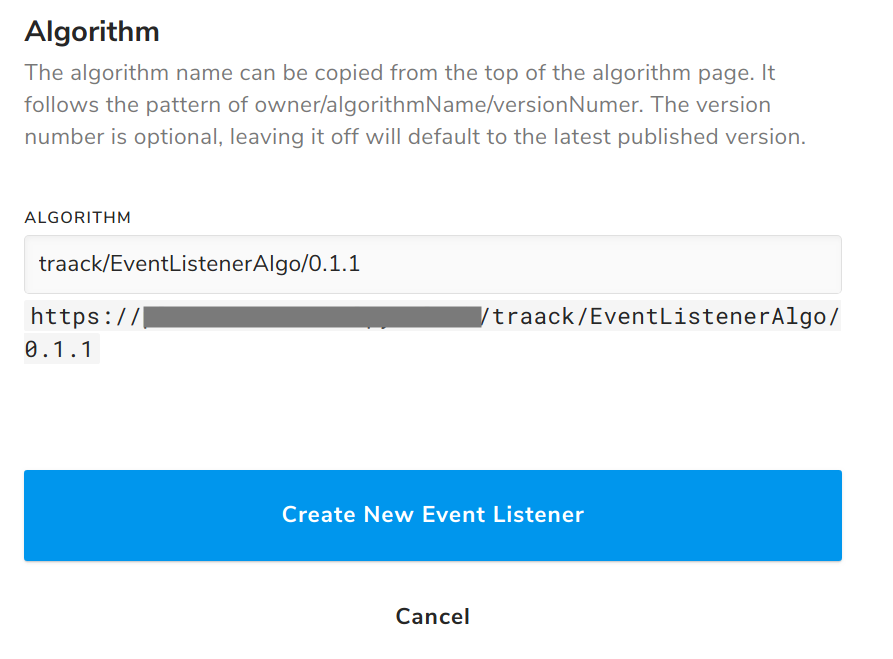
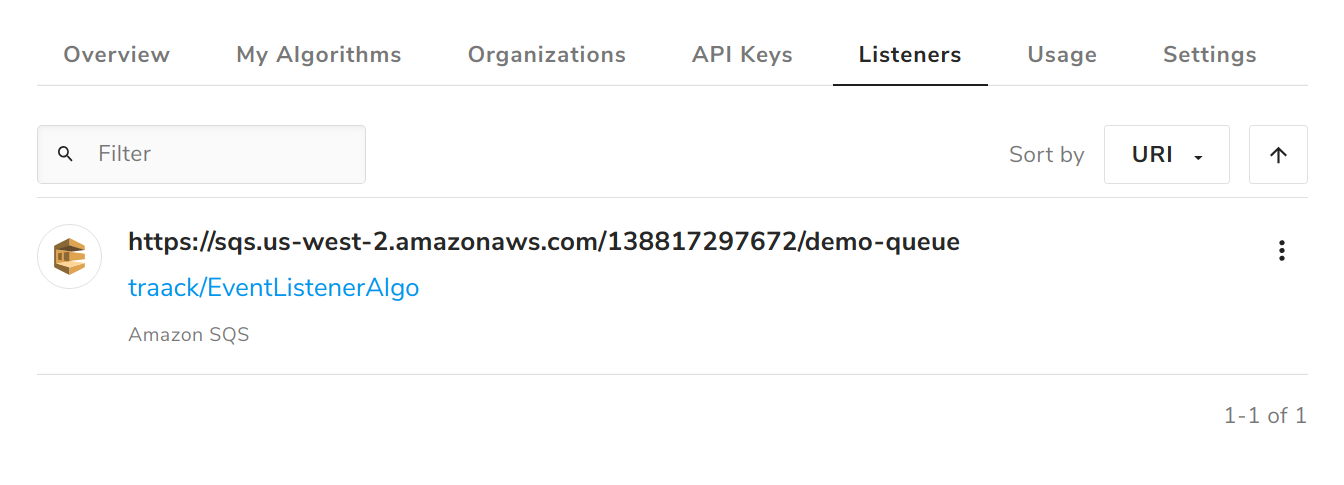
Enter the full path to the algorithm you created above and click Create New Event Listener. The Listeners tab on the algorithm profile will now list your newly created event listener.
4. Sending messages to the broker
Many methods exist for sending messages to Azure SB queues. For the purposes of this demonstration, here we show how to do it using Azure’s Python SDK for Service Bus queues.
Create an algorithm
To begin, create another Python 3.x algorithm with a generic Python 3.7 algorithm environment and default settings.
Store the connection string in the Secret Store
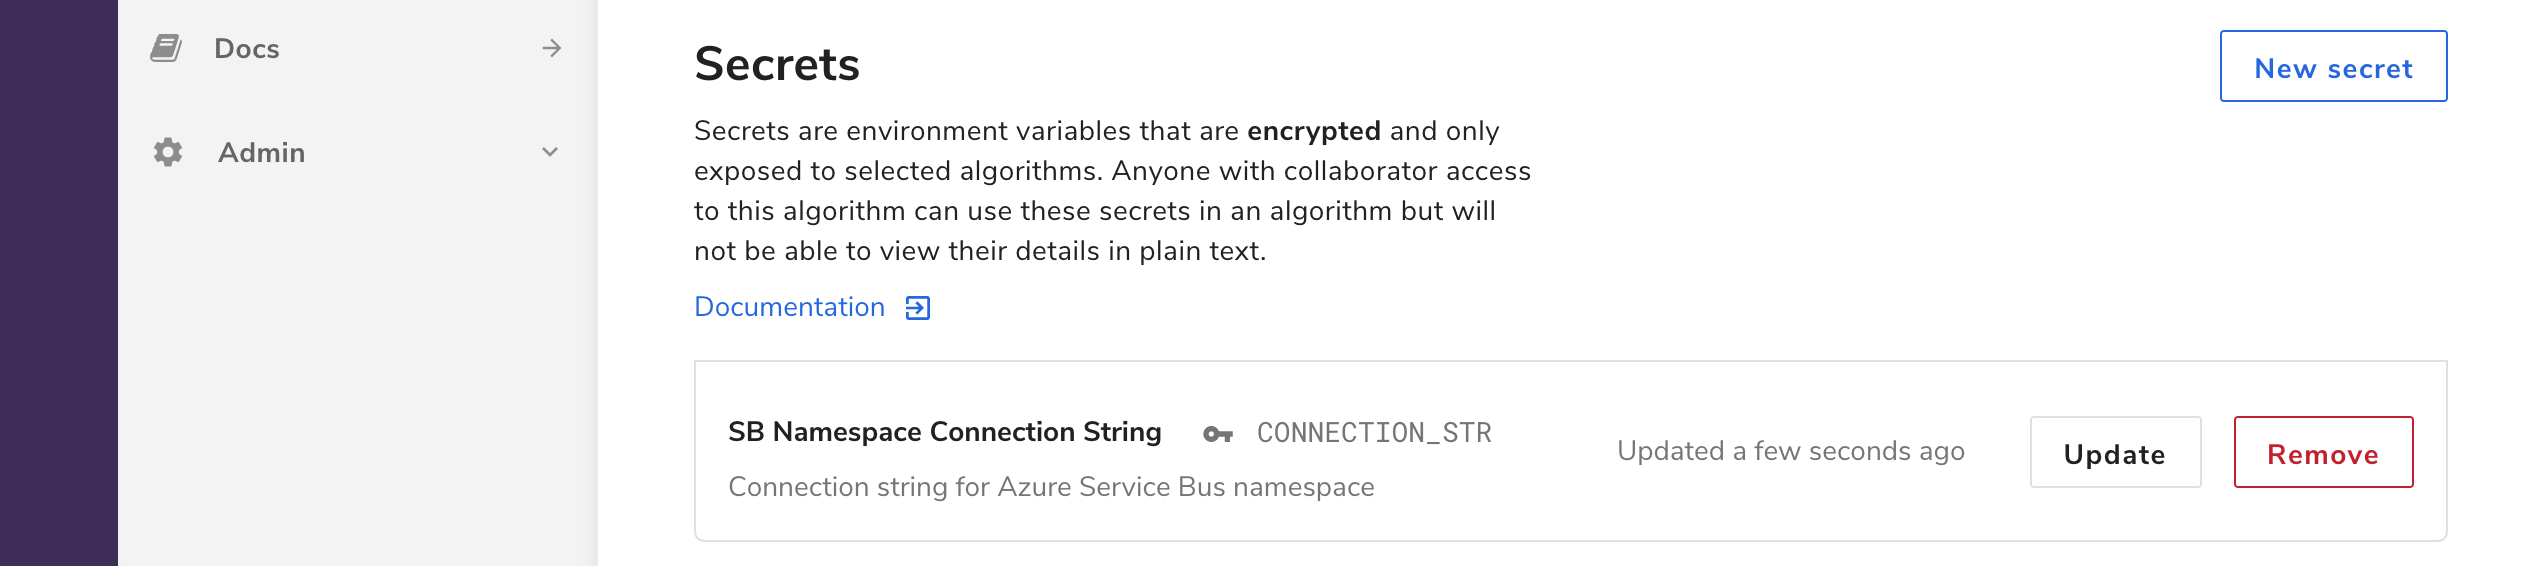
On the newly created algorithm’s profile, click the Settings tab and find the Secret Store section. Add a new secret called CONNECTION_STR with the contents of the connection string from the SB message broker connection step above. For more information on how to use the secret store, see the Secret Store docs.
Modify, build, and publish the algorithm
Click the Dependencies button and add the Azure Service Bus package, which Algorithmia will pull down automatically from PyPI when the algorithm is built. (If developing locally, you’ll add this to the requirements.txt file.)
algorithmia>=1.0.0,<2.0
azure-servicebus==7.3.1
In the body of your algorithm, paste the source code below, replacing the QUEUE_NAME value with the Queue Name string from the SB message broker connection step above. For more details on how to use this SDK, including how to send messages in batches, see Azure’s Service Bus SDK documentation.
import os
import json

import Algorithmia
from Algorithmia import ADK
from azure.servicebus import ServiceBusClient, ServiceBusMessage

CONNECTION_STR = "CONNECTION_STR"
QUEUE_NAME = "QUEUE_NAME"

def send_single_message(sender, message):
    # Send the message to the queue
    sender.send_messages(message)
    print("Sent a single message.")

def apply(input):
    """Send a message to the queue.

    input format:
      {"filename": "some-new-file.txt", "data": "file contents to store"}
    """

    # Create a Service Bus message
    message = ServiceBusMessage(json.dumps(input))
    # Create a Service Bus client using the connection string
    servicebus_client = ServiceBusClient.from_connection_string(
      conn_str=CONNECTION_STR,
      logging_enable=True)
    with servicebus_client:
        # Get a Queue Sender object to send messages to the queue
        sender = servicebus_client.get_queue_sender(queue_name=QUEUE_NAME)
        with sender:
            # Send one message
            send_single_message(sender, message)
    return "Sent a message to the queue."

algorithm = ADK(apply)
algorithm.init("Algorithmia")
Click the Save and Build buttons, and then Publish the algorithm.
3. Sending messages to the SB queue
To send a test message, call the algorithm with input in the following format.
{
    "filename": "some-new-file.txt",
    "data": "file contents to store"
}
To verify, open the Data Sources menu item in the left sidebar and navigate to the COLLECTION_NAME data collection that you configured above as the destination for your algorithm to write data. Based on the payload shown above in the Message body section, the collection should contain the file some-new-file, with contents equal to the string file contents to store.
