 Arize
ArizeArize AI is an ML observability platform that helps ML practitioners successfully take models from research to production, with ease. Arize’s automated model monitoring and analytics platform helps ML teams quickly detect issues the moment they emerge, troubleshoot why they happened, and improve overall model performance. By connecting offline training and validation datasets to online production data in a central inference store, ML teams are able to streamline model validation, drift detection, data quality checks, and model performance management.
Arize AI acts as the guardrail on deployed AI, providing transparency and introspection into historically black-box systems to ensure more effective and responsible AI. To learn more about Arize or ML observability and monitoring, visit their blog and resource hub
In this guide, we’ll show you how to integrate Arize with Algorithmia so you can bring their real-time monitoring capabilities to your algorithms. To make use of this integration, you’ll need to have an Arize account configured.
Overview
The workflow documented below contains steps that you’ll complete in a model training environment (e.g., a Jupyter notebook) outside of the Algorithmia platform, steps that you’ll need to complete within Algorithmia, and steps that you’ll complete from an external application once the algorithm is built on Algorithmia. At a high level, the workflow looks like this:
- Train and serialize a model.
- Upload the model file to a data collection hotsed on Algorithmia or to some other data repository to make it available to be loaded into an algorithm.
- Create an algorithm to load your model. Within the body of the algorithm, log metrics to Arize using the Arize client.
- From some external application, call the algorithm for inference. In this guide, we show this step from a Jupyter notebook, but it could be from any external client or application.
The following code is intended to be executed on some training platform external to Algorithmia (e.g., in a Jupyter notebook).
Training and serializing your model
To demonstrate the end-to-end workflow, we’ll first walk through training a simple scikit-learn model, and then we’ll show how to deploy that model on Algorithmia and send metrics to Arize from within your algorithm.
As with any Algorithmia algorithm, you can use the platform and tools of your choice for training your model. The code below represents one possible training workflow in a Jupyter notebook. To work with this code, see the GitHub repo.
In your training environment, you’ll first need to install these third-party libraries using pip or the tool of your choice.
algorithmia>=1.0.0,<2.0
joblib==1.0.1
numpy>=1.0
pandas<2.0,>=0.25.3
scikit-learn<1.0
shap==0.39.0
Train your model, generate some predictions, and then serialize the trained model.
import os
import time

import Algorithmia
import joblib
import numpy as np
import pandas as pd
from sklearn.linear_model import LogisticRegression
from sklearn.model_selection import train_test_split

# Load and split data.
from sklearn import datasets
data = datasets.load_breast_cancer()
X, y = datasets.load_breast_cancer(return_X_y=True)
X, y = (
    pd.DataFrame(X.astype(np.float32), columns=data["feature_names"]),
    pd.Series(y)
)

X_train, X_test, y_train, y_test = train_test_split(X, y, random_state=42)

# Fit a simple logistic regression model.
clf = LogisticRegression(max_iter=3000, verbose=False).fit(X_train, y_train)

# Generate predictions from the model.
y_train_pred = clf.predict(X_train)
y_test_pred = clf.predict(X_test)

# Create a directory to save serialized model files.
model_dir = "models/"
if not os.path.exists(model_dir):
    os.mkdir(model_dir)

# Serialize the model, adding a unique timestamp for versioning.
model_file = "Algorithmia_Tutorial_Model_{}.joblib".format(round(time.time()))
model_file_path = model_dir+model_file
joblib.dump(clf, model_file_path)
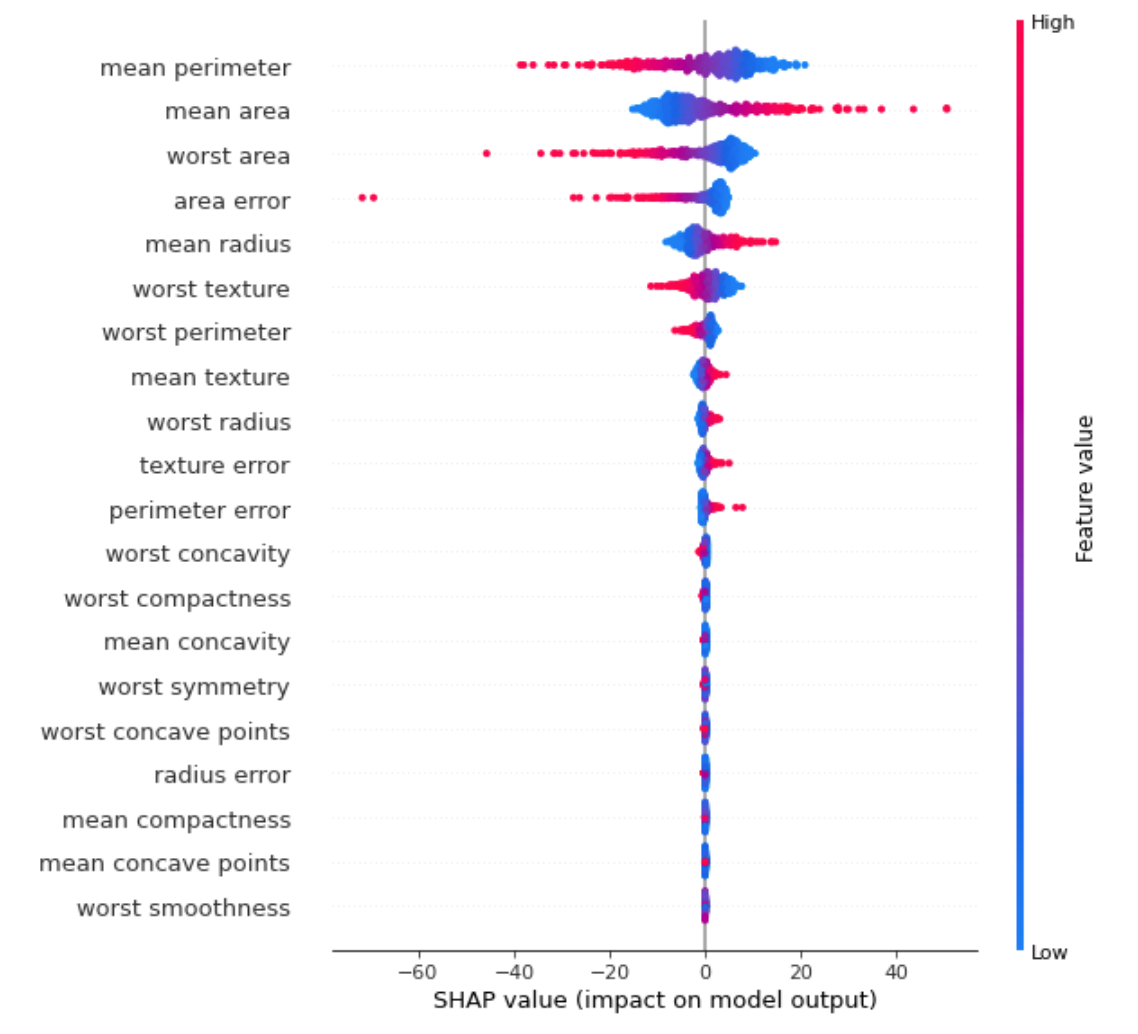
Generating explainability values using SHAP
SHAP (SHapley Additive exPlanations) is a game theoretic approach to explain the output of any ML model. For in-depth details on how to use the shap library, visit SHAP Core Explainers. The code below creates a visual to verify that SHAP values are being properly generated for explainability (to generate the plot, you’ll need to install matplotlib).
import shap
def get_shap_values(model, X_data, ExplainerType=shap.Explainer, show_graph=False):
    # NOTE: If there are errors, you'll need to manually select the explainer class.
    explainer = ExplainerType(model, X_data)
    shap_values = explainer.shap_values(X_data)

    # In development, it can be valuable to check graphs for feature explainability.
    if show_graph:
        shap.summary_plot(shap_values, X_data, feature_names=data['feature_names'])

    # NOTE: The Arize API expects a pandas DataFrame of the same shape and with
    #       the same column names as the model features.
    return pd.DataFrame(shap_values, columns=data["feature_names"])

shap_values = get_shap_values(clf, X, show_graph=True)
Uploading your serialized model to Algorithmia
You can use the following code to upload your model to a hosted data collection on Algorithmia, without ever leaving your training environment. Note that if you’re running Algorithmia Enterprise, you’ll need to specify the API endpoint CLUSTER_DOMAIN when you create the Algorithmia client object; if not, delete the references to this variable.
You’ll need to replace the COLLECTION_OWNER string with the name of the user or org account that owns the data collection. You’ll upload your model to that data collection and in your algorithm source code you’ll replace the COLLECTION_NAME string with the name of that data collection. The Algorithmia API key you’re using must have write access to this data collection. See our Hosted Data docs for information about how to use hosted data collections.
Finally, this code assumes that you’ve set the ALGORITHMIA_API_KEY environment variable to the value of your Algorithmia API key.
# Define where model and sample data will live.
CLUSTER_DOMAIN = "CLUSTER_DOMAIN"
COLLECTION_OWNER = "COLLECTION_OWNER"
COLLECTION_NAME = "COLLECTION_NAME"

ALGORITHMIA_API_KEY = os.getenv("ALGORITHMIA_API_KEY")

# Create a hosted data collection if it doesn't already exist.
client = Algorithmia.client(ALGORITHMIA_API_KEY, "https://"CLUSTER_DOMAIN)
collection_uri = "data://"+COLLECTION_OWNER+"/"+COLLECTION_NAME
collection = client.dir(collection_uri)
if not collection.exists():
    collection.create()

# Upload model file and test data to data collection.
client.file(collection_uri+"/"+model_file).putFile(model_file_path)
The following represents the algorithm code that you would deploy on Algorithmia, not the training platform used above.
Setting up your Algorithmia environment for model deployment
Create an algorithm
To begin, on Algorithmia you’ll need to create an algorithm using an environment with Python 3.6 or later.
Set Arize secrets in the Secret Store
In order to log metrics to Arize, you’ll need a pair of Arize API keys, which are accessible through the Arize Settings page. In your newly create algorithm profile’s Settings tab, set ARIZE_API_KEY and ARIZE_ORG_KEY as secrets so that they’ll be made accessible to the algorithm as environment variables. For more information on how to set secret values, see our Secret Store documentation.
Define the algorithm’s requirements
In your algorithm’s requirements.txt file, add the Arize Python library to add the monitoring capabilities provided by Arize, as well as the shap library and the standard ML dependencies joblib and pandas.
algorithmia>=1.0.0,<2.0
arize>=2.1.6
joblib==1.0.1
pandas<2.0,>=0.25.3
shap==0.39.0
If you’re using the Web IDE, the requirements file can be accessed through the Dependencies button.
Recall from the code samples above that if you’ll be interacting with Algorithmia from outside of the Web IDE, you must also set the ALGORITHMIA_API_KEY environment variable with the value of your Algorithmia API key. This API key only needs to have read access.
Write the algorithm’s source code, build, and then publish
This algorithm establishes a connection with Arize using the Arize Client, and then uses the Client’s log_bulk_predictions() and log_bulk_shap_values() methods to send Arize the predictions and SHAP values for monitoring. Note that in the code below you must replace the COLLECTION_OWNER and COLLECTION_NAME strings with the name of the account that owns the collection where the mode is stored, and the collection name.
import os
import uuid

import Algorithmia
from arize.api import Client
from arize.types import ModelTypes
import joblib
import pandas as pd
import shap

# Define where model and sample data live.
COLLECTION_OWNER = "COLLECTION_OWNER"
COLLECTION_NAME = "COLLECTION_NAME"

# Specify the exact model version your algorithm will be calling.
# The timestamp (`1617923983`) will be different for your model.
MODEL_NAME = "Algorithmia_Tutorial_Model_1617923983.joblib"

# Load keys from environment variables and instantiate clients.
ARIZE_API_KEY = os.getenv("ARIZE_API_KEY")
ARIZE_ORG_KEY = os.getenv("ARIZE_ORG_KEY")
ALGORITHMIA_API_KEY = os.getenv("ALGORITHMIA_API_KEY")

arize_client = Client(organization_key=ARIZE_ORG_KEY, api_key=ARIZE_API_KEY)
algo_client = Algorithmia.client(ALGORITHMIA_API_KEY, CLUSTER_DOMAIN)

def load_model(data_uri):
    """Load sklearn model from data collection and return model object."""
    model_path = algo_client.file(data_uri).getFile().name
    model = joblib.load(model_path)
    return model

# Load model.
model_file_path = "data://"+COLLECTION_OWNER+"/"+COLLECTION_NAME+"/"+MODEL_NAME
clf = load_model(model_file_path)

def apply(input):
    # Read JSON input to pd.DataFrame.
    X_data = pd.read_json(input)
    # Generate new predictions in production.
    y_pred = clf.predict(X_data)

    shap_values = shap.Explainer(clf, X_data).shap_values(X_data)
    shap_values = pd.DataFrame(shap_values, columns=X_data.columns)

    ids = pd.Series([str(uuid.uuid4()) for _ in range(len(X_data))])

    # Log prediction data to Arize, passing prediction IDs to match with actuals.
    log_responses = arize_client.bulk_log(
        model_id="Algorithmia_Tutorial_Model",
        model_version="1.0",
        model_type=ModelTypes.BINARY,
        features=X_data,
        prediction_ids=ids,
        prediction_labels=pd.Series(y_pred),
        shap_values=shap_values
    )

    # Return prediction data.
    res = pd.DataFrame(y_pred)
    res.index = ids
    res.index.rename("pred_id", inplace=True)
    return res.to_json()
The following code is intended to show how you’d call the algorithm for inference from an external application. Here, we’re demonstrating calling the algorithm from the same external environment (in our case a Jupyter notebook) that was used above. This code implies that the algorithm has been built on Algorithmia and that the same objects are available in the global namespace from above.
Calling your model for inference from an external application
Once you’ve built your algorithm, you can call it using its hash version to test it out; this will be a value like f35025657bdc37eb0d6ffeed62b0539ee21c8b4e. If you build your algorithm in the Algorithmia Web IDE, this hash is displayed in the test console output upon successful build completion, but it’s also available in the “Builds” tab on the algorithm’s homepage. You can also publish the algorithm, in which case you’ll be able to call the algorithm using a semantic version such as 1.0.0.
In the code below, substitute the appropriate strings for ALGO_OWNER (the user or org account under which the algorithm was created), ALGO_NAME (the name of the algorithm), and ALGO_VERSION (the hash version or semantic version described above). As in the code above when you originally uploaded your model to Algorithmia, the CLUSTER_DOMAIN variable should be deleted if you aren’t using an Enterprise cluster. The optional timeout parameter can be used to specify the timeout for the call, in seconds.
import Algorithmia

# Define variables to uniquely identify algorithm.
ALGO_OWNER = "ALGO_OWNER"
ALGO_NAME = "ALGO_NAME"
ALGO_VERSION = "ALGO_VERSION"

# Build algorithm identifier and instantiate client.
ALGO_ENDPOINT = ALGO_OWNER+"/"+ALGO_NAME+"/"+ALGO_VERSION
client = Algorithmia.client(ALGORITHMIA_API_KEY, "https://"+CLUSTER_DOMAIN)
algo = client.algo(ALGO_ENDPOINT)

# Optionally set timeout parameters for testing purposes.
algo.set_options(timeout=60)

# Create demo data, serialize to JSON, and pipe into algorithm.
_, X_test_2, _, y_test_2 = train_test_split(X, y, test_size=0.02)
input = X_test.to_json()
result_json = algo.pipe(input).result

# Just like input, output is JSON object, so convert back into pd.DataFrame.
result = pd.read_json(result_json)
Once you’ve incorporated these Arize logging methods and published your algorithm, every execution of your algorithm will send data to Arize.
In addition to this integration with Arize, we integrate with other platforms, including training platforms and other monitoring and observability platforms; see our Integrations page for information.
If you’re using Algorithmia Enterprise, you have access to an admin panel where you can view usage metrics at the cluster, user account, and algorithm level. See the Advanced Governance Reporting docs for more information. You can also opt in to our Insights feature in your algorithms, which enables you to publish your inference data to a Kafka topic which you can then subscribe to from external observability platforms. See Algorithmia Insights for more information.